Page tree

Versions Compared

Key

  • This line was added.
  • This line was removed.
  • Formatting was changed.
Comment: Published by Scroll Versions from space PT and version 2.10
Sv translation
languageen

Use this tool to create trap tickets that automatically use the trapping parameters you set. You can designate trap and keepway settings and set the color pair trap rules. Automatic trap will work on an entire file or on selected parts of the file. You can edit the trap ticket before executing automatic trap.

  1. Launch Adobe Illustrator and open the document requiring trapping.

  2. Before you start to Trap, launch the Ink Manager, press the Update Ink List button identify all colors in the file. 


    Colors will trap differently, depending on Ink Type, and its important to make sure every ink is correctly defined. See Setting Ink Types under Ink Manager Workflow.


  3. After confirming Ink Types, select an Illustrator Selection Tool or Prinergy Tools Selection Tool and select the objects you wish to trap.

  4. In the Adobe Illustrator menu bar, go to the Window menu, and select Prinergy > Trap > Auto Trapping.


    The Trap panel appears.


  5. Click the Trap button.  If no object is selected, a message window will notify you that no objects have been selected, and ask if you want to select all objects. 


  6. The Prinergy Tools trapper then automatically starts trappin, and displays trapping progress.


  7. After Auto Trapping, a new trapping layer is generated containing the traps, and the trap color pairs panel appears.


  8. Auto Traps are created on a unique layer labelled Prinergy Trap-#. (Trap layer numbers increment by one with each new auto trap process, and resulting layers will be labelled Prinergy Trap-1, Prinergy Trap-2, etc.) 
Sv translation
languagede

Verwenden Sie dieses Werkzeug, um Überfüllungs-Voreinstellungen zu erstellen, die automatisch die von Ihnen festgelegten Überfüllungsparameter verwenden. Sie können Überfüllungs- und Keepaway-Einstellungen vornehmen und Regeln für die Farbpaarüberfüllung festlegen. Die automatische Überfüllung wird entweder an einer gesamten Datei oder an ausgewählten Teilen der Datei ausgeführt. Sie können die Überfüllungs-Voreinstellung bearbeiten, bevor Sie die automatische Überfüllung ausführen.

  1. Starten Sie Adobe Illustrator, und öffnen Sie das Dokument, das Überfüllen erfordert.
  2. Wählen Sie in der Symbolleiste von Adobe Illustrator das Direktauswahl-Werkzeug aus, und wählen Sie die Objekte aus, an denen eine Überfüllung ausgeführt werden soll.
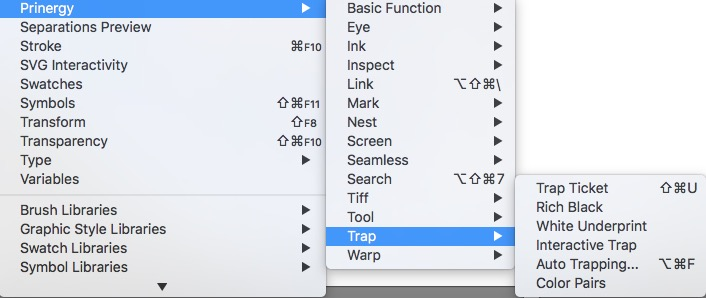
  3. Gehen Sie in der Illustrator-Menüleiste zum Menü „Fenster“, und wählen Sie Prinergy > Überfüllung > Automatische Überfüllung aus. 

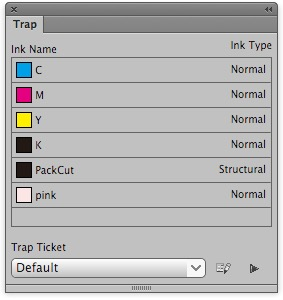
    Die Schnittstelle „Automatische Überfüllung“ wird angezeigt.
     
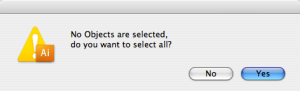
  4. Klicken Sie auf die Schaltfläche „Überfüllung“.  Wenn kein Objekt ausgewählt ist, wird das Meldungsfenster angezeigt, das auf diese Tatsache hinweist und fragt, ob Sie alle Objekte auswählen möchten. 
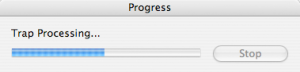
  5. Prinergy Tools Trapper startet die Überfüllung automatisch und zeigt ihren Fortschritt an.
  6. Nach der Überfüllung wird automatisch eine neue Überfüllungsebene erzeugt, und das Dialogfeld für dieÜberfüllungsfarbpaarewird angezeigt.
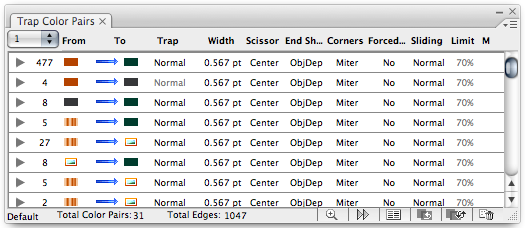
  7. Wenn dieses Dialogfeld angezeigt wird, ist die automatische Überfüllung abgeschlossen.
Sv translation
languagefr

Utilisez cet outil pour créer des billets de recouvrement qui utilisent automatiquement les paramètres de recouvrement que vous avez fixés. Vous pouvez désigner des paramètres de recouvrement et de recouvrement inversé et configurer les règles de recouvrement des paires de couleurs. Le recouvrement automatique travaille sur la totalité d'un fichier ou sur des parties sélectionnées d'un fichier. Vous pouvez modifier le billet de recouvrement avant d'exécuter un recouvrement automatique.

  1. Lancez Adobe Illustrator et ouvrez le document nécessitant le recouvrement.
  2. Dans la barre d'outils Adobe Illustrator, sélectionnez l'outil de sélection directe, puis choisissez les objets sur lesquels vous souhaitez appliquer le recouvrement.
  3. Dans la barre de menus d'Adobe Illustrator, allez dans le menu Fenêtre, puis sélectionnez Prinergy > Déformation > Recouvrement automatique

    L'interface Recouvrement automatique apparaît.
     
  4. Cliquez sur le bouton Recouvrement.  Si aucun objet n'est sélectionné, la fenêtre message apparaîtra pour vous informer que vous n'avez sélectionné aucun objet et vous demander si vous souhaitez sélectionner tous les objets. 
  5. Le logiciel de recouvrement des outils Prinergy démarre automatiquement le recouvrement et affiche la progression de celui-ci.
  6. Après recouvrement, une nouvelle couche de recouvrement sera automatiquement générée et la boîte de dialogue des paires de couleurs de recouvrement apparaîtra.
  7. Lorsque cette boîte de dialogue apparaît, le recouvrement automatique est terminé.
Sv translation
languagees

Utilice esta herramienta para crear notas de solapado que utilicen automáticamente los parámetros de solapamiento que establezca. Puede determinar la configuración de solapamiento y alejamiento, y establecer las reglas de solapamiento de pares de colores. El solapamiento automático funcionará en un archivo completo o en partes seleccionadas del archivo. Puede editar la nota de solapado antes de ejecutar el solapamiento automático.

  1. Inicie Adobe Illustrator y abra el documento que requiere solapamiento.
  2. En la barra de herramientas de Adobe Illustrator, seleccione la herramienta Selección directa y seleccione los objetos en los que desea llevar a cabo el solapamiento.
  3. En la barra de menús de Adobe Illustrator, vaya al menú Ventana y seleccione Prinergy > Solapamiento > Solapamiento automático

    Aparece la interfaz Solapamiento automático.
     
  4. Haga clic en el botón Solapamiento.  Si no se ha seleccionado un objeto, aparecerá una ventana con un mensaje que indica que no se han seleccionado objetos y se le pedirá si desea seleccionar todos los objetos. 
  5. La herramienta de solapamiento de Prinergy Tools inicia el solapamiento automáticamente y muestra el progreso de este.
  6. Después del solapamiento, se generará automáticamente una nueva capa de solapamiento y aparecerá el cuadro de diálogo de Solapar pares de colores.
  7. Cuando aparece este cuadro de diálogo, el solapamiento automático ha finalizado.
Sv translation
languagezh

使用此工具创建的陷印传票会自动使用您设置的陷印参数。您可以指定陷印和强制分离设置,并设置颜色对陷印规则。自动陷印将处理整个文件或文件的选定部分。您可以在执行自动陷印之前编辑陷印传票。

  1. 启动 Adobe Illustrator 并打开需要陷印的文档。
  2. 在 Adobe Illustrator 工具栏中,选择“直接选择”工具,然后选择要对其执行陷印的对象。
  3. 在 Adobe Illustrator 菜单栏中,转至窗口菜单,然后选择印能捷 > 陷印 > 自动陷印。 

    将显示“自动陷印”界面。
     
  4. 单击“陷印”按钮。 如果未选择任何对象,则会出现消息窗口,通知您未选择任何对象,并询问您是否要选择所有对象。 
  5. 印能捷工具陷印引擎自动开始陷印,并显示陷印进度。
  6. 陷印后,将自动生成新的陷印图层,并将出现陷印颜色对的对话框。
  7. 出现此对话框时,自动陷印已完成。