What is trapping?
Trapping is a prepress technique, also known as "color trapping" or "spreading and choking". Its purpose is to compensate for unacceptable gaps between adjacent color elements on the printed artwork caused by out-of-register printing. When checking press sheets, most people tend to focus on the light colors rather than the dark colors. Based on this, when applying trapping to the original image, the goal is to prevent the lighter background colors from showing through while maintaining the darker foreground colors. To prevent a press registration error and a distorted image and achieve the best visual effect, an overlap is enabled.
Why do we need trapping?
In the printing process, multicolor presses are more likely to go out of registration. This is especially true for flexographic printing, where registration errors occur more often. Because overprinting is two colors overlapping, the overprinted inks prevent a visible gap. However, when two objects of different colors overlap, they can knock out—the two colors will not print on top of each other. As a result, two colors will touch without overlapping, increasing the chance that the colors can go out of registration on the press. Knockouts may require trapping to insure that there are no gaps left behind. These images show examples of knockout (left) and overprint (right):
What can cause poor registration?
Case 1: Poor quality print films, offset plates, and press register can create registration problems.
Case 2: Different factors such as press condition, temperature, humidity and ink can affect the paper. As a result, the stretching or shrinkage of paper can cause registration problems and white gaps between adjacent colors. If the two touching colors are both dark, even a slight gap will be very noticeable, as shown in the image on the left. The image on the right shows successful registration.


Trapping methods
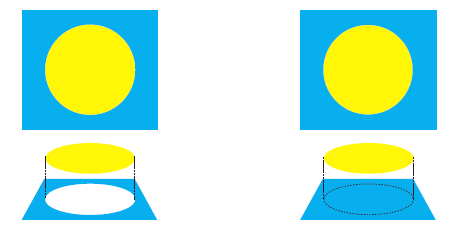
Normal Trap: The lighter color spreads into the darker color. As shown in this image, the circular object overlaps the square object. Because the fill of the circular object is a lighter color, standard trapping procedures dictate that the foreground object should be spread into the dark background object to maintain the visual edge.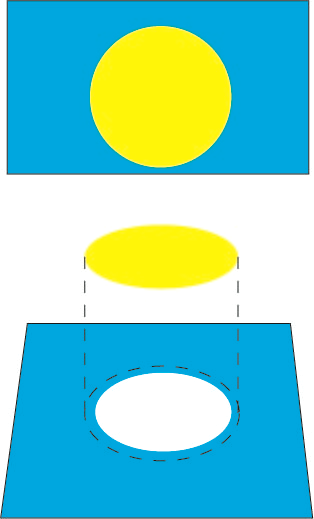
Keepaway Trap
Some colors are composed of light inks and dark inks overprinting on one or more lighter colors, creating an obvious difference in brightness between the light and dark areas. Registration problems cause a very noticeable "color edge" where the lighter inks extend beyond the edge of the darker ink. To avoid this unwanted edge, it is necessary to choke the lighter inks, as in this example of a keepaway trap:
In Prinergy Tools, the Keepaway operation is available only for an object on a white background. If the object is on any other light color background, this operation cannot be implemented.
Types of trapping in Prinergy Tools
There are four major components of Trap: Automatic Trap, Interactive Trap, Rich Black Trap and White Underprint Trap. The Prinergy Trap Tool also automatically creates an extra Trap Gap trap as a precaution to ensure that no gaps can possibly occur.
Automatic Trap: Automatic trap will work on a selected part of a file or on the entire current file. Before executing an automatic trap, you can edit the trap ticket.
- Trap ticket: Use the trap ticket dialog box to set the main trapping parameters for automatic trapping.
- Trap settings: Set the parameters of a normal trap.
- Keepaway settings: Set the parameters of the keepaway trap.
- Color Pair Rules: Set the priority of each color pair.
- Trap Color Pairs: This dialog box lists all generated trap color pairs of the current document, and displays the parameters used by each trap color pair. The trap color pairs can be saved and associated with the Illustrator document for future use.
- Trap Edge Tool: You can use this tool to select one or several trap edges, change trap direction, and connect trap edges. The corresponding trap parameters will be displayed in the trap color pairs catalog, which will allow detailed modification.
Interactive Trap: After applying auto-trapping to an entire page or artwork, use this tool to apply local edits to a specific object. You must use the Interactive Trap selection tool to marquee and isolate an area so that you can selectively change traps within the selection area without risking undesired changes to traps outside the selection area. The parameter set for this tool is the same as for automatic trap. In addition, you can use buttons to apply a spread or choke operation to the entire outside contour of the selected object or to a designated portion of the object's border.
Trap Preview: The trap preview displays the trap effect of the automatic trap or interactive trap more directly by decreasing the opacity of the original objects. The preview layer will not influence the layout export effect.
Rich Black Trap: Use this tool to add another ink to a dark color (usually Black) to create a darker printing effect.
White Underprint Trap: When printing on metal or transparent material, a white ink is necessary to create a white background. This acts as a neutral base that allows the other inks printed on top to have the correct appearance.
Trap Gap trap: When trapping a foreground and background object, the Prinergy Trap Tool will always create an extra "Trap Gap" trap on a unique layer called the Trap Gap Layer. Although not required for horizontal or vertical lines, it is applied universally to all trap objects to compensate for tiny gaps between trap and object with curved trap paths as a precaution to make sure that no gaps can possibly occur.
Limitations
- The Adobe Illustrator color list cannot have more than 18 spot colors. If there are more than 18 colors, it cannot be trapped.
- If the current file is RGB format, it cannot be trapped.
- Before using the Rich Black and White Underprint, it is necessary to execute the Update Ink function for the current file.
If not updated, the inks used in the current file will not display in the corresponding interface. - For all types of gap edges, use the Minimum Gap parameter to deal with problems.
- The varnish inks and structural inks will not be included in the trapping operation.
- After selecting the Allow Sliding option, the gradient object will not be included in the border connection operation.
- It is necessary to update the fonts before trapping. The earlier versions of text refer to all fonts in the document that was originally from a version of Illustrator earlier than version CS3.
- When the line width is smaller than 0.005 pt, the trapping will have an abnormal effect, because this kind of line will be deformed in Illustrator.