Ink Read
Auto Read
When the Ink Manager is opened for the first time, it will automatically read all the inks in the current file.
Manual Read
To read all the inks in the current document, click the Update Ink List button, or, from the side menu, select Update Ink List. You can choose this from the Options menu in the top right-hand corner, or select the Update Ink List icon on the bottom tool bar.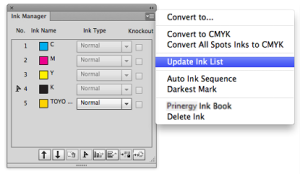
Ink Convert
Note: Mesh, Live Paint groups, and image data are not supported in the ink convert function. When attempting to convert inks used in these objects, a warning message will appear. The same inks of other objects will continue to convert.
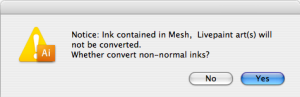
- Image will not support converting spot inks to CMYK.
The conversion of PANTONE or other spot colors is based on the CMYK Working Space ICC Profile loaded in Illustrator Color Settings.
Convert spot inks to CMYK
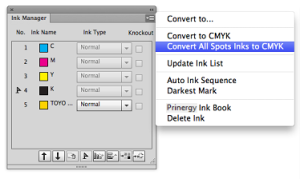
Convert All Spot Inks to CMYK
Click the Convert to CMYK button on the interface, or, from the side menu, select Convert All Spot Inks to CMYK. After conversion, the ink list will automatically update and the the spot inks will disappear.
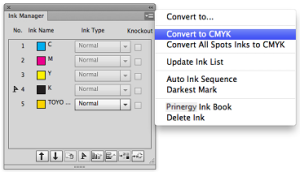
Convert the selected spot inks
- From the Ink Manager ink list, select one or more spot inks.
- Click the Convert to CMYK button on the interface, or, from the side menu, select Convert to CMYK. After conversion, the ink list will automatically update once, and the converted spot inks will disappear from the ink list.
Convert an ink to selected ink
Convert an ink to selected ink or null
- Select one or more inks from the ink list.
- Click the Convert to button or, from the side menu, select Convert to.
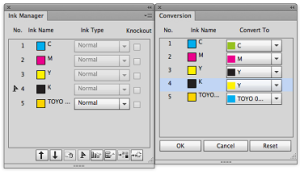
- Select the targeted ink or null, and click OK. Clicking Cancel will cancel the operation and return to the Ink Manager main dialog box. The system will save the ink with the selected state.

After converting, the ink list will automatically update and the converted inks will disappear.
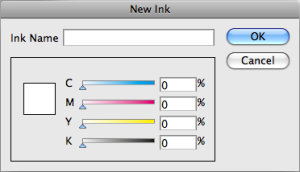
Convert an ink to a Custom Ink
- Select one or more inks from the ink list.
- Click the Convert to button or, from the side menu, select Convert Ink.
- Select Custom Ink. The New Ink panel appears.
- Set the CMYK formula, name the new ink, and click OK. After converting an ink, the ink list will automatically update and any converted inks will disappear.
Setting Ink Types
You can choose from a selection of ink types to apply to the ink (convert style). These ink styles are saved in the document and used by the Trap Tool. Note: The default ink type for CMYK inks is Normal. This ink type cannot be changed. If the ink is originally an opaque, varnish, or structural ink, the ink style cannot be changed.
- From the ink list of the Ink Manager, select the target spot inks.
- Select the pull-down menu beside the spot ink to set a new ink type.
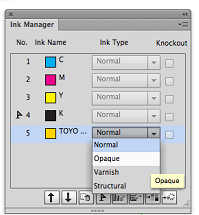
Normal inks trap to each other based on their lightness or darkness (color luminance). A lighter ink will trap into a darker ink.
Opaque inks (such as metallics) trap based on the Ink Sequence. An opaque ink that is lower in the sequence than another opaque ink will get knocked out by an opaque ink that is higher in the sequence. The ink sequence for Opaque inks should be their print order (last ink down knocks out of all previous inks).
Varnishes are treated as transparent inks and will be ignored by the trapper.
Structural inks such as dielines are non-printing inks and generally just used for references on proofs. The Trapper ignores any structural inks when trapping.
Setting the Darkest Ink Mark
One ink is always designated as the Darkest Mark color for use by the Marks Tool. This is to ensure that content that does not contain black will have marks print out with another ink with sufficient contrast to be legible.
To set the Darkest Mark indicator, select one ink and from the side menu, select Darkest Mark. 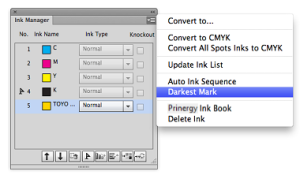
- After editing the inks (adding or deleting) and updating the ink list, the system will automatically save the original ink sequence and put the newly-added inks at the bottom of the list.
- By default, CMYK inks are always placed in the first four positions.
Ink Sequence
As mentioned above, Ink sequence is important for the correct trapping trapping opaque inks, like metallics. Normal inks trap based on color luminance, and the trap of the lighter color will spread into the darker color.
However, Opaque inks, trap based on Ink printing order (Sequence), not color. Opaque inks lower in the sequence will knock out of all inks higher in the sequence. So if you know that an
Auto Ink Sequence
When there are two or more inks in the Ink Manager, you can click the Auto Ink Sequence icon in the tool bar at the bottom, or select Auto Ink Sequence from the Options menu,
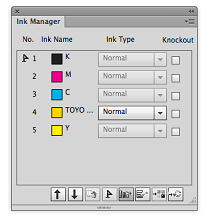
The Ink Manager will automatically sequence the inks with the darkest ink at the top of the list and the lightest ink at the bottom and will automatically position the Darkest Mark ![]() to be the No. 1 ink.
to be the No. 1 ink.
When you click Auto Ink Sequence or select Auto Ink Sequence in the side pull-down menu, inks will be automatically ordered from top to bottom and from light to dark. The Darkest Mark ![]() will be automatically displayed in the end of the sequence.
will be automatically displayed in the end of the sequence. 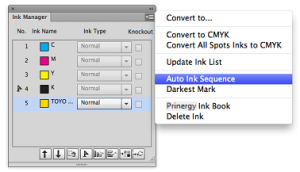
Manual Sequence
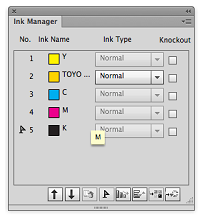
Change the ink order in a sequence by left-clicking anywhere in the Ink Name row with the mouse, then drag and drop the ink into the desired sequence position. Ink sequence numbers will be renumbered to the new sequence order.
Left click on the ink name:
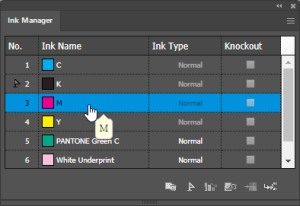
Drag into the desired position, and you will see a green checkmark to indicate that the ink displayed to the right side will get have its position changed:
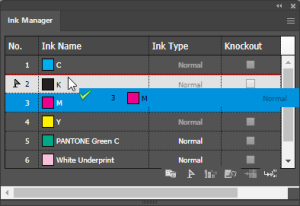
Release the mouse button to drop the ink into the new position. The sequence number will be reordered to reflect the new ink order.
Delete Ink
Select one or more inks by pressing Ctrl or Shift key, and then clicking the Delete Ink icon. The corresponding ink will be removed from both the ink list and the image. Sequence numbers will be renumbered to be continuous.
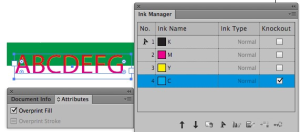
Optional overprint
In order to prevent undesired color changes when overprinting one object over another, you can selectively knockout ink channels in the object below the selected object.
Note: This function can be applied only to flat tints, text, and gradations.
Before Optional Overprint: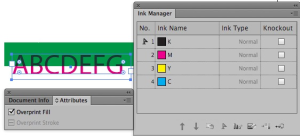
After Optional Overprint:
Prinergy Ink Book
New ink and spot ink can be added to Ink Manager or Ink Mix by using Prinergy Ink Book. You can apply ink mix, rich black or image channel mapping to existing colors, and save these as new Swatches that can be reused..
The Prinergy Ink Book contains the PANTONE Solid Coated, Uncoated and DIC libraries by default, but is most useful as a place to store special mix spot inks.
Update Ink Manager, and the used spot ink will be kept in Ink Manager.