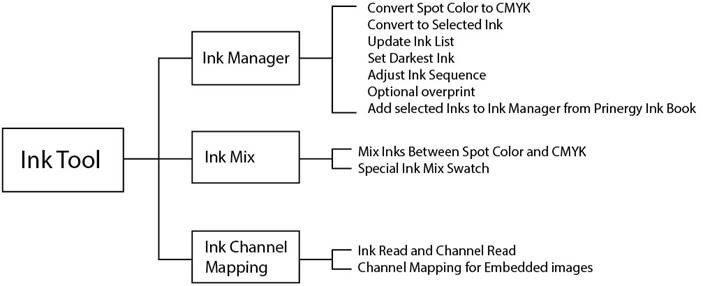
The Ink Tool has three major functions:
- Ink Manager
- Ink Mix
- Image Channel mapping
Ink Manager functions
- Update Ink List
Ink Manager displays the Color Sequence order, the Ink Name, and the Ink Type and Knockout state used for trapping.
Press the Update Ink List icon at the bottom of the Ink Manager dialog box to read and display all inks in the current document, and make them available as a resource for other Prinergy Tools functions, such as Trap Color Sequence, Marks, Ink Mix, and Image Channel Mapping.
- Auto Ink Sequence: Automatically defines the sequence of inks from lightest to darkest or from darkest to lightest, based on the color's neutral density value, and will determine how normal inks trap into each other (lightest into darkest). Operators can also adjust ink sequence by selecting a color and using the Up or Down arrows in the Ink Manager pallet to change ink order.
- Darkest Mark: Defines the darkest ink in the current ink list (new sentence) This is useful for setting the color to be used by specific marks for maximum contrast.
- Convert to CMYK: Press the Convert to CMYK icon at the bottom of the Ink Manager pallet to convert a selected Spot Color to CMYK.
- Convert All Spots Colors to CMYK: Use the Convert all Spot Color Inks to CMYK from the pull-down menu from the upper right corner of the Ink Manager to convert all spot inks in the document.
- Convert to: Map one link to another link.
- Prinergy Ink Book: Provides PANTONE Coated and Uncoated libraries and the DIC color library.
- Knockout: The Knockout checkbox allows you to selectively knock out individual CMYK channels or spot inks from below an overprinting object.
Ink Mix functions
Allows you to adjust the component inks and ink percentages of a selected object. Allows you to create combination colors containing both CMYK and spot inks (N-color). Ink Mix is supported for flat tint and gradient objects but not images.
- Add to Swatch and Ink Mix Swatch: Prinergy Tools allows you to save a mixed ink to the Ink Mix Swatch pallet for future use.
Image Channel Mapping functions
Allows you to map one ink channel to another in an embedded image, without having to open and edit the image in PhotoShop.
When you select an embedded image, its ink channels will be listed in the Image Channel Mapping dialog box after updating the Ink list.
- Remove a specific ink channel in an embedded image.
Ink Manager Limitations
- Ink Manager cannot read RGB inks.
- Ink Manager cannot read the inks of hidden objects / hidden layers or objects on not-printed layers.
- Spot inks in images cannot be converted to process inks.
- Multi-color text, special effects and linked image are not supported ink conversion
- 3D special effect objects can have ink channels mapped to 0%.
- Mesh, Live Paint groups, Image data, 3D special effect objects are not supported for spot ink conversions.
- The function "Keep spot ink in blend" currently supports only simple blend objects, i.e. blend objects formed by two color blocks with only one fill for each or with only one stroke for each. The function cannot be applied to other types of complicated blend objects like blend objects.
- For Ink Mix, if multi-appearance exists at the same ink, the top ink will be read.
Ink Mix only supports objects selected with the Selection or Direct Select tool.
- DCS image can't be embedded in an Illustrator file, so it is not supported in image channel mapping.