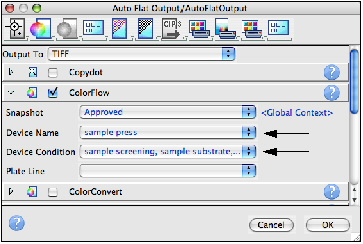
The following describes how to create final output that includes ColorFlow color control elements. In this example, you will edit an existing final output process template to enable ColorFlow.
The recommended practice is to create an established ColorFlow output process template, however, for the purposes of this task, an established process template will be temporarily edited. The edit will be lost after the process is complete.
Note: As this activity can't realistically emulate final output to a plate setter device, the following procedures outline how to generate TIFF files for each color separation, and save them to a storage folder in your Prinergy job folder.
- In Job Manager, select the Separations view.
- Right-click Label_Layout (1 Step and Repeat) and choose: Final Output > Auto Flat Output > AutoFlatOutput
- In the Start Process dialog box, click Edit Process Template.
- In the Output To list, select TIFF.
- Enable the ColorFlow section. View all available options.
- In the Device Name list, select sample press.
Note: If you do not see the sample press and its device condition, activate the Show all print devices option. - In the Device Condition list verify that the sample condition is selected:
Sample screening, sample substrate, Offset Press - Sheetfed, CMYK
This sample condition is shipped with the Prinergy system. - Verify that the ColorConvert section is not selected.
- Open the Device section. In the Output Type section, select Absolute File or Printer.
- Click the Browse button beside the Device Path window. Navigate to your Prinergy job folder that contains the Final Output folder created in Task 2:
Volumes / AraxiVolume_<ServerName>_J / Jobs /XX_Job32 / UserDefinedFolders / Final Output - Click Select "Final Output". Click OK.
- In the Start Process dialog box, click OK.
- At the completion of the final output process, verify that all separations were successfully processed in Job Manager.
- Right-click the XX_Job32 folder icon in the lower left corner of Job Manager. Select Open Job Folder in File Browser.
Open UserDefinedFolders > Final Output to view the TIFF files generated during the final output process.
