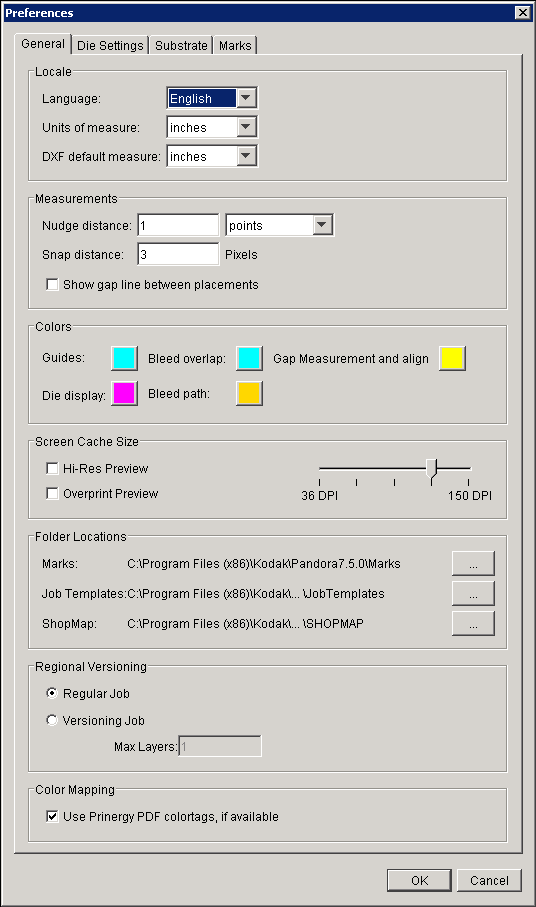
Locale
- In the Language box, select one of these options: English, French, German, Italian, Japanese, Spanish, and Chinese.
- In the Units of measure list, select the units you want Pandora to use as the default throughout the software: points, picas, inches, millimeters, centimeters.
- In the DXF default measure list, select the units of measurement you typically use when creating DXF die files: inches, millimeters.
Measurements
- Enter the Nudge distance to determine the amount that a selected object moves when you press one of the arrow keys.
- Enter the Snap distance to determine how close an object must be to a guide before it automatically snaps to the guide.
To use this feature, you must enable the Snap To option available in some of the View menu sub menus. - Select the Show gap line between placements check box to have pop-up distance indicators appear between various objects on the layout. This allows you to type in the distance required between two artworks.
Colors
You can set display colors for guides, bleed overlaps, gap measurement and align, dies, and the bleed path.
- Swatches enables you to pick from a set of colors.
- HSB enables you to manipulate the hue, saturation, and brightness to create the desired color.
- RGB enables you to set proportions of red, green, and blue to create the desired color.
Screen Cache Size
Manipulating large numbers of artwork files can cause delays while the preview RIP rerenders the artwork to the selected view. To reduce delays, you can apply image caching by setting the desired preview resolution. Artwork is then rendered using the desired resolution, eliminating the time needed to reRIP the image each time the view is changed.
- To allow for precise aligning, you can at any time re-render the current view in high-resolution mode. For maximum resolution, select the Hi-Res Preview check box.
- To display overprints correctly, select Overprint Preview. If selected, this option causes the software to spend extra time rendering the preview to ensure overprints display correctly. To save time, you may want to leave this option cleared.
Folder Locations
Folder Locations enable you to designate the default location of Marks, Job Templates, and ShopMap folders.
You can keep the folders in their default locations, move them elsewhere on your computer, or move them to a network server to allow sharing among different installations of the Pandora software. You can also rename the folders.
If you move or rename the Marks, Job Templates, or ShopMap folders, you must identify the new location and/or new name for the folder in the Preferences dialog box.
- Pandora comes with a wide selection of marks, and you can also add your own custom marks.
The default location for your custom marks is the User folder, located atC:\Program Files (x86)\Kodak\Pandora7.5.0\Marks\User. - You can save jobs as templates, and then use one of those templates when you start a new job.
The default location for your job templates is the JobTemplates folder, located atC:\Program Files (x86)\Kodak\Pandora7.5.0\JobTemplates. - The default location for your ShopMap is
C:\Program Files (x86)\Kodak\Pandora7.5.0\SHOPMAP.
Regional Versioning
The Regional Versioning preferences allow you to toggle between regular jobs and versioning jobs. When you create a versioning job, you can layer the base and version 1-up artworks, as long as the base and the version information are separate files. If you select Versioning Job, type the number of Max Layers that you require to create the versioning job.
Color Mapping
The Use Prinergy PDF colortags, if available preference should be selected as the default because it is a best practice to refine files with the Prinergy Workflow software or the Prinergy Evo Workflow software with Color Match enabled.
If files have been refined without Color Match enabled so that all spot colors are displayed, the Use Prinergy PDF colortags, if available check box should be cleared.