Use these best practices when creating a file that will be used as a page mark or sheet mark with Prinergy .
To create page mark or sheet mark files, use software such as Adobe InDesign, Adobe Illustrator, or QuarkXPress that allows registration color.
Complete these steps, in this order | More information |
|---|---|
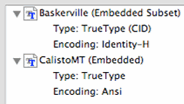
For variable marks (such as | Note: OpenType fonts are always subset, so they cannot be used for variable marks. Unfortunately, Illustrator software does not indicate which fonts are OpenType and which are TrueType or PostScript Type 1, making it more difficult than InDesign to avoid the OpenType fonts. Three fonts that will fully embed with InDesign CS4 are BeaufortPro, ChaparralPro and MyriadPro. Although these fonts display an OpenType icon they are in reality Type 1 fonts. InDesign CS5 is much better than CS4 at allowing the full embedding of fonts, with many of the standard fonts now working. |
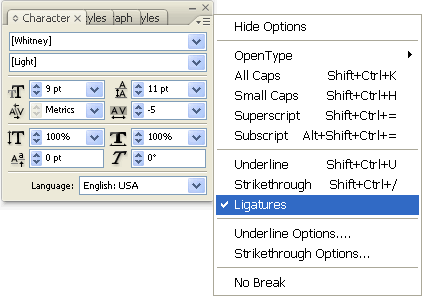
Check for any auto-substitution of ligatures (letter pairs like ff, fi, tt) in your variable marks and change them back to an actual two-letter pair. This may occur in the QuarkXPress or InDesign software. | If the auto-substitution of ligatures is not changed back to an actual two-letter pair, the name of the mark will not be correctly interpreted, and the correct variable data will not appear in the output. |
Select the color of the text of your mark, based on the separation on which you want the information to appear. | Issues to consider:
|
From InDesign, select File > Export to export to a PDF file. From Illustrator, select File > Save As to send to a PDF file. To fully embed fonts (if full embedding is permitted), in the Export Adobe PDF dialog box, select Advanced, and type | Printing to PostScript is not recommended because it is less reliable for fully embedding fonts. You must also distill it before it can be checked for a completely embedded font. |
Check the PDF file to ensure that the fonts are fully embedded. |
Actions that may trigger subsetting include:
There should be no need to refine your PDF file again in Prinergy. After you confirm that all fonts are fully embedded, your PDF file is ready to use as a page mark or sheet mark. |