Page tree

Versions Compared

Key

  • This line was added.
  • This line was removed.
  • Formatting was changed.
Comment: Published by Scroll Versions from space PT and version 2.10
Sv translation
languageen

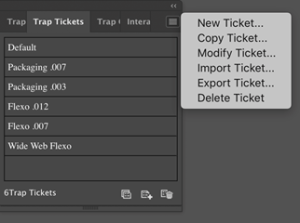
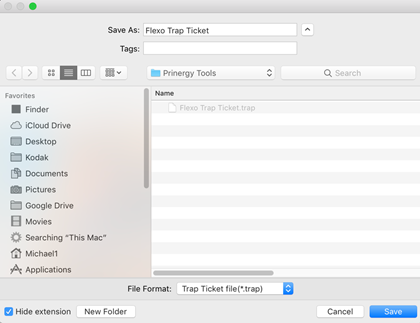
Before the implementation of trapping, save commonly-used parameters as a trap ticket that can be used to directly set parameters on subsequent projects.

In the Adobe Illustrator menu bar, go to the Window menu, and select Prinergy > Trap > Trap Ticket. The Trap list appears, displaying all completed trap tickets, one of which will have the system-assigned name Default. You will be presented with a number of options.

  • New Ticket: Prinergy Tools creates a new trap ticket based on the default template. Edit as needed to create a new ticket.


  • Copy Ticket: When you select an existing ticket and then select this option, a dialog box appears. When you enter a trap ticket name and click OK, the system creates a copy of the ticket with the new name.


  • Modify Ticket: When you select an existing ticket and then select this option, you are able to edit the selected ticket. 


  • Import Ticket: When you select this option, the Import Trap Ticket dialog box appears. Select the trap ticket file you want to import, and then click Open. (Or, double-click the file you want to import.)

      
  • Export Ticket: When you select an existing ticket and then select this option, the Export Trap Ticket dialog box appears. In the Save As box, type the file name. (The default name is untitled.)

Sv translation
languagede

Speichern Sie vor Implementierung der Überfüllung häufig verwendete Parameter als eine Überfüllungs-Voreinstellung, die bei nachfolgenden Projekten zur direkten Festlegung von Parametern verwendet werden kann.

Gehen Sie in der Illustrator-Menüleiste zum Menü „Fenster“, und wählen Sie Prinergy > Überfüllung > Überfüllungs-Voreinstellung aus. Die Überfüllungsliste wird eingeblendet, in der alle abgeschlossenen Überfüllungs-Voreinstellungen angezeigt werden, von denen eine den vom System zugewiesenen NamenStandard besitzt. Eine Reihe von Optionen wird angezeigt.

  • Neue Voreinstellung: Prinergy Tools erstellt eine neue Überfüllungs-Voreinstellung auf Grundlage der Standardvorlage. Bearbeiten Sie diese nach Bedarf, um eine neue Voreinstellung zu erstellen.
  • Voreinstellung kopieren: Wenn Sie eine vorhandene Voreinstellung und dann diese Option auswählen, wird ein Dialogfeld angezeigt. Wenn Sie einen Überfüllungs-Voreinstellungsnamen eingeben und aufOK klicken, erstellt das System eine Kopie der Voreinstellung mit dem neuen Namen.  
  • Voreinstellung ändern: Wenn Sie eine vorhandene Voreinstellung und dann diese Option auswählen, können Sie die ausgewählte Voreinstellung bearbeiten.
     
  • Voreinstellung importieren: Wenn Sie diese Option auswählen, wird das Dialogfeld „Überfüllungs-Voreinstellung importieren“ angezeigt. Wählen Sie die zu importierende Überfüllungs-Voreinstellung aus, und klicken Sie dann auf Öffnen. (Oder doppelklicken Sie auf die Datei, die Sie importieren möchten.)   
  • Voreinstellung exportieren: Wenn Sie eine vorhandene Voreinstellung und dann diese Option auswählen, wird das Dialogfeld „Überfüllungs-Voreinstellung exportieren“ angezeigt. Geben Sie im Feld Speichern unter den Dateinamen ein. (Der Standardname lautet untitled.)
Sv translation
languagefr

Avant la mise en place du recouvrement, enregistrez les paramètres que vous utilisez couramment en tant que billet de recouvrement que vous pourrez utiliser pour configurer directement des paramètres sur les projets ultérieurs.

Dans la barre de menus d'Adobe Illustrator, allez dans le menu Fenêtre, puis sélectionnez Prinergy > Déformation > Billet de recouvrement. La liste de recouvrement apparaît et affiche tous les billets de recouvrement terminés, dont un aura le nom attribué par le système Défaut. Un certain nombre d'options vous seront proposées.

  • Nouveau billet : Les outils Prinergy créent un nouveau billet de recouvrement en fonction du modèle par défaut. Modifiez-le si nécessaire pour créer un nouveau billet.
  • Copier le billet : Lorsque vous sélectionnez un billet existant et que vous sélectionnez cette option, une boîte de dialogue apparaît. Lorsque vous saisissez un nom de billet de recouvrement et cliquez sur OK, le système crée une copie du ticket avec le nouveau nom.  
  • Modifier le billet : Lorsque vous sélectionnez un billet existant, puis cette option, vous pouvez modifier le billet sélectionné.
     
  • Importer le billet : Lorsque vous sélectionnez cette option, la boîte de dialogue Importer un billet de recouvrement apparaît. Sélectionnez le fichier du billet de recouvrement que vous souhaitez importer, puis cliquez sur Ouvrir. (Ou double-cliquez sur le fichier que vous souhaitez importer.)   
  • Exporter le billet : Lorsque vous sélectionnez un billet existant et que vous sélectionnez cette option, la boîte de dialogue Exporter le billet de recouvrement apparaît. Dans le champ Enregistrer sous, saisissez le nom du fichier. (Le nom par défaut est untitled.)
Sv translation
languagees

Antes de implementar el solapamiento, guarde los parámetros utilizados habitualmente como una nota de solapado que pueda utilizar para establecer directamente los parámetros en proyectos posteriores.

En la barra de menús de Adobe Illustrator, vaya al menú Ventana y seleccione Prinergy > Solapamiento > Nota de solapado. Aparece la lista Solapamiento, en la que se muestran todas las notas de solapado completadas y una tendrá el nombre  Predeterminada asignado por el sistema. Se le presentarán varias opciones.

  • Nueva nota: Prinergy Tools crea una nueva nota de solapado basada en la plantilla predeterminada. Edítela como sea necesario para crear una nueva nota.
  • Copiar nota: Cuando selecciona una nota existente y, a continuación, selecciona esta opción, aparece un cuadro de diálogo. Al introducir una nota de solapado y hacer clic en Aceptar, el sistema crea una copia de la nota con el nuevo nombre.  
  • Modificar nota: Cuando selecciona una nota existente y, a continuación, selecciona esta opción, puede editar la nota seleccionada.
     
  • Importar nota: Cuando selecciona esta opción, aparece el cuadro de diálogo Nota de solapado. Seleccione el archivo de nota de solapado que desea importar y, a continuación, haga clic en Abrir. (O bien, haga doble clic en el archivo que desea importar).   
  • Exportar nota: Cuando selecciona una nota existente y, a continuación, selecciona esta opción, aparece el cuadro de diálogo Exportar nota de solapado. En el cuadro Guardar como, escriba el nombre de archivo. (El nombre predeterminado es untitled).
Sv translation
languagezh

在实施陷印之前,将常用参数另存为陷印传票,以便直接在后续项目上设置参数。

在 Adobe Illustrator 菜单栏中,转至窗口菜单,然后选择印能捷 > 陷印 > 陷印传票 此时将出现“陷印”列表,其中显示所有已完成的陷印传票,其中一个具有系统分配的名称 Default。您将看到多个选项。

  • 新建传票:印能捷工具根据默认模板创建新的陷印传票。根据需要进行编辑以创建新传票。
  • 复制传票:选择现有传票并选择此选项时,将出现一个对话框。当您输入传票名称并单击确定时,系统将使用新名称创建一个传票单的副本。  
  • 修改传票:选择现有传票并选择此选项时,您可以编辑选定的传票。 
     
  • 导入传票:选择此选项时,将出现“导入陷印传票”对话框。选择要导入的陷印传票文件,然后单击打开。(或者双击要导入的文件。)   
  • 导出传票:选择现有传票并选择此选项时,将出现“导出陷印传票”对话框。在另存为框中,键入文件名。(默认名称为无标题。)