Page tree

Versions Compared

Key

  • This line was added.
  • This line was removed.
  • Formatting was changed.
Comment: Published by Scroll Versions from space PLA and version 9.0
Sv translation
languageen

By modifying the files that Prepress Portal provides, you can create a customized job info sheet that meets your unique requirements. You can then make it available for use in any Prepress Portal job.

  1. Plan how you want the customized job info sheet to be used. You must make the following decisions:
    1. Whether the customized job info sheet will be the default, or whether you will design it for a specific customer or specific job.
    2. Which sample job info sheet best fits your needs.
  2. In Prepress Portal, create a test job that you can use to test your customizations.
  3. On the Prepress Portal server, copy the folder of sample job info sheet files from the PrinergyWebRoot\RUser\custom\JobInfoSheet\Examples folder to the \\<JobServer>\Jobs\<TestJob>\Control\UserConfig\JobInfoSheet folder for your test job.
    If necessary, create the ControlUserConfig, and JobInfoSheet folders.
    Note: The images and include folders are necessary only if the XSLT files reference the folder contents.
  4. Modify the XML, XSD, and XSLT files, or create new files to replace the existing ones.
    The XML file should list all the fields in the info sheet, the XSD file should define the attributes of each field, and the XSLT file should show how to display the info sheet in HTML. Edit the customer versions of the XSLT files unless you have specific information that you want only staff users to modify. Work on the edit versions of the files to create fields into which you can enter new values. Work on the read versions to display the fields to users.
    Note: You can edit all of the files in a simple text editor. Although XMLauthoring tools may make constructing XML, XSD, and XSLT files seem easy, customization of job info sheets requires a working knowledge of the XML, XSD, and XSLT technologies.
  5. Save each file with the same file name and file extension as the original file.
    Important: Do not save the files with a TXT file extension. If you are using Notepad, use the Save As menu option.
  6. Test your changes in Prepress Portal by viewing the job info sheet:
    • In InSite Prepress Portal 8.0, click the Summary tab of your test job.
    • In Insite Prepress Portal 9.0, select the job and in the Details panel, click Show Job Info Sheet.
  7. When you are satisfied with your changes, make the customized job info sheet available to users by copying it from the JobInfoSheet folder to one of the following locations:
    Note: Customized job info sheets appear only in new jobs; they do not appear in jobs that already exist on the system.

    To achieve this resultDo this

    All jobs to use the same job info sheet

    a. Create a Default folder at PrinergyWebRoot\RUser\custom\JobInfoSheet\.
    b. Place your customized files in the new Default folder.

    When a new job is created, Prepress Portal copies the job info sheet from the Default folder to the job folder and displays the job info sheet on the job's Summary tab.

    Different jobs to use different job info sheets

    Copy your customized files to the job template folder \\<JobServer>\Jobs\<JobTemplateName>\Control\UserConfig\JobInfoSheet.
    Note: If necessary, create the Control, UserConfig, and JobInfoSheet folders.
    When a new job is created using the job template, the new job inherits the job info sheet and other template settings. Prepress
    Portal copies the job info sheet from the job template folder to the new job folder, and displays the job info sheet on the Summary tab for the job.

    If you place your customized files in a different folder than those listed in the table, Prepress Portal displays the default job info sheet that was supplied when your system was installed.

Sv translation
languagede

Durch Bearbeiten der von Prepress Portal zur Verfügung gestellten Dateien können Sie einen benutzerdefinierten Job-Informationsbogen erstellen, der genau Ihren Anforderungen entspricht. Anschließend können Sie diesen Bogen für die Verwendung in allen Prepress Portal-Jobs freigeben.

  1. Entscheiden Sie, wie der der benutzerdefinierte Job-Informationsbogen eingesetzt werden soll. Hierfür müssen folgende Entscheidungen getroffen werden:
    1. Soll der benutzerdefinierte Job-Informationsbogen standardmäßig verwendet werden, oder ist er nur für einen bestimmten Kunden bzw. einen bestimmten Job gedacht?
    2. Welcher Beispiel-Job-Informationsbogen entspricht am ehesten Ihren Anforderungen?
  2. Erstellen Sie in Prepress Portal einen Test-Job, damit Sie die benutzerdefinierten Änderungen testen können.
  3. Kopieren Sie auf dem Prepress Portal-Server den Ordner mit den Beispiel-Job-Informationsbogendateien aus dem 
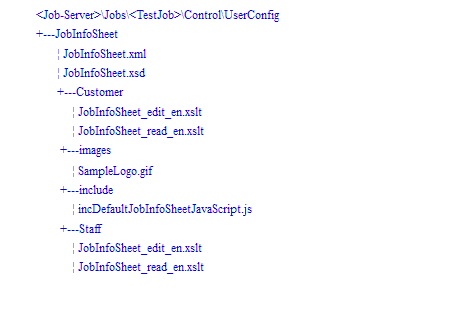
PrinergyWebRoot\RUser\custom\JobInfoSheet\Examples-Ordner in den \\<JobServer>\Jobs\<TestJob>\Control\UserConfig\JobInfoSheet-Ordner für Ihren Testjob.
    Erstellen Sie bei Bedarf die Ordner Control, UserConfig und JobInfoSheet .
    Hinweis: Die Ordner „images“ und „include“ sind nur dann erforderlich, wenn die XSLT-Dateien auf die Ordnerinhalte verweisen.
  4. Ändern Sie die XML-, XSD- und XSLT-Dateien, oder erstellen Sie neue Dateien zum Ersetzen der vorhandenen Dateien.
    Die XML-Datei sollte alle Felder in dem Informationsbogen auflisten, die XSD-Datei die Attribute für die jeweiligen Felder definieren, und die XSLT-Datei sollte angeben, wie der Informationsbogen in HTML angezeigt wird. Bearbeiten Sie die Kundenversionen der XSLT-Dateien, sofern keine besonderen Informationen vorhanden sind, die Sie nur von Mitarbeiterbenutzern bearbeiten lassen möchten. Bearbeiten Sie beim Erstellen von Feldern, in die Sie neue Werte eingeben können, die edit-Dateiversionen. Zum Anzeigen der Felder für Benutzer verwenden Sie die read-Versionen.
    Hinweis: Alle Dateien können in einem einfachen Texteditor bearbeitet werden. Auch wenn XML-Autorenwerkzeuge das Entwerfen von XML-, XSD- und XSLT-Dateien einfach erscheinen lassen, sind für das Anpassen von Job-Informationsbögen praktische Erfahrungen mit den XML-, XSD- und XSLT-Technologien erforderlich.
  5. Speichern Sie jede Datei unter demselben Dateinamen und mit derselben Erweiterung wie die ursprüngliche Datei.
    Wichtig: Speichern Sie die Dateien nicht mit einer TXT-Dateierweiterung ab. Nutzen Sie bei Verwendung des Windows-Editors die Menüoption Speichern unter.
  6. Testen Sie Ihre Änderungen in Prepress Portal, indem Sie den Job-Informationsbogen anzeigen:
    • Klicken Sie in InSite Prepress Portal 8.0 auf die Registerkarte Zusammenfassung Ihres Testjobs.
    • Wählen Sie in InSite Prepress Portal 9.0 den Job aus, und klicken Sie im Feld Details auf Job-Informationsbogen anzeigen.
  7. Wenn Sie alle gewünschten Änderungen vorgenommen haben, geben Sie den benutzerdefinierten Job-Informationsbogen für alle Benutzer frei, indem Sie ihn aus dem Ordner JobInfoSheet an einen der folgenden Orte kopieren:
    Hinweis: Benutzerdefinierte Job-Informationsbögen werden nur in neuen Jobs angezeigt, nicht in Jobs, die bereits im System vorhanden sind.

    Gewünschtes ErgebnisVorgehensweise

    Alle Jobs nutzen den gleichen Job-Informationsbogen

    a. Erstellen Sie einen Default-Ordner unter PrinergyWebRoot\RUser\custom\JobInfoSheet\.
    b. Legen Sie die benutzerdefinierten Dateien im neuen Default-Ordner ab.

    Wird ein neuer Job erstellt, kopiert Prepress Portal den Job-Informationsbogen aus dem Ordner Default in den Job-Ordner und zeigt diesen Job-Informationsbogen auf der Registerkarte Zusammenfassung des Jobs an.

    Verschiedene Jobs nutzen unterschiedliche Job-Informationsbögen

    Kopieren Sie Ihre benutzerdefinierten Dateien in den Ordner \\<JobServer>\Jobs\<JobTemplateName>\Control\UserConfig\JobInfoSheet der Jobvorlage.
    Hinweis: Erstellen Sie bei Bedarf die Ordner Control, UserConfig und JobInfoSheet.
    Wird mit der Job-Vorlage ein neuer Job erstellt, werden der Job-Informationsbogen und andere Vorlageneinstellungen für diesen neuen Job übernommen. Prepress
    Portal kopiert den Job-Informationsbogen aus dem Ordner der Jobvorlage in den Ordner des neuen Jobs und zeigt den Job-Informationsbogen auf der Registerkarte Zusammenfassung des entsprechenden Jobs an.

    Wenn Sie die benutzerdefinierten Dateien in einem Ordner ablegen, der nicht in der Tabelle aufgeführt ist, zeigt Prepress Portal den standardmäßigen Job-Informationsbogen an, der bei der Installation Ihres Systems verfügbar gemacht wurde.

Sv translation
languagefr

En modifiant les fichiers fournis par Prepress Portal, vous pouvez créer une fiche d'informations personnalisée sur le travail qui répond à vos propres besoins. Vous pouvez alors l'utiliser dans tout travail Prepress Portal.

  1. Planifiez comment vous souhaitez utiliser la fiche d'informations personnalisée sur le travail. Vous devez prendre les décisions suivantes :
    1. La fiche d'informations personnalisée sur le travail sera-t-elle la fiche par défaut ou allez-vous la concevoir pour un client ou un travail spécifique ?
    2. Quel exemple de fiche d'informations sur le travail répond le mieux à vos besoins ?
  2. Dans Prepress Portal, créez un travail de test que vous pouvez utiliser pour tester vos personnalisations.
  3. Sur le serveur Prepress Portal, copiez le dossier des exemples de fichiers de fiches d'informations sur les travaux du dossier PrinergyWebRoot\RUser\custom\JobInfoSheet\Examples vers le dossier \\<JobServer>\Jobs\<TestJob>\Control\UserConfig\JobInfoSheet correspondant à votre travail de test.
    Si nécessaire, créez les dossiers ControlUserConfig et JobInfoSheet .
    Remarque : Les dossiers images et include ne sont nécessaires que si les fichiers XSLT référencent leur contenu.
  4. Modifiez les fichiers XML, XSD et XSLT ou créez-en de nouveaux pour remplacer les fichiers existants.
    Le fichier XML doit répertorier tous les champs de la fiche d'informations, le fichier XSD doit définir les attributs de chaque champ et le fichier XSLT doit montrer comment afficher la fiche d'informations au format HTML. Modifiez les versions client des fichiers XSLT, à moins que vous ne souhaitiez que seuls les utilisateurs membres du personnel modifient des informations spécifiques. Utilisez les versions edit des fichiers afin de créer des champs dans lesquels vous pouvez saisir de nouvelles valeurs. Utilisez les versions read pour afficher les champs aux utilisateurs.
    Remarque : Vous pouvez modifier l'ensemble des fichiers dans un simple éditeur de texte. Même si les outils de création XML peuvent laisser penser que la construction de fichiers XML, XSD et XSLT est simple, la personnalisation des fiches d'informations sur les travaux nécessite une connaissance pratique des technologies XML, XSD et XSLT.
  5. Enregistrez chaque fichier sous le même nom et avec la même extension de fichier que celui d'origine.
    Remarque : N'enregistrez pas les fichiers avec l'extension de fichier TXT. Si vous utilisez le Bloc-notes, utilisez l'option Enregistrer sous.
  6. Testez vos modifications dans Prepress Portal en affichant la fiche d'informations sur le travail :
    • Dans InSite Prepress Portal 8.0, cliquez sur l'onglet Résumé de votre travail de test.
    • Dans Insite Prepress Portal 9.0, sélectionnez le travail et cliquez sur Afficher la fiche d'informations sur le travail dans le volet Détails.
  7. Lorsque vous êtes satisfait de vos modifications, mettez la fiche d'informations personnalisée sur le travail à la disposition des utilisateurs ; copiez-la pour cela depuis le dossier JobInfoSheet vers l'un des emplacements suivants :
    Remarque : Les fiches d'informations personnalisées sur les travaux apparaissent uniquement dans les nouveaux travaux ; elles ne s'affichent pas dans les travaux qui existent déjà sur le système.

    Pour parvenir à ce résultatProcédez ainsi

    Que tous les travaux utilisent la même fiche d'informations sur le travail

    a. Créez un dossier Default dans PrinergyWebRoot\RUser\custom\JobInfoSheet\.
    b. Placez vos fichiers personnalisés dans le nouveau dossier Default.

    Lorsqu'un travail est créé, Prepress Portal copie la fiche d'informations sur le travail du dossier Default dans le dossier du travail et affiche la fiche d'informations sur le travail dans l'onglet Résumé du travail.

    Que différents travaux utilisent différentes fiches d'informations sur les travaux

    Copiez vos fichiers personnalisés dans le dossier du modèle de travail \\<JobServer>\Jobs\<JobTemplateName>\Control\UserConfig\JobInfoSheet.
    Remarque : Si nécessaire, créez les dossiers Control, UserConfig et JobInfoSheet.
    Lorsqu'un travail est créé à l'aide du modèle de travail, le nouveau travail hérite de la fiche d'informations sur le travail et des autres paramètres du modèle. Prepress
    Portal copie la fiche d'informations sur le travail du dossier des modèles de travail dans le dossier du nouveau travail et affiche la fiche d'informations sur le travail dans l'onglet Résumé du travail.

    Si vous placez vos fichiers personnalisés dans un autre dossier que celui qui est répertorié dans le tableau, Prepress Portal affiche la fiche d'informations sur le travail par défaut fournie lors de l'installation du système.

Sv translation
languageit

Modificando i file forniti da Prepress Portal, è possibile creare un foglio di informazioni sui processi personalizzato che soddisfi i propri requisiti. È possibile poi metterli a disposizione per l'utilizzo in qualsiasi processo in Prepress Portal.

  1. Programmare il modo in cui si desidera usare il foglio di informazioni sui processi personalizzato. È necessario prendere le seguenti decisioni:
    1. Se il foglio di informazioni sui processi personalizzato sia predefinito oppure progettato per un cliente o processo specifico.
    2. Quale foglio di informazioni sui processi campione si adatta di più alle proprie esigenze.
  2. In Prepress Portal, creare un processo di prova utilizzabile per testare le personalizzazioni.
  3. Sul server di Prepress Portal, copiare la cartella dei file di fogli di informazioni sui processi campione dalla cartella PrinergyWebRoot\RUser\custom\JobInfoSheet\Examples alla cartella \\<JobServer>\Jobs\<TestJob>\Control\UserConfig\JobInfoSheet del proprio processo di prova.
    Se necessario, creare la ControlUserConfig e le cartelle JobInfoSheet .
    Nota: le immagini e le cartelle incluse sono necessarie solo se i file XSLT fanno riferimento ai contenuti della cartella.
  4. Modificare i file XML, XSD e XSLT oppure creare nuovi file per sostituire quelli esistenti.
    Il file XML deve elencare tutti i campi nel foglio di informazioni, il file XSD deve definire gli attributi di ogni campo e quello XSLT deve mostrare come visualizzare il foglio di informazioni in HTML. Modificare le versioni cliente dei file XSLT, a meno che non si abbiano informazioni specifiche che si desidera far modificare agli utenti dello staff. Lavorare sulle versioni edit dei file per creare campi nei quali immettere nuovi valori. Lavorare sulle versioni read per mostrare i campi agli utenti.
    Nota: È possibile modificare tutti i file in un semplice editor di testo. Anche se gli strumenti XMLauthoring potrebbero far sembrare semplice costruire file XML, XSD e XSLT, la personalizzazione dei fogli di informazioni sui processi richiede una conoscenza approfondita delle tecnologie XML, XSD e XSLT.
  5. Salvare ogni file con lo stesso nome ed estensione del file originale.
    Importante: Non salvare i file con un'estensione di file TXT. Se si utilizza il Blocco note, utilizzare l'opzione Salva con nome del menu.
  6. Testare le modifiche in Prepress Portal visualizzando il foglio di informazioni sui processi:
    • In InSite Prepress Portal 8.0, fare clic sulla scheda Riepilogo del processo di prova.
    • In Insite Prepress Portal 9.0, selezionare il processo e, nel riquadro Dettagli fare clic su Mostra foglio informativo processo.
  7. Quando si è soddisfatti delle modifiche apportate, rendere disponibile il foglio di informazioni sui processi personalizzato anche agli utenti, affinché lo copino dalla cartella JobInfoSheet in una delle seguenti posizioni:
    Nota: i fogli di informazioni sui processi personalizzati vengono visualizzati solo nei nuovi processi; non compaiono nei processi già esistenti sul sistema.

    Per ottenere questo risultatoEffettuare questa operazione

    Tutti i processi usano lo stesso foglio di informazioni sui processi

    a. Creare una cartella Default in PrinergyWebRoot\RUser\custom\JobInfoSheet\.
    b. Mettere i file personalizzati nella nuova cartella Default.

    Dopo aver creato un processo, Prepress Portal copia il foglio di informazioni sui processi dalla cartella Default alla cartella del processo e mostra il foglio di informazioni sui processi nella scheda Riepilogo.

    Processi diversi usano diversi fogli di informazioni sui processi

    Copiare i file personalizzati nella cartella del modello di processo \\<JobServer>\Jobs\<JobTemplateName>\Control\UserConfig\JobInfoSheet.
    Nota: se necessario, creare le cartelle Control, UserConfig e JobInfoSheet.
    Quando viene creato un nuovo processo tramite un modello di processo, questo nuovo processo eredita il foglio di informazioni sui processi e le altre impostazioni del modello. Prepress
    Portal copia il foglio di informazioni sui processi dalla cartella del modello di processo alla nuova cartella del processo e mostra il foglio di informazioni sui processi nella scheda Riepilogo del processo.

    Se si mettono i file personalizzati in una cartella diversa rispetto a quelle elencate nella tabella, Prepress Portal mostra il foglio di informazioni sui processi predefinito, fornito al momento dell'installazione del sistema.

Sv translation
languagezh

通过修改 Prepress Portal 提供的文件,您可以创建满足您独特需求的自定义作业信息页。接着您可以让其在任何 Prepress Portal 作业中可用。

  1. 计划您要如何使用自定义的作业信息页。您必须做出以下决定:
    1. 是否将自定义的作业信息页设置为默认作业信息页,或者您是否会针对特定客户或特定作业对其进行设计。
    2. 哪一种示例作业信息页最能满足您的需求。
  2. 在 Prepress Portal 中,创建您可以用于测试您的自定义的测试作业。
  3. 在 Prepress Portal 服务器上,将示例作业信息页文件的文件夹从 PrinergyWebRoot\RUser\custom\JobInfoSheet\Examples 文件夹复制到测试作业的 \\<JobServer>\Jobs\<TestJob>\Control\UserConfig\JobInfoSheet 文件夹。
    如有必要,创建 ControlUserConfigJobInfoSheet  文件夹。
    注:仅当 XSLT 文件引用文件夹内容时,才需要图像和包含文件夹。
  4. 修改 XML、XSD 和 XSLT 文件,或创建新文件以替换现有文件。
    XML 文件应列出信息页中的所有字段,XSD 文件应定义每个字段的属性,XSLT 文件应说明如何将信息页显示为 HTML 格式。编辑 XSLT 文件的客户版本,除非您有仅希望员工用户修改的特定信息。处理文件的 edit 版本,创建您可以输入新值的字段。处理 read 版本,以便向用户显示字段。
    注:您可以在简单的文本编辑器中编辑所有文件。虽然 XMLauthoring 工具似乎可以非常轻松地构建 XML、XSD 和 XSLT 文件,但作业信息页的自定义需要 XML、XSD 和 XSLT 技术知识。
  5. 使用与原始文件相同的文件名和文件扩展名来保存每个文件。
    重要提示:请勿使用 TXT 文件扩展名保存文件。如果您正在使用记事本,请使用“另存为”菜单选项。
  6. 通过查看作业信息页在 Prepress Portal 中测试您的更改:
    • 在 InSite Prepress Portal 8.0 中,单击测试作业的“摘要”选项卡。
    • 在 Insite Prepress Portal 9.0 中选择作业,然后在“详细信息”面板中单击“显示作业信息页”。
  7. 如果您对更改感到满意,您可将自定义作业信息页从 JobInfoSheet 文件夹复制到以下位置之一以供用户使用:
    注:自定义作业信息页仅显示在新作业中;它们不会显示在系统中已存在的作业中。

    要实现此结果执行此操作

    所有作业使用相同的作业信息页

    a. 在 PrinergyWebRoot\RUser\custom\JobInfoSheet\ 中创建一个 Default 文件夹。
    b.将您的自定义文件放置在新的 Default 文件夹中。

    创建新作业后,Prepress Portal 会将作业信息页从 Default 文件夹复制到作业文件夹,并在作业“摘要”选项卡显示作业信息页。'

    不同的作业使用不同的作业信息页

    将自定义文件复制到作业模板文件夹 \\<JobServer>\Jobs\<JobTemplateName>\Control\UserConfig\JobInfoSheet
    注:如果需要,创建 ControlUserConfigJobInfoSheet 文件夹。
    当使用作业模板创建新作业时,新作业沿用作业信息页和其他模板设置。Prepress
    Portal 会将作业信息页从作业模板文件夹复制到新的作业文件夹,并在作业的“摘要”选项卡显示作业信息页。

    如果您将自定义文件放置在与表中所列的文件夹不同的文件夹中,Prepress Portal 会显示系统安装时提供的默认作业信息页。

Sv translation
languagees

Es posible modificar los archivos proporcionados por Prepress Portal para crear una hoja de información de trabajo personalizada que cumpla sus requisitos concretos. Después puede ponerla a disposición de cualquier trabajo de Prepress Portal.

  1. Planifique cómo desea usar la hoja de información de trabajo personalizada. Debe tomar las siguientes decisiones:
    1. Si la hoja de información de trabajo personalizada será la hoja predeterminada o si la va a diseñar para un cliente o un trabajo específicos.
    2. Qué hoja de muestra se adapta mejor a sus necesidades.
  2. En Prepress Portal, cree un trabajo de prueba para usarlo para probar las personalizaciones.
  3. En el servidor de Prepress Portal, copie la carpeta de los archivos de la hoja de información de trabajo de prueba desde la carpeta PrinergyWebRoot\RUser\custom\JobInfoSheet\Examples a la carpeta \\<JobServer>\Jobs\<TestJob>\Control\UserConfig\JobInfoSheet para el trabajo de prueba.
    Si es necesario, cree las carpetas Control, UserConfig y JobInfoSheet .
    Nota: Las carpetas images e include solo son necesarias si los archivos XSLT hacen referencia al contenido de las carpetas.
  4. Modifique los archivos XML, XSD y XSLT o cree archivos nuevos para sustituir los existentes.
    El archivo XML debe mostrar todos los campos de la hoja de información, el archivo XSD debe definir los atributos de cada campo y el archivo XSLT debe mostrar cómo se verá la hoja de información en HTML. Edite las versiones del cliente de los archivos XSLT, a no ser que tenga información específica que desee que solo puedan modificar los miembros de su plantilla. Trabaje en las versiones edit de los archivos para crear campos en los que se puedan introducir valores nuevos. Trabaje en las versiones read para mostrar los campos a los usuarios.
    Nota: Todos los archivos se pueden editar en un editor de textos sencillo. Aunque las herramientas de creación de XML pueden hacer parecer que crear archivos XML, XSD y XSLT es fácil, la personalización de las hojas de información de trabajo requiere un conocimiento práctico de las tecnologías XML, XSD y XSLT.
  5. Guarde cada archivo con el mismo nombre y la misma extensión que el archivo original.
    Importante: No guarde los archivos con la extensión .txt. Si utiliza el Bloc de notas, utilice la opción de menú Guardar como.
  6. Pruebe los cambios en Prepress Portal visualizando la hoja de información de trabajo:
    • En InSite Prepress Portal 8.0, haga clic en la ficha Resumen del trabajo de prueba.
    • En Insite Prepress Portal 9.0, seleccione el trabajo y, en el panel Detalles, haga clic en Mostrar hoja de información de trabajo.
  7. Cuando quede satisfecho con los cambios, ponga la hoja de información de trabajo personalizada a disposición de los usuarios copiándola desde la carpeta JobInfoSheet a una de estas ubicaciones:
    Nota: Las hojas de información de trabajos personalizadas sólo aparecen en los trabajos nuevos, no en los que ya existen en el sistema.

    Para lograr este resultadoHaga lo siguiente

    Que todos los trabajos usen la misma hoja de información de trabajo

    a. Cree una carpeta Default en PrinergyWebRoot\RUser\custom\JobInfoSheet\.
    b. Coloque los archivos personalizados en la nueva carpeta Default.

    Cuando se crea un trabajo nuevo, Prepress Portal copia la hoja de información de trabajo desde la carpeta Default a la carpeta del trabajo y muestra la hoja de información de trabajo en la ficha Resumen del trabajo.

    Que trabajos distintos usen hojas de información de trabajo distintas

    Copie los archivos personalizados a la carpeta de la plantilla del trabajo \\<JobServer>\Jobs\<JobTemplateName>\Control\UserConfig\JobInfoSheet.
    Nota: Si es necesario, cree las carpetas Control, UserConfig y JobInfoSheet.
    Cuando se crea un trabajo nuevo mediante la plantilla de trabajo, hereda la hoja de información de trabajo y otros valores de configuración de la plantilla. Prepress
    Portal copia la hoja de información de trabajo de la carpeta de la plantilla de trabajo en la carpeta del trabajo nuevo y muestra la hoja de información en la ficha Resumen del trabajo.

    Si coloca los archivos personalizados en una carpeta distinta a la mostrada en la tabla, Prepress Portal muestra la hoja de información de trabajo predeterminada que se indicó al instalar el sistema.

Sv translation
languageja

Prepress Portal で用意されているファイルを変更して、独自の要件を満たすカスタム ジョブ インフォメーション シートを作成し、任意の Prepress Portal ジョブで使用することができます。

  1. カスタム ジョブ インフォメーション シートの使用方法について計画します。次の判断を行う必要があります。
    1. カスタム ジョブ インフォメーション シートをデフォルトに設定するかどうか、または特定の顧客または特定のジョブ用に設計するかどうかの判断。
    2. 最もニーズに適したサンプル ジョブ インフォメーション シートの判別。
  2. Prepress Portal で、カスタマイズのテストに使用できるテスト ジョブを作成します。
  3. Prepress Portal サーバーで、テスト ジョブのために、サンプルのジョブ インフォメーション シート ファイルのフォルダを PrinergyWebRoot\RUser\custom\JobInfoSheet\Examples フォルダから \\<JobServer>\Jobs\<TestJob>\Control\UserConfig\JobInfoSheet フォルダにコピーします。
    必要に応じて ControlUserConfig、および JobInfoSheet  フォルダを作成します。
    注意:images フォルダおよび include フォルダは、XSLT ファイルがフォルダの内容を参照している場合にのみ必要です。
  4. XML、XSD、および XSLT ファイルを変更するか、新しいファイルを作成して既存のファイルを置き換えます。
    XML ファイルにはインフォメーション シートのフィールドがすべて含まれるリスト、XSD ファイルには各フィールドの属性の定義、XSLT ファイルにはインフォメーション シートを HTML 形式で表示する方法が含まれています。スタッフ ユーザーのみに変更を許可する情報がある場合以外は、顧客用バージョンの XSLT ファイルを編集してください。新しい値を入力できるフィールドを作成するには、edit バージョンのファイルを使用します。フィールドをユーザーに表示するには、read バージョンのファイルを使用します。
    注意:すべてのファイルは、通常のテキスト エディタで編集できます。XML 作成ツールを使用すると、XML ファイル、XSD ファイル、および XSLT ファイルを簡単に作成できますが、ジョブ インフォメーション シートのカスタマイズには、XML、XSD、および XSLT 技術に関する実務的な知識が必要になります。
  5. 各ファイルに、元のファイルと同じファイル名と拡張子を付けて保存します。
    重要:ファイルの拡張子を TXT にしてファイルを保存しないでください。メモ帳を使用する場合は、[名前を付けて保存]メニュー オプションを使用します。
  6. ジョブ インフォメーション シートを表示して、Prepress Portal で変更をテストします。
    • InSite Prepress Portal 8.0 で、テストジョブの[概要]タブをクリックします。
    • InSite Prepress Portal 9.0 でジョブを選択して、[詳細]パネルで[ジョブ インフォメーション シートの表示]をクリックします。
  7. 変更に問題がなければ、カスタム ジョブ インフォメーション シートを、JobInfoSheet フォルダから以下のいずれかの場所にコピーして、ユーザーが使用できるようにします。
    注意:カスタム ジョブ インフォメーション シートは新しいジョブでのみ表示され、システム上に既に存在するジョブには表示されません。

    目的手順

    同じジョブ インフォメーション シートを使用するすべてのジョブ

    a. PrinergyWebRoot\RUser\custom\JobInfoSheet\Default フォルダを作成します。
    b.カスタマイズされたファイルを、新しい Default フォルダに配置します。

    新しいジョブが作成されると、Prepress Portal で、ジョブ インフォメーション シートが Default フォルダからジョブ フォルダにコピーされ、ジョブの[概要]タブでジョブ インフォメーション シートが表示されます。'

    異なるジョブ インフォメーション シートを使用する各種ジョブ

    カスタマイズされたファイルをジョブ テンプレート フォルダ \\<JobServer>\Jobs\<JobTemplateName>\Control\UserConfig\JobInfoSheet にコピーします。
    注意:必要に応じて、ControlUserConfig、および JobInfoSheet フォルダを作成します。
    ジョブ テンプレートを使用して新しいジョブが作成されると、新しいジョブではジョブ インフォメーション シートとテンプレートの他の設定が継承されます。Prepress
    Portal で、ジョブ インフォメーション シートがジョブ テンプレート フォルダから新しいジョブ フォルダにコピーされ、ジョブの[概要]タブでジョブ インフォメーション シートが表示されます。

    カスタマイズしたファイルを、この表にあるフォルダと異なるフォルダに配置した場合は、Prepress Portal のインストール時に提供されたデフォルトのジョブ インフォメーション シートが表示されます。