Page tree

Versions Compared

Key

  • This line was added.
  • This line was removed.
  • Formatting was changed.
Comment: Published by Scroll Versions from space PANTWK and version Pandora_Training_Working_8.4
Sv translation
languageen
  1. From the Window menu, select Show ShopMap Palette.
  2. On the ShopMap palette, if they don't already exist, create these materials and add them to the layout view.
    Note: If you have Auto Sized Substrates enabled for Plate and Die, you will see messages when adding these job elements to the layout. To use the job elements that you are adding to the layout, click No.
    • Substrate: 38 x 58 in. (965.2 x 14 mm)
    • Plate: 40 x 60 in. (1016 x 1524 mm)
    • Press: 2
  3. From the File menu, select Import > Die.
  4. In the CAD Correct Activity folder, select the Brighton.cf2 die file and click Open.
    Note: There will be several error warnings. When asked if you want to cancel, click No and continue to import the die.
  5. Perform one of the following actions:
    • From the File menu, select Import > Artwork.
    • In the Pandora toolbar, click the Import Artwork icon.
  6. In the Import Artwork dialog box, locate where you are storing the sample activity files.
  7. In the CAD Correct Activity folder, select the Brighton.pdf file and click Open.
     
  8. Select the die.
  9. Drag the artwork to the die and make note of the results. 
    Note: The die that was added to the layout does not contain any die stations. As a result, Pandora will not be able to snap artwork to this die. 
  10. On the layout view, delete the artwork from the layout.
  11. Delete the die from Pandora.
  12. Minimize the Pandora window. 


Sv translation
languagefr
  1. Dans le menu Fenêtre, sélectionnez Afficher la palette ShopMap.
  2. Dans la palette ShopMap, s'ils n'existent pas déjà, créez ces matériaux et ajoutez-les à la vue Mise en page.
    Remarque : si vous avez activé Substrats dimensionnés automatiquement pour Plaque et Découpe, des messages s'affichent lorsque vous ajoutez ces éléments de travail à la mise en page. Pour utiliser les éléments de travail ajoutés à la mise en page, cliquez sur Non.
    • Substrate (Support) : 38 x 58 po. (965,2 x 14 mm)
    • Plaque : 40 x 60 po. (1 016 x 1 524 mm)
    • Presse : 2
  3. Dans le menu Fichier, sélectionnez Importer > Découpe.
  4. Dans le dossier 
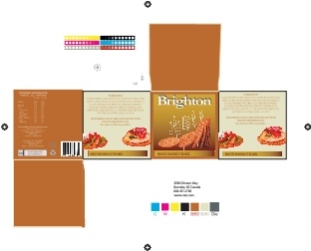
CAD correct Activity, sélectionnez le fichier de découpe Brighton.cf2 et cliquez sur Ouvrir.
    Remarque : plusieurs avertissements d'erreur apparaissent. Lorsqu'il vous sera demandé si vous voulez annuler, cliquez sur Non et continuez à importer la découpe.
  5. Effectuez l'une des opérations suivantes :
    • Dans le menu Fichier, sélectionnez Importer > Maquette.
    • Dans la barre d'outils de Pandora, cliquez sur l'icône Importer la maquette.
  6. Dans la boîte de dialogue Importer l'illustration, localisez l'emplacement où vous stockez les exemples de fichiers d'activité.
  7. Dans le dossier CAD correct Activity, sélectionnez le fichier Brighton.pdf et cliquez sur Ouvrir.
     
  8. Sélectionnez la découpe.
  9. Faites glisser la maquette sur la découpe et notez les résultats. 
    Remarque : la découpe qui a été ajoutée à la mise en page ne contient aucun poste de découpe. Par conséquent, Pandora ne sera pas en mesure d'aligner la maquette sur cette découpe. 
  10. Dans la vue Mise en page, supprimez la maquette de la mise en page.
  11. Supprimez la découpe de Pandora.
  12. Réduisez la fenêtre Pandora.