Page tree

Versions Compared

Key

  • This line was added.
  • This line was removed.
  • Formatting was changed.
Comment: Published by Scroll Versions from space PRINERGY and version 9.0

...

Sv translation
languagees

Puesto que algunas interfaces de prensa requieren detalles adicionales en el archivo PPF de PrintLink que no se incluyen en la especificación CIP3, es posible personalizar las etiquetas CIP3 con variables y cambiar los valores predeterminados de la interfaz de prensa en el archivo de configuración de PrintLink.

Etiquetas que se pueden personalizar

En el archivo de configuración de PrintLink puede personalizar las siguientes etiquetas con el archivo personalizado de Prinergy nombrando variables:

/CIP3AdmJobName
/CIP3AdmJobCode
/CIP3AdmSheetName (se explica a continuación)
/PageSection (se explica a continuación)

Por ejemplo, si el nombre de trabajo de Prinergy es Docket12345 y el archivo de configuración de PrintLink es AdmJobName=%job%, la etiqueta CIP3 del arhivo PDF imprimirá /CIP3AdmJobname (Docket12345).


Variables específicas para PrintLink

Puede personalizar las etiquetas CIP con cualquier variable de denominación en archivos personalizados válidos, pero las que aparecen a continuación son específicas para PrintLink.

Variable

Descripción

%jobcode%

Esta variable toma el valor del código de trabajo tal y como se define en los atributos del trabajo de Prinergy. Puede utilizar esta variable en las etiquetas /CIP3AdmJobName y /CIP3AdmJobCode.

%Side%

La variable puede ser F para el anverso (front) o B para el reverso (back). Utilice esta variable con la etiqueta /CIP3AdmSheetName.

%SideJapanese%

Esta variable imprime O para Omote (delantero) y U para Ura (trasero). Utilice esta variable con la etiqueta /CIP3AdmSheetName para salidas en japonés.

%Lowpagenumber%

Esta variable imprime el folio inferior de la página en cualquier superficie. Es la variable predeterminada para la etiqueta /PageNumber, sin embargo, algunas consolas de prensa de periódicos requieren el folio inferior de la página en la etiqueta /CIP3AdmJobName.

%SignatureLetter%

Esta variable sustituye el número de pliegos de Prinergy con una letra. Por ejemplo, el pliego 1 es sustituido por A, el pliego 2 es sustituido por B, y así sucesivamente.
Utilice esta variable con la etiqueta /PageSection.


Cambio de los valores predeterminados de interfaz de prensa

Puede editar el archivo de configuración de PrintLink para que anule los valores predeterminados de interfaz de prensa que aparecen a continuación. Si desea activar la etiqueta, elimine la almohadilla (#) y cambie el valor predeterminado (por ejemplo, de =false para =true).

#AdmInkColors=true (para agregar colores planos en L*a*b*. Resulta útil para los clientes de Brisque que estén migrando a Prinergy y utilicen estaciones lectoras Heidelberg.)

#AlwaysFront=true (para generar salida de los reversos como anversos)

#SwapFrontswithBacks=true (Para generar salidas de forma que los datos del reverso aparezcan antes que los datos del anverso)

#ReplaceUnderscoresFromJobName=false

#RotateWithPreviewMatrix=false

#OutputJDF=false

#OutputLowPageNumber=false

#UseImpoNameForAdmJobName=true

#UseSigNumInSheetNum=false

#UseImpoNameInFilename=true

#MirrorWithPreviewMatrix=false

#AdmJobName=%job%

#AdmSheetName=%signature%/%sheet%%side%

#PageSection=%signatureletter%

#OutputLowPageNumber=false (para generar la salida de etiquetas de periódico especiales en el archivo PPF)

#AdmInkColors=false (para generar la salida de la etiqueta AdmInkColors en el archivo PPF)

#OutputKBATags=false (para generar la salida de etiquetas KBA especiales en el archivo PPF)

#KBAPlateType=Hoja de periódico de gran formato

#KBAPageType=Hoja de periódico de gran formato


Etiqueta /CIP3AdmSheetName

Algunas estaciones lectoras de valores de tinta exigen la etiqueta /CIP3AdmSheetName para definir la bobina y los números de hoja en un formato bobina.hoja. Para que las imposiciones de varias bobinas funcionen con PrintLink y Prinergy, debe crear en Preps cada bobina como su propio pliego.

A continuación, edite el archivo de configuración de PrintLink para que se lea lo siguiente:

/CIP3AdmSheetName=%signature%.%sheet%

El archivo PPF imprime los siguientes valores.

Para bobina/pliego 1:
/CIP3AdmSheetName (1.1)
donde:
1.1 = Web 1, hoja 1

Para bobina/pliego 2:
/CIP3AdmSheetName (2,1)
donde:
2,1 = Web 2, hoja 1

Para obtener más información acerca de la configuración de las imposiciones de varias bobinas, consulte el boletín técnico sobre PrintLink configurable.


Etiqueta /PageSection

La etiqueta /PageSection se rellena cuando la activa en el archivo de configuración de PrintLink y selecciona Interfaz genérica de prensa de periódicos en la lista Interfaz de prensa dentro de la sección PrintLink de la plantilla de proceso.
Puesto que Prinergy no utiliza secciones, sustitúyalas por pliegos. Cree cada sección como un pliego en Preps. A continuación, utilice la variable %SignatureLetter% para cambiar el número de pliegos por una letra; por ejemplo, pliego 1 por pagesection A, pliego 2 por pagesection B, etc.

Por ejemplo,

Edite el archivo de configuración de PrintLink para que se lea lo siguiente:

/PageSection=%SignatureLetter%

El archivo PPF imprime:

/PageSection (A)
donde:
A = pliego 1

Como alternativa, puede configurar hojas o superficies como secciones y utilizar las variables %sheet% o %surface%.

Sv translation
languageit

Since some press interfaces require additional details in the PrintLink PPF file that are not included in the CIP3 specification, you can customize the CIP3 tags with variables and change the default press interface settings in the PrintLink configuration file.


Customizable tags

In the PrintLink configuration file, you can customize the following tags with Prinergy custom file naming variables:

/CIP3AdmJobName

/CIP3AdmJobCode

/CIP3AdmSheetName (explained below)

/PageSection (explained below)

For example, if your Prinergy job name is Docket12345, and the PrintLink configuration file says AdmJobName=%job%, the CIP3 tag in the PPF file prints /CIP3AdmJobname (Docket12345).


Variables specific to PrintLink

You can customize the CIP tags with any valid custom file naming variables, but the following are specific to PrintLink.

Variable

Description

%jobcode%

This variable takes the job code value as defined in the Prinergy job attributes. You can use this variable in the /CIP3AdmJobName and /CIP3AdmJobCode tags.

%Side%

This variable prints F for front or B for back. Use this variable with the /CIP3AdmSheetName tag.

%SideJapanese%

This variable prints O for Omote (front) and U for Ura (back). Use this variable with the /CIP3AdmSheetName tag for Japanese output.

%Lowpagenumber%

This variable prints the low page folio on any given surface. It is the default variable for the /PageNumber tag, however, some newspaper press consoles require the low page folio in the /CIP3AdmJobName tag.

%SignatureLetter%

This variable replaces the Prinergy signature number with a letter. For example, signature 1 is replaced with an A, signature 2 is replaced with a B, and so on.
Use this variable with the /PageSection tag.


Changing default press interface settings

You can edit the PrintLink configuration file to override the following press interface defaults. You activate the tag by removing the crosshatch (#) and then changing the default value (for example, from =false to =true).

#AdmInkColors=true (to add spot colors in L*a*b*. This is useful for Brisque customers who are migrating to Prinergy and use Heidelberg Reader Stations.)

#AlwaysFront=true (to output backs to fronts.)

#SwapFrontswithBacks=true (to output so that back data appears before front data)

#ReplaceUnderscoresFromJobName=false

#RotateWithPreviewMatrix=false

#OutputJDF=false

#OutputLowPageNumber=false

#UseImpoNameForAdmJobName=true

#UseSigNumInSheetNum=false

#UseImpoNameInFilename=true

#MirrorWithPreviewMatrix=false

#AdmJobName=%job%

#AdmSheetName=%signature%/%sheet%%side%

#PageSection=%signatureletter%

#OutputLowPageNumber=false (to output special newspaper tags in the PPF file)

#AdmInkColors=false (to output the AdmInkColors tag in the PPF file)

#OutputKBATags=false (to output special KBA tags in the PPF file)

#KBAPlateType=Broadsheet

#KBAPageType=Broadsheet


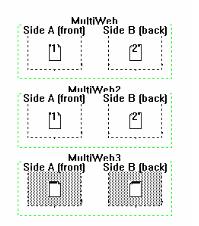
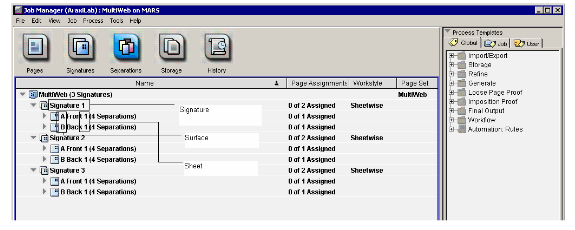
Multi-Web impositions and Printlink

Some ink key reader stations need the /CIP3AdmSheetName tag to define the web and sheet numbers in a web.sheet format. This usually takes the form of 1.1 and 2.1 (1.1 = web 1 sheet 1 and 2.1 = Web 2 sheet 2). For multiweb impositions to work with PrintLink and Prinergy you must first create each web as its own signature in Preps.


Note: The screen shots below are the only multi-web impositions that will work to achieve the tag values mentioned above.

Each web will need to be defined as its own signature in Preps (see screen shots below). Some customers create an imposition for each web or create multiple webs in 1 signature (we cannot populate the sheetname tag when the imposition is created in this way).

Image Added

Figure 1: Multi Web Template in Preps

Image Added

Figure 2: Preps template imported into Prinergy (Prinergy Separation View)

For the above template, the ink reader station requires the /Cip3admsheetname value of “1.1”. Where the number before the “dot” represents the Web, and the number after the “dot” represents the Sheet. To achieve this enter the following line in your Printlink configuration file: AdmSheetName=%signature%.%sheet%.

This results in the following values in PPF files. The examples below are for Side A. Side B would be the same values, since it is considered part of the same sheet.

Then edit the PrintLink configuration file to read:

/CIP3AdmSheetName=%signature%.%sheet%

The PPF File prints the following values.

For web/signature 1:
/CIP3AdmSheetName (1.1)
where
1.1 = web 1, sheet 1

For web/signature 2:
/CIP3AdmSheetName (2.1)
where
2.1 = web 2, sheet 1

For web/signature 3:
/CIP3AdmSheetName (3.1)
where
3.1 = web 3, sheet 1


/PageSection tag

The /PageSection tag is populated when you activate it in the PrintLink configuration file and select Generic Newspaper Press Interface in the Press Interface list in the PrintLink section of the process template.
Because Prinergy does not use sections, substitute signatures instead. Create each section as a signature in Preps. Then use the variable %SignatureLetter% to change the signature number to a letter—for example, signature 1 to pagesection A, signature 2 to pagesection B, and so on.

For example, when you edit the PrintLink configuration file to read:

/PageSection=%SignatureLetter%

The PPF file prints:

/PageSection (A)
where
A = signature 1
Alternatively, you can set up sheets or surfaces as sections, and use the %sheet% or %surface% variables.

Less common settings (these override the settings in the press interface)

#ReplaceUnderscoresFromJobName=false

#RotateWithPreviewMatrix=false

#OutputJDF=false

#UseImpoNameForAdmJobName=true

#UseSigNumInSheetNum=false

#UseImpoNameInFilename=true

#OutputLowPageNumber=false

Note: You can change the value of the above settings to override the press interface defaults.