Since some press interfaces require additional details in the PrintLink PPF file that are not included in the CIP3 specification, you can customize the CIP3 tags with variables and change the default press interface settings in the PrintLink configuration file.
Customizable tags
In the PrintLink configuration file, you can customize the following tags with Prinergy custom file naming variables:
/CIP3AdmJobName
/CIP3AdmJobCode
/CIP3AdmSheetName (explained below)
/PageSection (explained below)
For example, if your Prinergy job name is Docket12345, and the PrintLink configuration file says AdmJobName=%job%, the CIP3 tag in the PPF file prints /CIP3AdmJobname (Docket12345).
Variables specific to PrintLink
You can customize the CIP tags with any valid custom file naming variables, but the following are specific to PrintLink.
Variable | Description |
|---|---|
| This variable takes the job code value as defined in the Prinergy job attributes. You can use this variable in the |
| This variable prints F for front or B for back. Use this variable with the |
| This variable prints O for Omote (front) and U for Ura (back). Use this variable with the |
| This variable prints the low page folio on any given surface. It is the default variable for the /PageNumber tag, however, some newspaper press consoles require the low page folio in the |
| This variable replaces the Prinergy signature number with a letter. For example, signature 1 is replaced with an A, signature 2 is replaced with a B, and so on. |
Changing default press interface settings
You can edit the PrintLink configuration file to override the following press interface defaults. You activate the tag by removing the crosshatch (#) and then changing the default value (for example, from =false to =true).
#AdmInkColors=true (to add spot colors in L*a*b*. This is useful for Brisque customers who are migrating to Prinergy and use Heidelberg Reader Stations.)
#AlwaysFront=true (to output backs to fronts.)
#SwapFrontswithBacks=true (to output so that back data appears before front data)
#ReplaceUnderscoresFromJobName=false
#RotateWithPreviewMatrix=false
#OutputJDF=false
#OutputLowPageNumber=false
#UseImpoNameForAdmJobName=true
#UseSigNumInSheetNum=false
#UseImpoNameInFilename=true
#MirrorWithPreviewMatrix=false
#AdmJobName=%job%
#AdmSheetName=%signature%/%sheet%%side%
#PageSection=%signatureletter%
#OutputLowPageNumber=false (to output special newspaper tags in the PPF file)
#AdmInkColors=false (to output the AdmInkColors tag in the PPF file)
#OutputKBATags=false (to output special KBA tags in the PPF file)
#KBAPlateType=Broadsheet
#KBAPageType=Broadsheet
Multi-Web impositions and Printlink
Some ink key reader stations need the /CIP3AdmSheetName tag to define the web and sheet numbers in a web.sheet format. This usually takes the form of 1.1 and 2.1 (1.1 = web 1 sheet 1 and 2.1 = Web 2 sheet 2). For multiweb impositions to work with PrintLink and Prinergy you must first create each web as its own signature in Preps.
Note: The screen shots below are the only multi-web impositions that will work to achieve the tag values mentioned above.
Each web will need to be defined as its own signature in Preps (see screen shots below). Some customers create an imposition for each web or create multiple webs in 1 signature (we cannot populate the sheetname tag when the imposition is created in this way).
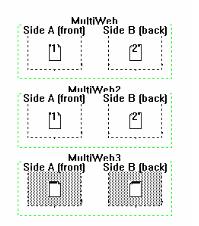
Figure 1: Multi Web Template in Preps
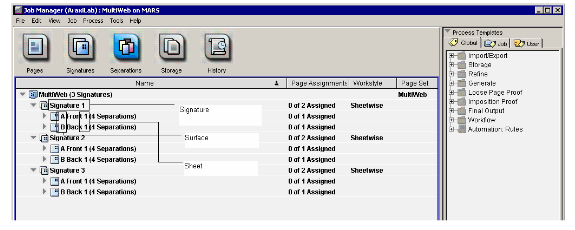
Figure 2: Preps template imported into Prinergy (Prinergy Separation View)
For the above template, the ink reader station requires the /Cip3admsheetname value of “1.1”. Where the number before the “dot” represents the Web, and the number after the “dot” represents the Sheet. To achieve this enter the following line in your Printlink configuration file: AdmSheetName=%signature%.%sheet%.
This results in the following values in PPF files. The examples below are for Side A. Side B would be the same values, since it is considered part of the same sheet.
Then edit the PrintLink configuration file to read:
/CIP3AdmSheetName=%signature%.%sheet%
The PPF File prints the following values.
For web/signature 1:
/CIP3AdmSheetName (1.1)
where
1.1 = web 1, sheet 1
For web/signature 2:
/CIP3AdmSheetName (2.1)
where
2.1 = web 2, sheet 1
For web/signature 3:
/CIP3AdmSheetName (3.1)
where
3.1 = web 3, sheet 1
/PageSection tag
The /PageSection tag is populated when you activate it in the PrintLink configuration file and select Generic Newspaper Press Interface in the Press Interface list in the PrintLink section of the process template.
Because Prinergy does not use sections, substitute signatures instead. Create each section as a signature in Preps. Then use the variable %SignatureLetter% to change the signature number to a letter—for example, signature 1 to pagesection A, signature 2 to pagesection B, and so on.
For example, when you edit the PrintLink configuration file to read:
/PageSection=%SignatureLetter%
The PPF file prints:
/PageSection (A)
where
A = signature 1
Alternatively, you can set up sheets or surfaces as sections, and use the %sheet% or %surface% variables.
Less common settings (these override the settings in the press interface)
• #ReplaceUnderscoresFromJobName=false
• #RotateWithPreviewMatrix=false
• #OutputJDF=false
• #UseImpoNameForAdmJobName=true
• #UseSigNumInSheetNum=false
• #UseImpoNameInFilename=true
• #OutputLowPageNumber=false
Note: You can change the value of the above settings to override the press interface defaults.