Page tree

Versions Compared

Key

  • This line was added.
  • This line was removed.
  • Formatting was changed.
Comment: Published by Scroll Versions from space PANDORA and version 9.0
Sv translation
languageen

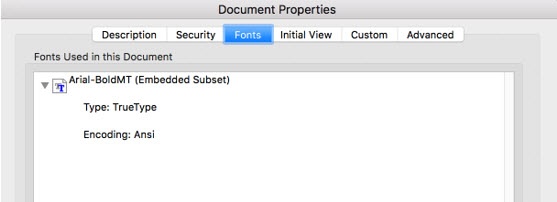
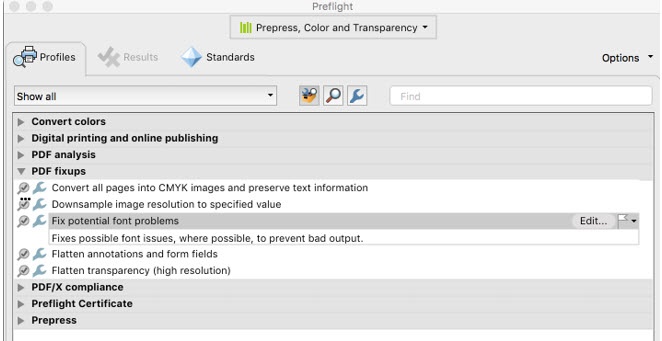
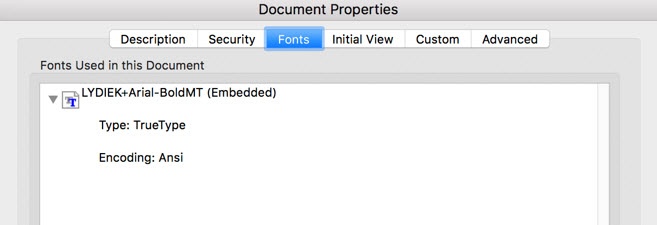
Before you can use the label mark that you created in Adobe Illustrator in Pandora, you must ensure that the fonts are embedded and not subset. If they are subset, you muse use preflight in Adobe Acrobat to embed them.

To change the font in Adobe Acrobat:

  1. In Acrobat DC, open the PDF that you just saved.
  2. On the Mac, go to Acrobat Menu File > Properties.
  3. Select Fonts and check whether they are Embedded or Embedded Subset.
    Image Modified

    • If they are Embedded, you are done.
    • If they are Embedded Subset, continue to the next step.
  4. Close the Properties window and launch Acrobat Preflight.
  5. In Acrobat Preflight, select the Prepress, Color, and Transparency group.
  6. Under PDF fixups select Fix potential font problems.

    Image Modified

  7. To embed all fonts, click Analyze and fix.

    Image Modified
  8. On the Mac, go to Acrobat Menu File > Properties.
  9. Select Fonts and confirm that they are now Embedded.

    Image Added
Sv translation
languagede

Bevor Sie die Label-Marke verwenden können, die Sie in Adobe Illustrator in Pandora erstellt haben, müssen Sie sicherstellen, dass die Schriftarten eingebettet sind und keine Untergruppe sind. Falls sie als Untergruppe vorliegen, verwenden Sie Preflight in Adobe Acrobat zum Einbetten.

So ändern Sie die Schrift in Adobe Acrobat:

  1. Öffnen Sie in Acrobat DC die PDF-Datei, die Sie gerade gespeichert haben.
  2. Auf dem Mac wählen Sie im Acrobat-Menü Datei > Eigenschaften aus.
  3. Klicken Sie auf Schriften, und überprüfen Sie, ob diese Eingebettet oder Eingebettet Untergruppe sind.
    Image Added

    • Bei Angabe von Eingebettet sind Sie fertig.
    • Bei Angabe von Eingebettet Untergruppe fahren Sie mit dem nächsten Schritt fort.
  4. Schließen Sie das Eigenschaftenfenster, und starten Sie Acrobat Preflight.
  5. Wählen Sie in Acrobat Preflight die Gruppe Druckvorstufe, Farbe und Transparenz aus.
  6. Aktivieren Sie unter PDF-Problembehebung Potenzielle Probleme mit Schriften beheben.

    Image Added

  7. Um alle Schriftarten einzubetten, klicken Sie auf Analysieren und beheben.

    Image Added
  8. Auf dem Mac wählen Sie im Acrobat-Menü Datei > Eigenschaften aus.
  9. Prüfen Sie, ob die Schriftarten jetzt Eingebettet sind.

    Image Added
Sv translation
languagees

Para poder utilizar la marca de etiqueta que ha creado en Adobe Illustrator en Pandora, debe asegurarse de que las fuentes están incrustadas y no en un subconjunto. Si están en un subconjunto, debe utilizar Preflight en Adobe Acrobat para incrustarlas.

Para cambiar la fuente en Adobe Acrobat:

  1. En Acrobat DC, abra el PDF que acaba de guardar.
  2. En el Mac, vaya a Archivo de menú de Acrobat > Propiedades.
  3. Seleccione Fuentes y compruebe si se muestran como Incrustadas o Subconjunto incrustado.
    Image Added

    • Si se muestran como Incrustadas, ha terminado.
    • Si se muestran como Subconjunto incrustado, continúe con el paso siguiente.
  4. Cierre la ventana Propiedades e inicie Acrobat Preflight.
  5. En Acrobat Preflight, seleccione el grupo Preimpresión, color y transparencia.
  6. En Reparaciones de PDF, seleccione Corregir posibles problemas de fuentes.

    Image Added

  7. Para incrustar todas las fuentes, haga clic en Analizar y corregir.

    Image Added
  8. En el Mac, vaya a Archivo de menú de Acrobat > Propiedades.
  9. Seleccione Fuentes y confirme que ahora se muestran como Incrustadas.

    Image Added
Sv translation
languagefr

Avant de pouvoir utiliser le repère d'étiquette que vous avez créé dans Adobe Illustrator dans Pandora, vous devez vous assurer que les polices sont intégrées et pas incluses dans un sous-ensemble. Si elles font partie d'un sous-ensemble, vous devez utiliser Preflight dans Adobe Acrobat pour les intégrer.

Pour modifier la police dans Adobe Acrobat :

  1. Dans Acrobat DC, ouvrez le fichier PDF que vous venez d'enregistrer.
  2. Sur Mac, accédez au menu Fichier d'Acrobat > Propriétés.
  3. Sélectionnez Polices et vérifiez qu'elles sont Intégrées ou incluses dans un Sous-ensemble intégré.
    Image Added

    • Si elles sont Intégrées, vous avez terminé.
    • Si elles sont incluses dans un Sous-ensemble intégré, passez à l'étape suivante.
  4. Fermez la fenêtre Propriétés et lancez Acrobat Preflight.
  5. Dans Acrobat Preflight, sélectionnez le groupe Prépresse, couleur et transparence.
  6. Sous Corrections de PDF, sélectionnez Corriger les problèmes de polices potentiels.

    Image Added

  7. Pour intégrer toutes les polices, cliquez sur Analyser et corriger.

    Image Added
  8. Sur Mac, accédez au menu Fichier d'Acrobat > Propriétés.
  9. Sélectionnez Polices et vérifiez qu'elles sont désormais Intégrées.

    Image Added
Sv translation
languageit

Prima di poter utilizzare il segno etichetta creato in Adobe Illustrator in Pandora, è necessario assicurarsi che i font siano incorporati e non si tratti di un sottoinsieme. Se costituiscono un sottoinsieme, è necessario utilizzare Preflight in Adobe Acrobat per incorporarli.

Per modificare il font in Adobe Acrobat:

  1. In Acrobat DC, aprire il PDF appena salvato.
  2. Sul Mac, accedere a Acrobat Menu File > Proprietà.
  3. Selezionare Font e verificare se siano di tipo Incorporato o Sottoinsieme incorporato.
    Image Added

    • Se sono di tipo Incorporato, la procedura è conclusa.
    • Se sono di tipo Sottoinsieme incorporato, proseguire con il passaggio successivo.
  4. Chiudere la finestra Proprietà e avviare Acrobat Preflight.
  5. In Acrobat Preflight, selezionare il gruppo relativo a prestampa, colore e trasparenza.
  6. In Correzioni PDF, selezionare Correggi potenziali problemi di font.

    Image Added

  7. Per incorporare tutti i font, fare clic su Analizza e correggi.

    Image Added
  8. Sul Mac, accedere a Acrobat Menu File > Proprietà.
  9. Selezionare Font e verificare che ora siano di tipo Incorporato.

    Image Added
Sv translation
languagezh

您必须首先确保嵌入字体(字体并非子集),然后才能在 Pandora 中使用您在 Adobe Illustrator 中创建的标签标记。如果它们是子集,您必须使用 Adobe Acrobat 中的预检功能来嵌入它们。

要在 Adobe Acrobat 中更改字体:

  1. 在 Acrobat DC 中,打开您刚保存的 PDF。
  2. 在 Mac 上,转至 Acrobat 菜单文件 > 属性
  3. 选择字体,检查它们是嵌入还是嵌入子集
    Image Added

    • 如果它们嵌入,则操作完成。
    • 如果它们是嵌入子集,则继续下一步。
  4. 关闭“属性”窗口,然后启动 Acrobat Preflight。
  5. 在 Acrobat Preflight 中,选择印前、颜色和透明度组。
  6. PDF 修复中,选择修复潜在的字体问题

    Image Added

  7. 要嵌入所有字体,请单击分析和修复

    Image Added
  8. 在 Mac 上,转至 Acrobat 菜单文件 > 属性
  9. 选择字体并确认它们现在为嵌入

    Image Added
Sv translation
languageja

Adobe Illustrator で作成したラベル マークを Pandora で使用する場合には、まずフォントが埋め込まれていること、そしてサブセットではないことを確認する必要があります。サブセットである場合には、Adobe Acrobat のプリフライト機能を使用して、埋め込んでおく必要があります。

Adobe Acrobat でフォントを変更するには、次を実行します。

  1. Acrobat DC で、保存した PDF を開きます。
  2. Mac で[★Acrobat メニューからファイル★]>[プロパティ]を選択します。
  3. フォント]タブを選択し、[埋め込み]か、[埋め込みサブセット]であるかをチェックします。
    Image Added

    • 埋め込み]であれば、このステップで完了です。
    • 埋め込みサブセット]であれば、次のステップに進みます。
  4. [プロパティ]ウィンドウを閉じて、Acrobat プリフライトを起動します。
  5. Acrobat プリフライトで、[プリプレス、カラー、および透明]グループを選択します。
  6. PDF フィックスアップ]で、[潜在的なフォントの問題を修正]を選択します。

    Image Added

  7. すべてのフォントを埋め込むため、[解析してフィックスアップ]をクリックします。

    Image Added
  8. Mac で[★Acrobat メニューからファイル★]>[プロパティ]を選択します。
  9. [フォント]を選択し、すべてのフォントが[埋め込み.]になっていることを確認します。

    Image Modified