
TIFF Assembler Plus v4.2
New Features Review
April 2018
![]()
- TAP v4.2 is a planned release with new features and bug fixes to better support ACM driven cutting tables
- 18 new features
- 31 bug fixes
See TIFF Assembler Plus v4.2 Release Notes for a specific listing of all new features and bug fixes, and additional instructions on using the new features.
- Updated splash screen, and icons.


Numbered camera marks
- Numbers automatically added to ACM camera marks to aid in alignment

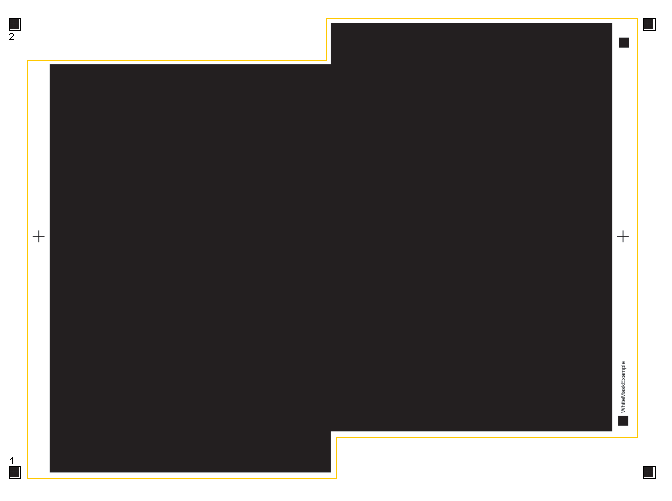
 !worddav402e018a4aa99e34538f0201c3e358d7.png|height=258,width=256!only marks 1 and 2 are numbered, even if 4 are enabled
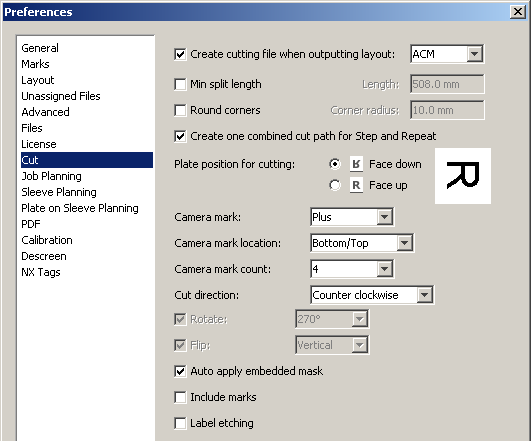
Bevel knife cut support
- Bevel knife cut requires control of knife direction – CW or CCW
- TAP v4.1 cut Counter clockwise
- Direction required for bevel knife depends on Plate position for cutting – Face down/up
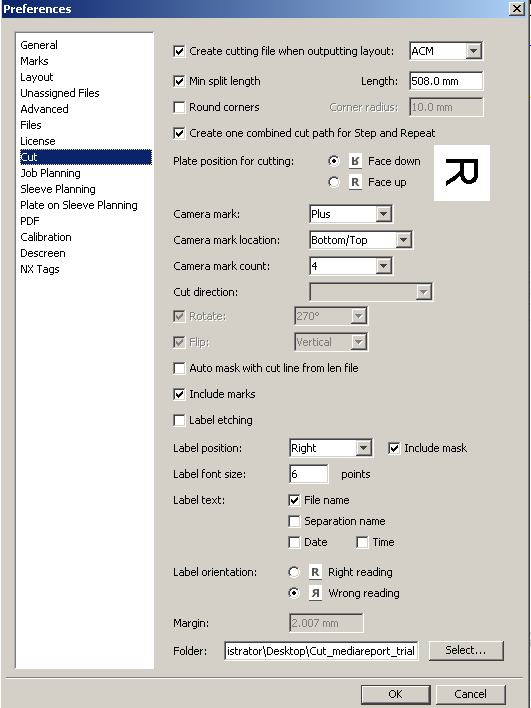
Preferences>Cut >Cut direction
- Preferences>Cut >Min split length must be disabled to set Cut direction
 Bevel cut helps prevent plate lift
![]()
![]()
![]()
![]()
![]()
![]()
![]()
![]()
- Min split length causes knife to move CW and CCW on long cut lines
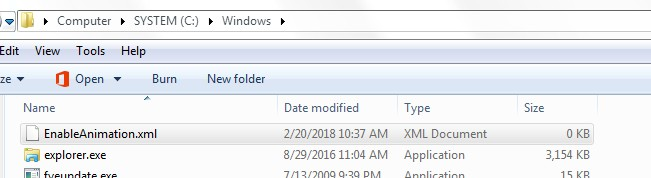
Improved animation file

 !worddave7ddd63e0074ebbd65d73903d3d5aecd.png|height=443,width=431!Animation file shows more information – margins; camera marks; TIL, plate, and file sizes
Layout TAP 4.1 cut animation TAP 4.2 cut animation
Enabling Cut Animations
- Cut animations were introduced in TAP v4.1
- Cut animations are only supported for ACM cutting file format
- To enable Cut Animations
-Create EnableAnimation.xml in C:\Windows

 !worddav43091fa298bcf27b9675225283c83bac.png|height=70,width=674!When Cut Animations are enabled, a HTML file with the same name as the ACM file is created on output. The HTML file is saved to the same directory as the ACM file
- Preferences>Cut>Include labels enables option to include TAP added labels in cut shape*
![]()


Include marks = Enabled
Mark label added by TAP is included inside the cut shape 
Include marks = Disabled
Mark label added by TAP is outside the cut shapeMark label added by TAP
- If cut shape is defined by a mask, then this preference setting is ignored
- Cut labels, like Marks labels, are relative to file native orientation, so if file is rotated in the layout, both labels follow the file
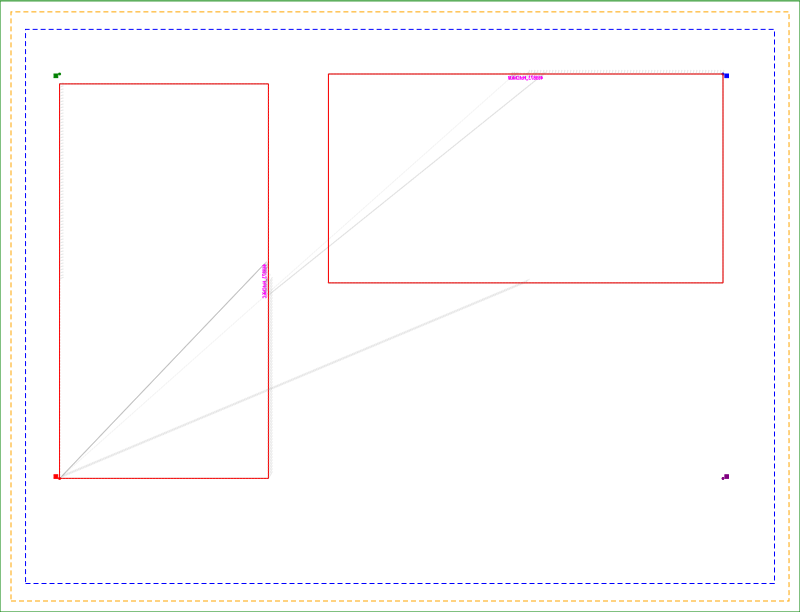
Example: Marks labels and Cut labels both positioned Right
File placed with no RotationFile placed with
90 Rotation

![]()
![]()
![]() !worddav3794d60fa76a58a2508c0d39a80c1ee0.png|height=30,width=304!Marks labels
!worddav3794d60fa76a58a2508c0d39a80c1ee0.png|height=30,width=304!Marks labels
Cut
![]()
![]()
 !worddav4e55f320608fa8c4a5b3bf0a2677cec3.png|height=238,width=148!labels
- Cut masks can be applied and area outside mask maintained, icon shows whether


 !worddav0be8d48574c9d59d21d559216d9392f3.png|height=21,width=25!mask has been applied

 = External cut-crop mask
has been applied
= Cut mask has been applied with no crop
In TAP v4.2 option to Apply external mask is not available if a mask has already been applied. - Bleed or no crop options do not affect cut shape, cut shape is always defined by the mask

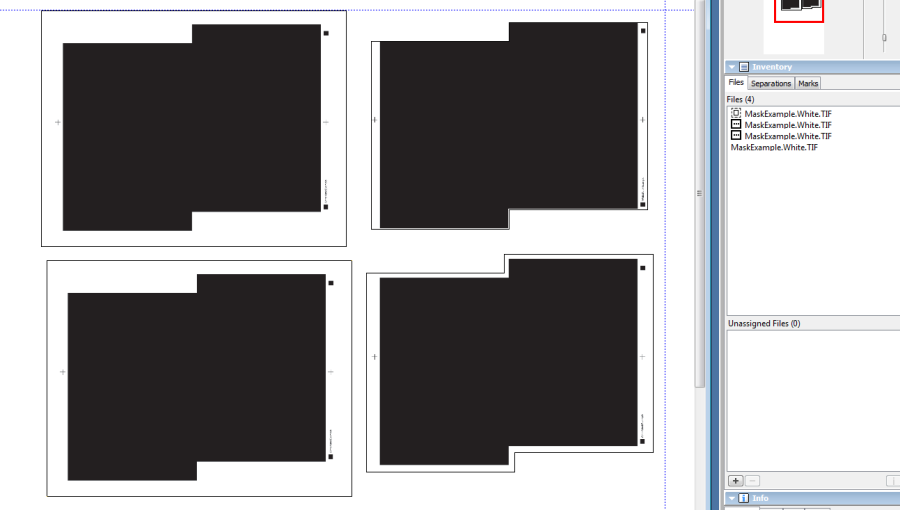
 5 mm 0 mm No Crop
  !worddav0240f77d94b563dd4c59d21feae092dc.png|height=327,width=426!Red cut shape is the same for all three cases.
Light gray line shows difference in TIFF
content included on plate.
- For masked files, cut Label position will be Center unless Preferences>Cut>Include mask is
enabled
- If Include mask is enabled a warning will appear indicating label may fall outside cut shape
- TAP places the label relative to a rectangle defined by the four outermost corners of the masked image
- User must pay attention to cut shape and Label position to insure label falls inside the cut
shape
Label position = RightLabel Position = Top


![]()
![]() Label inside cut shapeLabel only partially inside cut shape
Label inside cut shapeLabel only partially inside cut shape
- LEN files may have cut information directly embedded or reference an Esko PDFPLA file
- The availability of the mask data in a LEN file depends on the software and settings used to RIP and create the LEN file
- The PDFPLA file used to create the LEN file is the most reliable source of the mask data
- If TIFF Assembler Plus cannot extract the cut mask data from the LEN file, it tries to locate the PDFPLA file using the path stored in the LEN file. If that path is not accessible, it looks in the same folder as the LEN file.
- A PDFPLA file can contain multiple cut masks, which allows each separation to have a different cut
mask.
- TAP v4.2 does not support cut mask embedded in LEN files by Esko DFS Line Editor
- LEN files are converted to TIFF files when added to layout – lenl2t.tif
- Embedded masks can be applied with user specified bleed, or no crop
- Inventory Panel icons show status of embedded masks

![]() = Embedded mask is available, but not yet applied
= Embedded mask is available, but not yet applied ![]() = Embedded mask has been applied with crop
= Embedded mask has been applied with crop
![]() = Mask has been applied without crop
= Mask has been applied without crop
 Applying embedded masks – manual application
- Manual – Select file, right click, select Apply embedded mask,* selectbleed margin or no crop
- option only appears if the selected file has an embedded mask available
Applying embedded masks – automatic application
- Automatic – Preferences>Cut>Auto apply embedded mask
- Mask Margin gets defined in Layout preset
- -For mask with no crop Auto applied embedded mask margin = -1
![]()
![]()
Preferences>Layout>Save layout upon output
 !worddav3008fd2ad0812cae4d2fc4a2ad69b1db.png|height=60,width=264!When enabled, layout is automatically saved to the folder defined in Preferences
Layout .cta file gets the same root
name used for the output TIFF file
Enables conversion of LEN to TIFF before building layouts
 How this hot folder works:
- When file_name.PDFPLA is dropped into the input folder, a new output folder is created (C:output_folder_namefile_name ) and file_name.PDFPLA is moved to that new output folder.
- When file_nameK.len is dropped into the input folder, the LEN file converts automatically to _file_nameK.tif (with the cut information embedded) and the TIF file is moved to the C:output_folder_name{}file_name_ folder.
Important notes:
- The cut information is embedded in the TIF file only if the file_name.PDFPLA file is dropped into the hot folder before the LEN file.
- The file_name.PDFPLA file and the file_nameK.len file must have the same _file_name
prefix to appear in the same output folder.
- If a LEN file with the same name as a previously used file is dropped into the input folder,
any file with the same name in the output directory is overwritten.
- 3. If the Convert LEN to Tiff hot folder was configured with the Delete input files after output
option enabled, file_name_K.len is deleted.
If Delete input files after output is not enabled, the file is moved to the
C:input_folder_name\ProcessedFiles folder.
- Additional keyboard shortcuts for ease and speed of use
- Shift + 1: Select Arrow pointer
- Shift + 2: Select Zoom pointer
- Shift + O: Output layout
- Shift + L: Open Layout setup
- Shift + P: Open Preferences
- Esc: closes Preferences or Layout setup windows
Thank You
![]()