You have successfully created a versioned job that uses the black plates to manage the versioned data. At the last minute, your customer calls with a new correction—the image on the first page of each versioned brochure is to be different. You are now required to edit the job to allow the first page of each version to be handled as an independent versioned page.
Note: You must complete Scenario One before completing the following tasks.
If you have a Layered PDF Versioning job in which some pages cannot use the same color extractions as the rest of the job, you can use color extraction override to output those pages within the same versioning job.
For example, consider a job in which the bulk of the pages requires only a black plate change between versions, but one signature requires a 4-color change. You can set up those pages for a 4-color change within the same job—essentially using a different version plan for those pages.
- Copy new input files to the job folder
- Add and refine edited PDF pages
- Replace versioned page content with new content
- Use override colors to extract
- Create an imposed proof
Copy new input files to the job folder
- From your workstation, locate:
Prinergy Activity Practice Files / Act_31_LPV - Copy the
Edited PDF Pagesfolder. - Restore Job Manager.
- Right-click the XX_LPV_A job folder icon in the lower left corner of Job Manager. Select Open Job Folder in File Browser.
- In the
XX_LPV_Afolder, openUserDefinedFolders. - Paste the
Edited PDF Pagesfolder intoUserDefinedFolders. - Close the job folder.
Add and refine edited PDF pages
- In the Pages view, right-click the Input Files pane and choose Add Input Files.
- In the Add Input Files dialog box, click the Job Folder button and locate:
UserDefinedFolders / Edited PDF Pages. - Click the Add All button to add all PDF pages to the Files to Add list.
- In the Options section of the Add Input Files dialog box, select the Process Selected Files Using Process Template check box. and use the process template: Refine > Refine > 1stRef-Normz.
- In the Add Input Files dialog box, click OK.
- In the Start Process dialog box, click OK.
Replace versioned page content with new content
- Select the Versioned Pages view.
- In the search box, type
New.
The edited PDF pages appear.
- Drag
8pgAuction_English_NewPg.1.p1to the existingEnglish VP_1.pdf versioned page.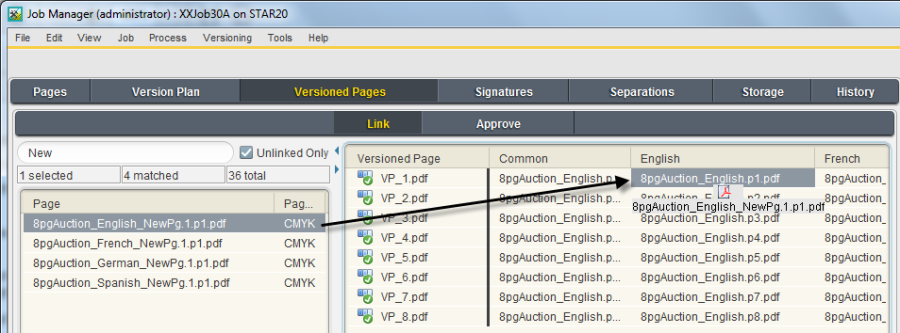
- A Warning dialog box appears stating that a versioned page is already linked to the selected layer. Click Continue Link to Layer.
- Repeat the same steps for the new French, German, and Spanish PDF pages.
Note: In the Pages view, all originating PDF pages will appear in the Pages pane, with the exception of English. The originating English PDF page doesn't appear because it is still linked to the Common layer. In this scenario however, the Common layer will no longer be used, so it isn't crucial that the Common layer be updated. - In the Versioned Pages view, right-click
VP_1.pdfand select: Generate > Generate > Generate
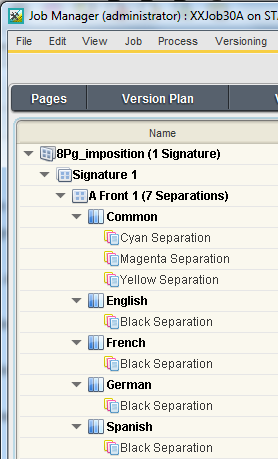
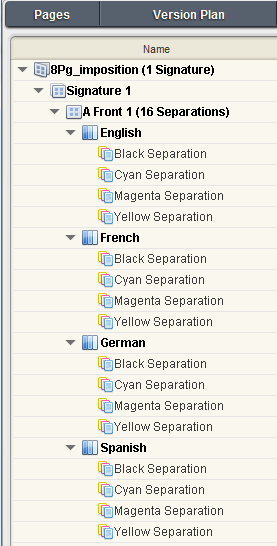
This re-generatesVP_1.pdfto embed the edited PDF pages. - Select the Separations view. Make note of the organization of all separations. The Common layer contains Cyan, Magenta, and Yellow, and each version layer contains Black (version data).
Use override colors to extract
- Select the Versioned Pages view.
- Right-click
VP_1.pdfand choose Override Colors to Extract.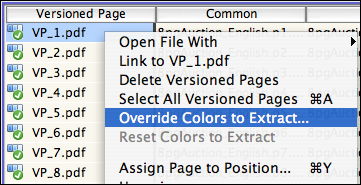
- In the Layer Type column for each layer, change the type from Change to Base.
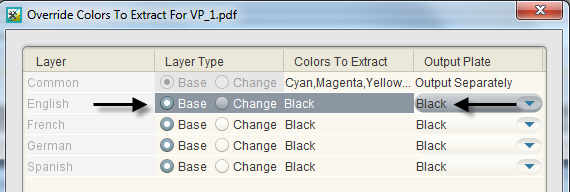
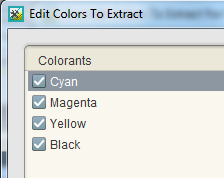
- For the English layer, click in the Colors to Extract column (Black).
- In the Edit Colors To Extract dialog box, select all colors to extract (C, M, Y, K). Click OK.
- Repeat the same steps (steps 4 and 5) for French, German, and Spanish.
- At completion, Click OK in the Override Colors to Extract dialog box.
- View the change indicators for versioned page VP_1.pdf. An exclamation mark is displayed beside the versioned page name, and altered layers are highlighted in a different color. The exclamation mark indicates that one of the layers has had its colors to extract overridden. This mark will stay there until you select Reset colors to override. The colored cells indicate which layer(s) have had overrides applied.
- Right-click versioned page
VP_1.pdfand select: Generate > Generate > Generate. - Click OK in the Start Process dialog box.
- Select the Separations view.
- Expand Signature 1 to view each language version. Note that each language now contains four separations, and there is no longer a Common layer.
Create an imposed proof
- Right-click Signature 1 and select the process template: Imposition Output > Virtual Proof > Virtual Proof.Imposed.600.
- In the Start Process dialog box, ensure that the Output All Versions option is selected. Click OK.
- Right-click Signature 1 and select Open VPS files.
- From the Window menu, choose Separations Palette to view all separations.
- Magnify the front cover (page 1).
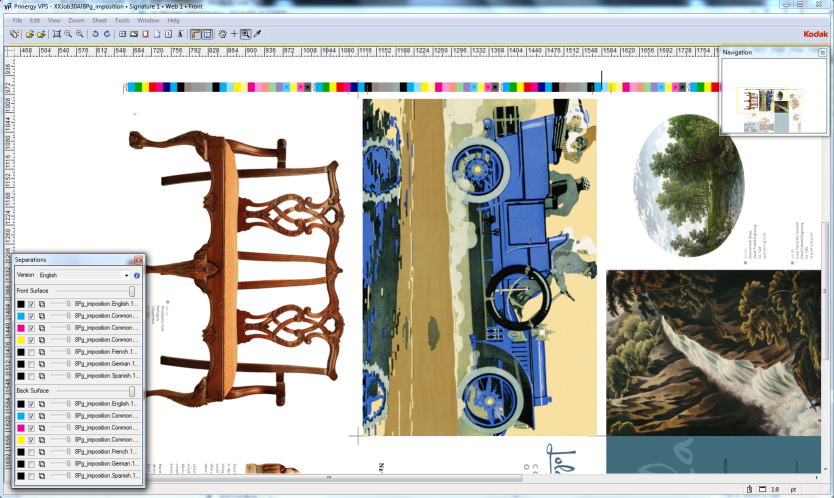
- In the Separations palette, select each version. Note the new page content and the CMYK separations.
- At completion of the proofing process, quit Prinergy VPS software.
- Close XX_LPV_A Job Manager.
- Destroy XX_LPV_A.