You want to create a smart hot folder that will automatically create a job, name the job, and move the job to an active hot folder. Included with automatic job creation, you want input files to be automatically added, refined, and PDF pages generated into Prinergy VPS loose page proof output.
- Create a template job
- Create a workflow template
- Create a hot folder associated to the workflow template
- Create a smart hot folder
- Use the smart hot folder
- Delete the workflow process template and group
- Delete the smart hot folder
Create a template job
In this task, a template job is created to work as a base job for automatic job creation when used with a Smart Hot Folder.
- In Job Finder, right-click your main group, and choose New Job.
- Type the job name
XX_Smart_Hot_Folder(where <XX> represents your initials). - Click Create.
Create a workflow template
In this task, a workflow template is created that defines how an automatically created job will process input files.
- From the Tools menu, choose Process Template Editor.
- Right-click the Workflow Template Import, Refine and Loose Page Output and choose New Workflow Template.
- In the Import, Refine and Loose Page Output dialog box, select the following:
- Import: Uncheck (the import is used for previously created Prinergy jobs)
- Refine: Checked
- Group = Refine
Process Template = 1stRef-Normz - Loose Page Output: Checked
- Group = Virtual Proof
Process Template = Virtual Proof.LoosePage
Click Add to add the process template to the Process Template list.
- From the File menu, select Save.
- In the Save Workflow Template dialog box, enter the name of your workflow template group. Type
XXHotFolderGroup(where <XX> represents your initials). - Click the Create Workflow Template Group button.
- Double-click the XXHotFolder Group and enter a name for the workflow template. Type
XXHotFolder(where <XX> represents your initials). - Click the Create Workflow Template button.
- Close the Import, Refine and Loose Page Output dialog box.
- Close Process Template Editor.
Create a hot folder associated to the workflow template
In this task, a hot folder is first created as part of the template job, and then linked to a workflow template. The hot folder triggers the automatic processing of input files based on selections defined in the workflow template. Essentially, the template job is associated to a hot folder, which in turn is associated to a workflow template. This setup defines the path that all automatically created jobs will follow.
- From the Job menu, choose Manage Hot Folders.
- Click Add to create a hot folder.
- In the Create Hot Folder dialog box, select the Add and Process Files option.
- In the Process Template list, locate the workflow template: Workflow > Import, Refine & Loose Page Output > XXHotFolderGroup > XXHotFolder.
- Select XXHotFolder and click OK.
- Close the Manage Hot Folders dialog box.
- Close XX_Smart_Hot_Folder.
Create a smart hot folder
In this task, a smart hot folder is created that will automatically create a job (based on the template job), name the job using defined source and target naming patterns, and direct input files to a hot folder for automatic processing.
- From the Tools menu in Job Finder, select Smart Hot Folder Manager.
- In the Smart Hot Folder Manager dialog box, click Add.
- In the Smart Hot Folder Name window, type
XXSmartHotFolder(where <XX> represents your initials). - In the Smart Hot Folder Location window, browse to:
Jobs on <server> J drive / SmartHotFolders. - Click the Select "SmartHotFolders" button.
Note: If you can't locate the globalSmartHotFoldersfolder, then the folder hasn't been initiated. If this is the case, select Use Default Location. This will automatically establish theSmartHotFoldersfolder within the Jobs folder and be accessible for the entire system. - In Hot Folder Type: select Job Creator.
- In the Create a new job based on the job template window, browse to your template job: XXMain Group > XX_Smart_Hot_Folder
In the Select Template Job dialog box, clear all options except Hot Folders. Click OK.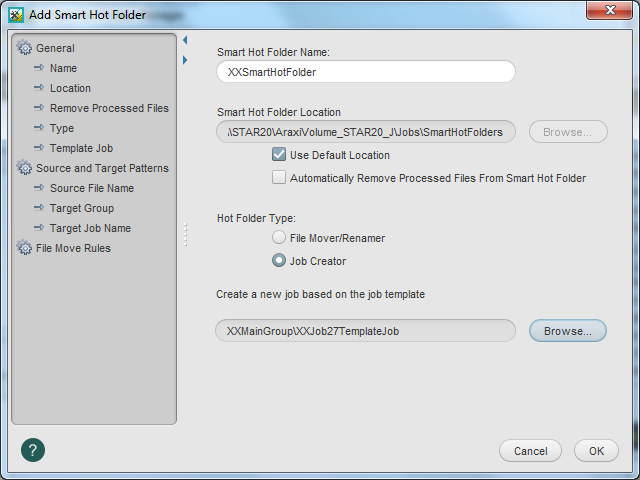
- In the left-hand pane, select Source and Target Patterns.
- In the Source File Name Pattern: type the following:
[#JobID]_[$Name].[%Ext]
This pattern should match input file names that you intend to place in the smart hot folder, for example,12345_Wells.ps. - In the Target Job Name Pattern: type the following:
XX_[#JobID]_[$Name](where <XX> represents your initials).
This defines the name of the newly created job once the files are dropped in the smart hot folder, for example,XX_12345_Wells.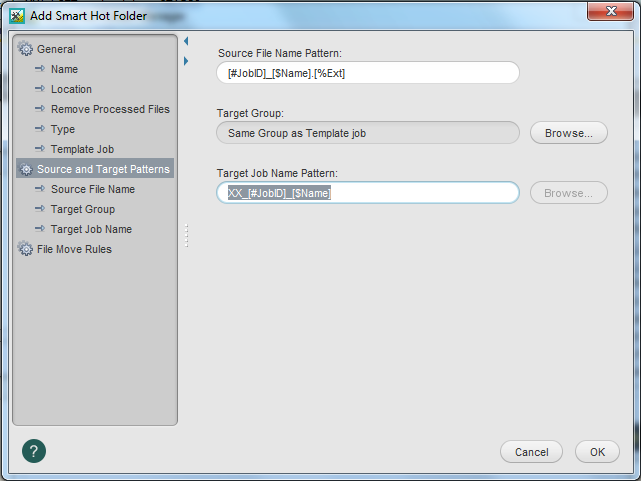
- In the left-hand pane, select File Move Rules.
- Click the Add button.
- Enable Use Smart Hot Folder's Source Pattern.
- Clear Rename Files.
- Select the Move to Job Hot Folder option.
- In the Select Hot Folder list, select your hot folder:
XXHotFolder.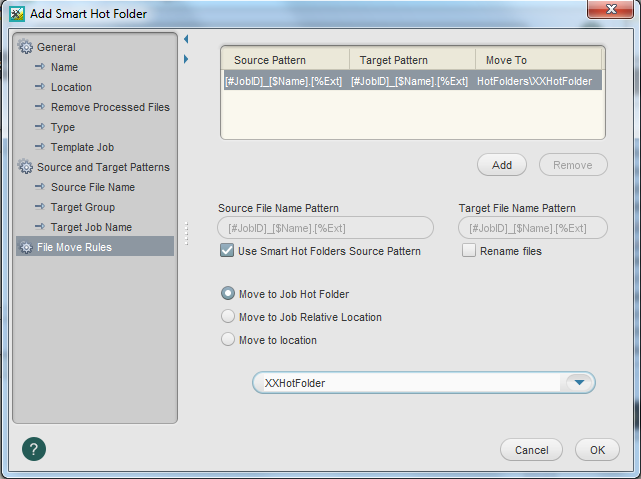
- Click OK.
- Click Close.
Use the smart hot folder
When input files are copied to the smart hot folder, a new job is automatically created and named. Input files are then directed to the hot folder, which triggers the processing of the input files based on the selections defined in the workflow template.
- From your workstation, locate:
Prinergy Activity Practice Files / Act_27_Smart Hot Folders / Input File - Open the
Input Filefolder, and copy the input file12345_Wells.ps. - From your desktop, locate the
SmartHotFoldersfolder:Jobs on <server> J drive / SmartHotFolders - Open the
SmartHotFoldersfolder, and locate your folderXXSmartHotFolder. - Paste the
12345_Wells.psfile into theXX_SmartHotFolderfolder. - View Job Finder to locate the newly created job called:
XX_12345_Wells(where <XX> represents your initials).
This job will be located in your main group. - Open the job to monitor the automated refine and proof processes.
- Proof the job using VPS software.
Delete the workflow process template and group
- Restore Job Manager.
- From the Tools menu, choose Process Template Editor.
- In the Process Template Editor, locate: Workflow Templates > Import, Refine and Loose Page Output > XXHotFolderGroup > XXHotFolder.
- Right-click your process template XXHotFolder and select Delete. The process template is deleted.
- Right-click your refine group XXHotFolderGroup and select Delete. The process template group is deleted.
- Close the Process Template Editor.
Delete the smart hot folder
- From the Tools menu, choose Smart Hot Folder Manager.
- In the Smart Hot Folder Manager dialog box, select: XXSmartHotFolder (where XX represents your initials).
- Click Delete.
- In the Confirm Smart Hot Folder Delete dialog box, click OK.
- Close the Smart Hot Folder Manager.
- Close XX_12345_Wells Job Manager.