Create a rule set that uses the Digital Submit event to send files for printing on a digital press.
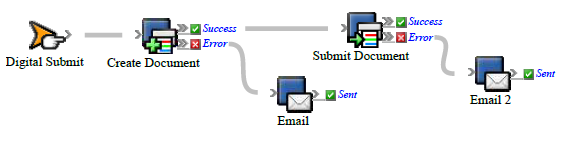
When you drop files onto a digital print device in the Prinergy Digital Submit window, the Digital Submit event is generated. Use this event to start a rule that creates the document and submits it to the digital print device along with the JDF process file.
What the rule does
Prepares files for printing and defines the printing parameters for a digital press.
Why it is useful
Automates digital printing of large numbers of files.
Events and actions used
Event | Actions |
|---|---|
Digital Submit | Create Document |
Note: If you want to control when a document is submitted for printing, do not attach the Submit Document action. Instead, use the Prinergy Digital Direct software (included with the Digital Print feature) to stage documents and set up printing queues.
Tip: In Rule Builder, you can search for a specific event or action by clicking anywhere on the Events, Flow, or Actions tabs, and typing the name.
Key parameters
Event or action | Parameter |
|---|---|
Digital Submit | The Digital Submit event contains the JDF intent information for the job, set by the user in the Digital Direct software. |
Create Document | Digital Print Queue: Select the digital device. |
Submit Document (Optional) | Change Digital Print Queue: Select the device that you want the documents to be printed on (for example, Kodak Digimaster). |
Where to enable it
This rule must be enabled across the system. It cannot be enabled for specific jobs.
Other considerations
You must have the Prinergy Digital Print feature installed and configured on your system, including setting up a digital printer workflow processor in Prinergy Administrator and installing the NexPress data model.
Note: For instructions, see the Prinergy Digital Print Installation and Configuration Guide, available on Partner Place at https://partnerplace.kodak.com/.