A Smart Hot Folder workflow has three components: a ScreenSet#.xml file, a hot folder, and a smart hot folder.
The following procedures display how to create a new automatic smart hot folder workflow. Creating a new semi-automatic smart hot folder workflow requires editing of the RBA rules.
Create ScreenSet#.xml files
- Copy an existing
ScreenSet#.xmlfile and rename it to the next number available. - Use one of the methods in the Reference 1 section to edit the new
ScreenSet#.xmlfile.
Create hot folders
- Open the SO-TEMPLATE job.
- In Job Manager, from the Job menu, select Manage Hot Folders.
- Click Add.
- Select Add and Process Files.
- Scroll down and then expand Automation: Enabled Rules.
- Expand All Jobs.
- Expand SO_AUTOMATION.
- Select SO_REFINE.
- In the Name box, type the matching ScreenSet# name.
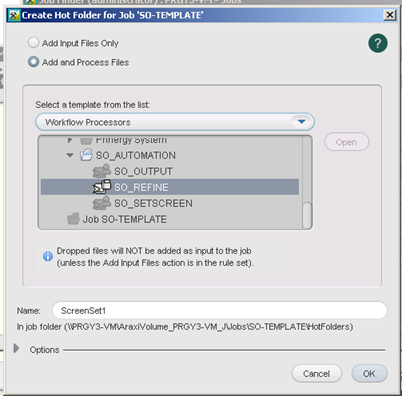
- Click OK.
- Close the Manage Hot Folders window.
- Close the Job Manager window.
Create smart hot folders
- From the Job Finder Tools menu, select Smart Hot Folder Manager.
- Click Add.
- In the Smart Hot Folder Name box, enter a name that represents the workflow for your production scenario. The naming convention for the default smart hot folders is
SO-ScreenSet#. - Select the Use Default Location box.
- Select the Automatically Remove Processed Files From Smart Hot Folder box.
- Under Hot Folder Type, select the Job Creator option.
- Click Browse. Double-click the template group.
- Select the
SO-TEMPLATEand click OK.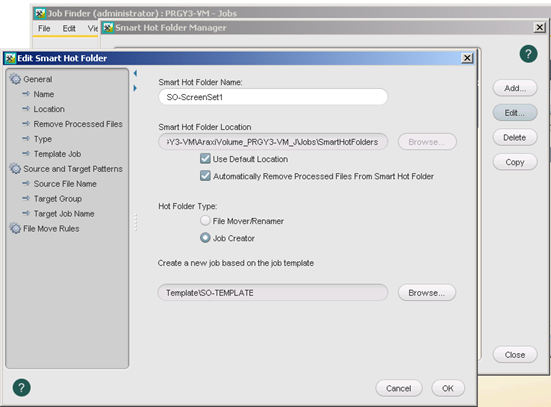
- On the left pane, select Source and Target Patterns.
- In the Source File Name Pattern box, type
[$jobname].[$Ext] - For Target Group, click Browse.
- select SO-AUTOMATION and click Select.
- In the Target Job Name Pattern box, type
[$jobname]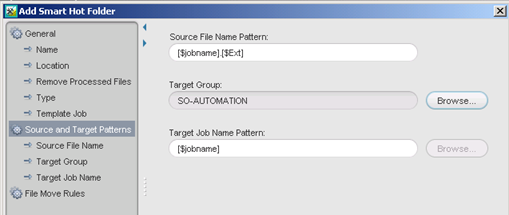
- On the left pane, select File Move Rules.
- Click Add.
- Select the Use Smart Hot Folders Source Pattern check box.
- In the Target File Name Pattern box, type
[$jobname] - Select Move to Job Hot Folder.
- From the list at the bottom, select the matching hot folder.
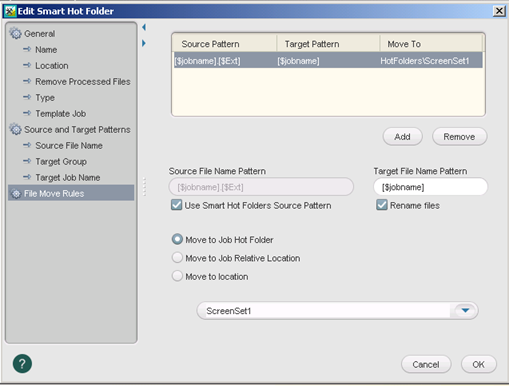
- Click OK.
- Close the Smart Hot Folder Manager.