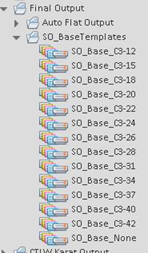
The default path for the screen sets is J:\_SO_Config
ScreenSet1.xml – ScreenSet10.xml
This default path is on the PST for Packaging server. The steps below, except for the Microsoft Excel one, reference this path. If you do not have access to the PST for Packaging server or wish to edit on a different computer, copy the ScreenSets to your desired location for editing, then copy the edited versions back to the default location on the PST for Packaging server.
Screen set variables
| Name | Cyan, Magenta, Yellow, Black, and 1 thru N, where N is the max number of spot separations. Must be 1-N in order. |
| ScreenType | AM (Maxtone), AMCX (Maxtone CX), AMSX (Maxtone SX) |
| DotShape | For AM = Round, Round-Square(Euclidean), EllipticalP, Square1, Square, Line, Line1, Light Elliptical, Heavy Elliptical, Rhomboid For AMCX = Round, Round-Square(Euclidean), EllipticalP, Square1, Square, Line, Line1, Light Elliptical, Heavy Elliptical, Rhomboid For AMSX = Round1, Euclidean |
| ScreenRuling | (See Process Template Editor for complete list of available ScreenRulings) For AM = 80, 90, 95, 100, 110, 120, 133, 141, 150, 175, 190, 200 For AMCX = 80, 90, 95, 100, 110, 120, 133, 141, 150, 175, 190, 200 For AMSX = 80, 90, 95, 100, 110, 120, 133, 141, 150, 175, 190, 200 |
| Angle | For AM/AMCX = 0, 7.5, 15, 22.5, 30, 37.5, 45, 52.5, 60, 67.5, 75, 82.5, 18.4, 71.6, 90, 97.5, 105, 120, 135, 157.5, 165, 172.5 For AMSX = 0, 7.5, 15, 22.5, 30, 37.5, 45, 52.5, 60, 67.5, 75, 82.5 |
| Highlight_SX | 1x1, 1x2, 2x2, 2x3, 3x3, 3x4, 4x4 |
| Shadow_SX | None, 1x1, 1x2, 2x2, 2x3, 3x3, 3x4, 4x4 |
| Highlight_CX | A calculated micron size as an integer value only. Such as, 10, 20, 30. A value must be set, use "0" if no value. |
| Shadow_CX | A calculated micron size as an integer value only. Such as, 10, 20, 30. A value must be set, use "0" if no value. |
| Calibration | C3-XX or None, where XX is the end of the created Process Template names that have a specific calibration applied. Process Templates with no calibration should end in "None". Note: If you want create a custom curve, the name of the process template must be SO_Base_<custom name>. You can then use the <custom name> when editing ScreenSets or in the job to edit screens on-the-fly.
|
| HyperFlexClassic | Used with Maxtone CX to support highlight dots. Integer value, Requires default value "0” |
| MinCalibrationTint | Used to cut off high light dots. Decimal value, Requires default value "0" |
Edit a ScreenSet with Notepad++
Requirements: A version of Notepad++ should already be installed on the PST for Packaging server. If not, or if you’ would like to download the latest version, go to https://notepad-plus-plus.org/download and download the x64 version.
- Open Notepad++.
- The program remembers the last files it opened so close the files that are not needed.
- From the File menu, select Open.
- Navigate to J:\_SO_Config and select a ScreenSet#.xml file.
- Click Open.
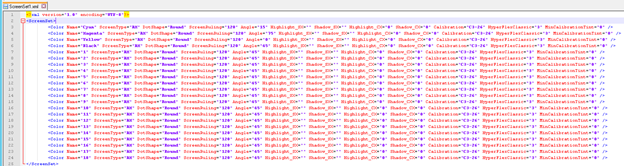
- Make sure that the ScreenSet section is expanded. Each color has its own line. Edit as desired screen sets with valid variables. When you complete editing, save and exit.
Edit a ScreenSet with XML Notepad
Requirements: Download XML Notepad (v2.7, requires .NET 4) from http://www.lovettsoftware.com/downloads/xmlnotepad/readme.htm. Alternate download (v2.5, requires .NET 2) from https://www.microsoft.com/en-us/download/details.aspx?id=7973.
Install the application.
- Open XML Notepad.
- From the File menu, select Open.
- Navigate to
J:\_SO_Configand select aScreenSet#.xmlfile - Click Open.
- Each color is its own tree. To edit, you expand the color tree on the left and then edit the information in the box on the right.
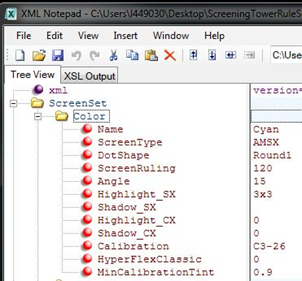
Note: You can substitute in actual customer production values for the following variables. - Edit as desired screen sets with valid variables. When you complete editing, save and exit.
Edit a ScreenSet with Microsoft Excel
It is not recommended to install Microsoft Excel on the PST for Packaging server. If you want to use Excel, copy the ScreenSets to the computer where Excel is installed and then copy the edited versions back to the PST for Packaging server.
The following steps are based on Microsoft Excel 2016.
- Start the Excel software.
- Navigate to and open a
ScreenSet#.xmlfile. - In the Open XML window that appears select the default As an XML table, and click OK.
- If the Info window appears, click OK.
- Each color gets its own row and the fields are columns.
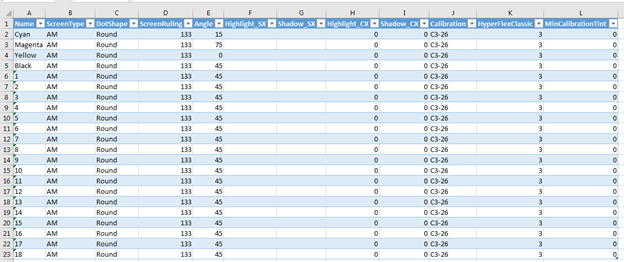
- Edit as desired with valid variables.
- Select File -> Save As.
- Navigate to the location of the ScreenSets on the computer you are working on.
- In the Save as type menu, select XML Data.
- Select the
ScreenSet#.xmlfile, and click Save. - Click Yes to overwrite.