In this activity, we're going to create a job and output different combinations of Maxtone or Hyperflex with different dot shapes.
Create a job
- If it is not already open, start Prinergy Workshop.
- In Job Finder, right-click your main group, and choose New Job.
- Type the job name
XX_Pack_Automation_Job2(where <XX> represents your initials). - Click Create.
- Minimize the Job Manager window.
Copy an input file to the job folder and add input files to the job
- From your workstation, locate:
PST for Packaging Practice Files / Act_04_Prinergy Flexo Screening - Restore Job Manager.
- Drag the
123ramps_StepWedge_v1.pdfto the Job Manager's Input Files area. - In the Add Input Files dialog box that appears, under Options, click Select and select the 1stRef-Normz refine process template.
- Click OK.
- Click OK.
Your file is copied to theUserDefinedFoldersfolder. - In the Start Process dialog box, click OK to start the Refine process.
Change a Loose 1-Up Artwork Output settings on-the-fly
Note: For the following output tasks, you can create unique Loose 1-Up Artwork Output templates or you can use the template you created in Activity 3 and change the settings on-the-fly.
- In the Job Manager window, in the Process Templates area, select Global.
- Expand Loose 1-Up Artwork Proof.
- Expand XXLoose1-UpGroup.
- From the 1-Up Artwork section on the left, select and drag the
123ramps_StepWedge_v1.p1.pdffile to the XXLoose1-Up process template. - Click Edit Process Template.
- Expand the Processed File Options section.
- Select the Use Custom File Naming option.
- Type
%Filename%_<custom>_%LongColorName%.%extension%in the Filename Template box. Where<custom>is a unique identifier for the settings you are outputting. - Close the Processed File Options section.
- Expand the Calibration & Screening section.
- Edit per the task you are performing below.
Create output with Hyperflex Classic
- When generating plate files, use values of 1 through 4 to see what Hyperflex Classic does. The setting can be found in the Calibration and Screening section of the process template.

- View the results in TIFF Assembler Plus to see the effect of the settings. Play close attention to the highlight patches and the fadeout of the vignettes.
Create output with Maxtone CX
- When generating plate files, use values of 15 to 30 microns (in steps of 5) to see what Maxtone CX does. The settings can be found in the Calibration and Screening section of the process template. Maxtone CX must be selected as the screening system.
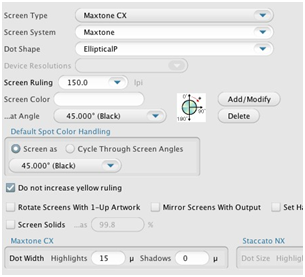
- View the results in TIFF Assembler Plus to see the effect of the settings. Again, play close attention to the highlight patches and the fadeout of the vignettes.
Create output with Maxtone FX
- When generating plate files, use values of None, 1x2, 2x2, 2x3, 3x3, 3x4, 4x4 pixels to see what Maxtone NX does. The settings can be found in the Calibration and Screening section of the process template. Maxtone FX must be selected as the screening system.
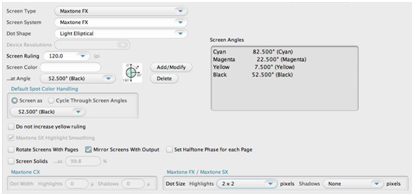
- View the results in TIFF Assembler Plus to see the effect of the settings. Again, play close attention to the highlight patches and the fadeout of the vignettes.
Create output with Maxtone SX
- When generating plate files, use values of None, 1x2, 2x2, 2x3, 3x3, 3x4, and 4x4 pixels to see what Maxtone SX does. The settings can be found in the Calibration and Screening section of the process template. Maxtone SX must be selected as the screening system.

- View the results in TIFF Assembler Plus to see the effect of the settings. Pay attention to the highlight patches and the fadeout of the vignettes. You will notice that AM dots are not fully aligned on dot centers until further up the tonal range (the actual percentage varies according to the selected frequency, but you should expect to see dot center alignment somewhere around 10%).
(Optional) Create output with Maxtone (AM Screening)
- When generating plate files, use different settings for Print Curve; Screen System; Dot Shape; & Screen Ruling.
- View the results in TIFF Assembler Plus to see the effect of the settings.