IMPORTANT NOTE:
If at any point during the upgrade, you see a pop-up message to “Retry” or “Cancel”, DO NOT Cancel. Leave the message up and contact your regional support organization.
Kodak is continuously working to improve the performance and security of its software products, and occasionally uses installation software to make important changes available to customers as updates or upgrades. If these conditions describe your system:
- You have a currently installed PRINERGY Workflow version
- The PRINERGY Workflow software will remain on its current platform (combination of operating system and hardware/virtual machine)
- You want to apply the changes available from the update or upgrade to your current PRINERGY Workflow system
it is your responsibility as end user/customer system administrator to install the update or upgrade software (for details, see the terms and conditions you accepted when installing your current system). If you require assistance installing the update or upgrade—or if you wish to upgrade your PRINERGY Workflow system’s platform—contact your service representative.
To install the upgrade
Run the Prinergy Workflow installer on each server.
Allow sufficient time to perform the upgrade, and understand that you cannot process jobs through your Prinergy system during this time.
Note: When you are upgrading to Prinergy Workflow 9.0, you will need to have the Oracle 19 installer files as part of your upgrade for your Prinergy primary and any HotStandby (EPM+) servers. The Oracle 19 installer files are available on the 9.5 downloads page. If you are upgrading to Prinergy Workflow 9.5 from Prinergy Workflow 8.2 or earlier, you will need to have a rehost performed by Kodak to move your Prinergy system to a supported operating system. Prinergy Workflow 9.5 supports Windows 2016 and Windows 2019. Support for Windows 2016 was introduced with Prinergy 8.3.
Important:
- If at any point during the upgrade, you see a pop-up message to “Retry” or “Cancel”, DO NOT Cancel. Leave the message up and contact your regional support organization.
- Before you perform the upgrade, restart all of the Prinergy servers.
- Exit Prinergy Administrator (UADM).
- When upgrading Prinergy in a VOE deployment, create a snapshot of the Prinergy VOE just prior to performing the upgrade. Creating a snapshot is a quick way to create a restore point of their system to a known-good working state if the upgrade fails for some reason. If a problem is encountered, the snapshot can be restored with little effort to bring the system back online.
- When upgrading a secondary server, you must upgrade the primary server first. If your system has a secondary server configured as a Hot Standby (EPM+) failover server and you do not upgrade the primary server first, Hot Standby will fail.
- Before upgrading the primary server on a system with Hot Standby, go to Windows Services on both primary and EPM servers and STOP the Double-Take and Double-Take Management services and CHANGE them both to Disabled. They must remain Disabled until the failover server has been upgraded. Once the upgrade of the failover server is completed, go to Windows Services on both primary and EPM servers and CHANGE the Double-Take service to Automatic and start it, then CHANGE the Double-Take Management service to Automatic (Delayed Start) and start it. For additional information, see Upgrading the servers in a Prinergy Hot Standby system running on Windows 2016/2019 operating system with Double-Take 8.2.
- The installer consists of two packages (such as
Prinergy_9.0.0.BLD123.exeandPrinergy_9.0.0.BLD123_part2.zip). The.zipfile must remain zipped and in the same location as the.exefile. - The Oracle 19 installer ZIP file should be located with the Prinergy installer files as well and should be unzipped to make for a simpler upgrade install process.
- Create a folder on J drive called Prinergy9 (Important - the folder name must not include any spaces REF: PRINERGY-52139). Copy installers and Oracle.zip to folder.
- Disable any anti-virus software that is installed on the server for the duration of the upgrade. If it is not disabled, the upgrade may fail because there are scripts that the upgrade needs to run which the anti-virus software may block.
- If subscribed to Kodak Cloud services, the Kodak Cloud Agent service must be stopped on the primary server before upgrading.
To stop the Kodak Cloud Agent service:- Go to Start > Administrative Tools > Services.
- Locate the Kodak Cloud Agent service, right-click it and select Stop.
- Unzip the Oracle 19 installer ZIP file maintaining the folder structure in it. Later when prompted for the location of the Oracle installer, provide the location of the top level folder. It should contain two sub folders:
OracleClient_19.0.0.0_x32&OracleClient_19.0.0.0_x64.
Note: Do not launch the Oracle installer. The Prinergy installer will launch the Oracle installer as part of the installation process. - To upgrade your server, double-click the installer (
.exefile such asPrinergy_9.0.0.BLD123.exe) and follow the on-screen instructions.- If you have a version of Miscrosoft Visual C++ redistributable greater than version 10 redistributable already installed on your server, when installing Prinergy, you may encounter a message that states
Failed to install VC10 Native Runtime Library Redistributable Package. If you encounter this message, you can continue to the Prinergy installation by clicking OK in the message dialog box. The Prinergy installation process will proceed and should complete without error. Prinergy should start and run as normal once the installation has completed.
- If you have a version of Miscrosoft Visual C++ redistributable greater than version 10 redistributable already installed on your server, when installing Prinergy, you may encounter a message that states
- If a new license key is required for the upgrade, the Add License Key dialog box is displayed. If you have not previously installed a version of Prinergy that uses software-based licensing, you will need to enter your License ID. If you have previously installed a version of Prinergy that uses software-based licensing, then the License ID box should already be populated.
- Verify that your correct License ID is displayed in the License ID box.
Your License ID is the same as your Prinergy Workflow serial number which takes the form YCxxxxx or YCxxxxx-xx. If you do not know your Prinergy Workflow serial number and you have a Partner Place account you can look it up by performing the following actions:
Note: If you do not have a Partner Place account but do have a support plan that entitles you to the Prinergy upgrade, register at https://partnerplace.kodak.com/, and then perform the following actions.- Log on to Partner Place at https://partnerplace.kodak.com/.
Go to Service & Support > Product Registration and License Activation > View registered products.
Select your site. A list of registered products appears, including the serial number for your Prinergy Workflow system (in the form YCxxxxx or YCxxxxx-xx).
- Verify that your correct Partner Place username is displayed in the Partner Place username box.
Note: If required, you can create a new Partner Place account or change the one you are using, by clicking the Create\Update Partner Place username link. - Select the License Key option.
- Click Retrieve License.
- Perform one of the following actions:
- If your Prinergy server is able to communicate directly with PLAS, then your license(s) will be retrieved and you can now upgrade your system. Proceed with step 17.
- If your Prinergy server is behind a firewall or otherwise unable to communicate directly with PLAS, proceed with step 8.
- If Prinergy cannot reach the server for automatic license retrieval it will provide you with the opportunity to save an XML license request file. Save the XML license request file and transfer it to a system that has internet access.
- In a web browser, go to: https://ecentral.kodak.com/productregistration/FileUpload.aspx.
- On the web page, click Browse in Microsoft Internet Explorer, or Choose File in Google Chrome.
- In the browser that opens, navigate to the location of your XML license request file, select it and click Open.
- To submit your license request file, on the web page, click Upload file.
An XML license response file is created. - Save the XML license response file and transfer it to your Prinergy primary server.
- In Prinergy Administrator, in the Add License Key dialog box, select the Load License key from file (main/trial) option.
- Click Browse and navigate to your XML response file.
- Click Read File.
- After the license appears in the License Key box, click Apply.
- Your Prinergy system is now licensed. Click Next, and proceed with the rest of the upgrade process.
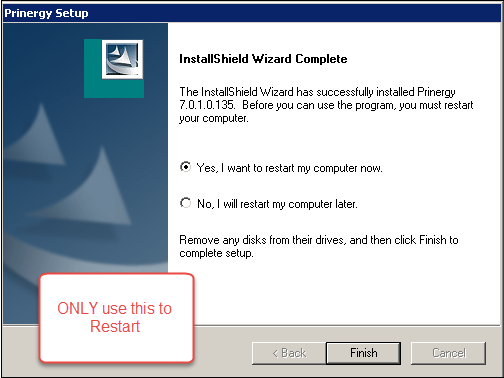
- When the following screen appears, select Yes, I want to restart my computer now., to restart the server.
- After upgrading the server and before starting Prinergy, verify that the IP address for this server to use is configured. To do so, perform the following actions:
- Go to Prinergy Administrator > Tools > Configure System.. > Network Cards.
- If there is no IP address displayed next to the Prinergy IP Address label or it does not show the correct IP address, select the correct address from the IP Address list and confirm the change by clicking OK.
- If prompted, restart the server.
- Start Prinergy to complete the upgrade process.
- Re-enable any anti-virus software that was disabled in step 1.
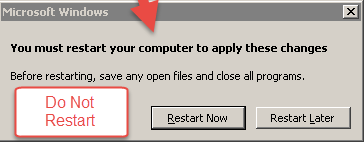
Important: During the upgrade you may see a Windows pop-up message asking you to Restart Now. DO NOT restart the server. Restart the server only when you see the InstallShield Wizard Complete screen (see step 22).