This process template section determines how marks are handled during CT/LW output to a Karat digital press.
Extra Margin for Marks and Bleed
When calculating the position of pages, additional space is included for marks and the bleed, if indicated.
Provide margin values for Left, Right, Top, and Bottom margins, in the selected unit of measure.
Bleed for Unassigned Pages
Prints a bleed line when proofing PDF pages that have not yet been assigned to a position of an imposition plan. When assigned pages are proofed, the bleed lines are taken from the imposition plan.
Provide values for Left, Right, Top, and Bottom in the selected unit of measure.
Crop Distance Beyond Bleed for Pages
Creates an additional margin beyond the bleed marks to allow output of the software information that is positioned outside the bleed.
Provide values for Left, Right, Top, and Bottom, in the selected unit of measure.
This value, and any value that extends the crop beyond the page size, allows the entire page image to be output (up to the page size defined by other layout measurements).
A negative value moves the crop inside the bleed by the specified amount.
If the pages are assigned to page positions linked to an imposition plan, this value is added to the bounding box defined on the imposition plan. If the assigned page positions are linked to multiple imposition plans, the largest bounding box is calculated and this value is added to the calculated measurement.
Default Marks Font
Prinergy can populate variable marks with double-byte characters such as those found in Japanese, Chinese, and Korean.
Here's an example of how you could use the feature:
- Create a Preps imposition file that includes a variable mark, such as
$[PageName]. - In Prinergy, in the Marks section of the imposition output process template, in the Default Marks Font box, type the exact name of the double-byte font that can be used in case the variable mark's original font was not a double-byte font. The font must reside either in a Prinergy-aware font folder or in the job's font search path.
- Submit the imposition file to Prinergy.
If the imposition file contains a page name with double-byte fonts, Prinergy outputs the file with these characters.
- Create a Preps imposition file that includes a variable mark, such as
Sheet Marks
Identify the name and location of a PDF file containing sheet marks (for example variable marks, logo, and signoff line). Click Browse to locate and select a file.
Include print curve in calibration
When this check box is selected, the plate curve and print curve are applied to the mark. The curves applied are the ones selected in the Plate Curve list and Print Curve list in the Calibration & Screening section of the process template. When this check box is cleared, only the plate curve is applied. To prevent the application of the plate curve to a mark, select %%None%% in the Plate Curve list in the Calibration & Screening section of the process template.
Locate Sheet Marks Adjacent to
(See Sheet marks options explained and Sheet marks on final output.)
Select Left, Right, Bottom, or Top to determine on which edge of the paper or plate a sheet mark is placed.
The default setting is Bottom.
at Distance
(See Calculating the at distance value on final output.)
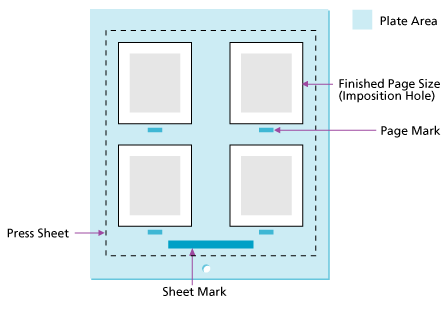
Determines where, relative to the edge, the mark is placed:
- Sheet marks are placed relative to the plate edge. Depending on the distance you type, you can place the sheet mark on the press sheet or on the plate.
- Page marks are placed relative to the finished page size (the imposition hole).
Justified
Select Left, Center, or Right to determine the justification for the sheet mark.
The default value is Center.
Page Marks
Identify the name and location of a PDF file containing page marks. Click Browse to locate and select a file.
You may need to provide space for page marks by increasing gutter measurements.
The variable mark $[PagePositionNumber] or $[PPN] can be used to verify that the pages are in the correct page set positions in the imposition.
Calibrate
When this check box is selected, the plate curve and print curve are applied to the mark. The curves applied are the ones selected in the Plate Curve list and Print Curve list in the Calibration & Screening section of the process template. When this check box is cleared, only the plate curve is applied. To prevent the application of the plate curve to a mark, select %%None%% in the Plate Curve list in the Calibration & Screening section of the process template.
Locate Page Marks Adjacent to
Select where to place the page marks in relation to the page's trim box.
When you select Right or Left, the page marks rotate as follows:
- Left—rotates the mark 90° counterclockwise
- Right—rotates the mark 90° clockwise
- Bottom—no rotation
- Top—no rotation
at Distance
(See Calculating the at distance value on final output.)
Determines where, relative to the edge, the mark is placed:
- Sheet marks are placed relative to the plate edge. Depending on the distance you type, you can place the sheet mark on the press sheet or on the plate.
- Page marks are placed relative to the finished page size (the imposition hole).
Draw Trim and Bleed Marks
Determines where, in relation to each page, trim and bleed marks should be placed. Trim and bleed marks are created in registration color and are 0.25 points in weight. Bleed marks are solid lines; trim marks are dashed lines. Trim marks are drawn according to the option selected:
None—trim and bleed marks are not drawn.
On Content—trim and bleed marks are drawn on the content (complete trim marks are drawn on the proof).
Outside Content—trim and bleed marks do not extend to the content (only the four corners appear on the proof).
Note: In order to print bleed lines on loose page output, the page must be assigned to a page set that is linked to an imposition plan. The bleed lines are taken from the imposition plan.
Safe Protect Box
The safe protect box enables you to print proofing lines within the trim box (or media box) on a proof to check that the page content is within the page margins. The safe protect box is drawn on the proof inside the trim or media box.
This feature is available in the loose page output and imposition output process templates when the Draw Trim and Bleed Marks option is set to On Content or Outside Content.
Note: If you select Output To Virtual Proof, you can select the Safe Protect Box check box even if you select None for Draw Trim and Bleed Marks. In this case, you can view the safe protect box in the Virtual Proofing System software. The safe protect box is not printed on the proof.
Select the Safe Protect Box check box and in each of the Left, Right, Top, and Bottom boxes, type the distance from the trim or media box that you want the safe protect lines to appear. You can type different numbers in each of the four sides.
When calculating where to place the safe protect lines, note that Prinergy measures from various starting points as shown in the following table.
Proof | Safe protect box is measured from this location |
Imposition | The imposition hole trim box |
Loose page |
If a PDF page includes trim, it appears in the Trim Size column in the Pages pane of the Pages view. Note: If the PDF page does not include trim, you can define it using the Prinergy Geometry Editor plug-in for Adobe Acrobat. After the trim is defined, refine the page again. |
The lines of the safe protect box are drawn according to the option selected for trim and bleed marks:
- If you selected Outside Content, only the four corners of the safe protect box appear on the proof.
- If you selected On Content, the complete box is drawn on the proof.
Note: If you entered information for Trim Adjustment, the Safe Protect Box dimensions are calculated based on the Trim Adjustment dimensions.
Trim Adjustment
If you are using pages that have no trim or an incorrect trim box, in the Trim Adjustment area, type the distance from the edge of the page that you want trim lines to appear in each of the Left, Right, Top, and Bottom boxes.
You can type different numbers in each of the four sides.
Trim Adjustment is available only when you select Draw Trim and Bleed Marks, and On Content or Outside Content.
Note: If you enter information for Trim Adjustment, the Safe Protect Box dimensions are calculated based on the Trim Adjustment dimensions.
Locate Crop Mark of Length
Available if On Content or Outside Content is selected in the Draw Trim and Bleed Marks box.
Determines the length of the crop marks to be drawn, in the selected unit of measure.
The at Distance box determines how far away from content to draw the crop mark.
at Distance
Available when On Content or Outside Content is selected in the Draw Trim and Bleed Marks box.
Determines how far away from content to draw the crop mark.
Unit Used for Variable Marks
Select the unit you want to use to measure variable marks—inch, cm (centimeter), mm (millimeter), or pts (points).
Slugline
A slugline mark is a text or variable mark that you place on loose page, imposition, or final output. Instead of using Sheet Marks or Page Marks, you can use Slugline to quickly place a slugline mark.
A slugline mark does not need a PDF file, so you can easily place a mark without creating a PDF file. However, a slugline mark is just a line of text or a variable mark. You can only specify the text size.
- In the Slugline mark box, type the text or variable mark.
- In the Text size box, type the font size for the mark.
- In Place on media, specify the distance from left and from bottom.
- In Rotation, select 0, 90, 180, or 270 to rotate the mark counterclockwise in 90-degree increments.
From: (Left, Center, Right)—sets the horizontal alignment of the slugline mark and the origin edge that the From setting shifts the content from.
From: (Top, Center, Bottom)—sets the vertical alignment of the slugline mark and the origin edge that the From setting shifts the content from.
Note: If you are using a variable mark in your slugline, the _offset and _replace parameters and any page-oriented variables parameters and barcode variables, are currently not supported.
Replace variable marks in PDF content files
Select this check box to enable variable text marks (for example, $[color] or $[job]) to be replaced when those marks are found in content PDFs placed within an imposition. Content PDFs are PDFs which make up the content of the finished product, the printed, cut, and bound page(s).
Clearing this check box means that only variable marks in mark PDFs will be replaced and that any variables present in content PDFs will be left as is. For example, if $[color] appears within a content page it will still appear as $[color] in output.
IMPORTANT: When using this setting you must follow the procedure outlined in Partner Place Answer ID 69302. Failing to do so could result in serious output problems.