If you are printing signature booklets on more than one duplexing laser printer, create an imposition output process template for each printer. The settings in the process template are device-specific, so you cannot share imposition output process templates among several printers.
Because there is only one Windows Print Manager document for each signature booklet, you cannot load-balance the printing ofsignature booklet among several printers.
Note: Be sure to test each process template on its specified printer.
- Plan the signature booklet format and connect the printers.
- In any window, from the Tools menu, select Process Template Editor.
- In the Process Template Editor dialog box, right-click the Imposition Output group and select New Process Template Group.
- Name the new imposition output group Signature Booklets.
- Open an existing imposition output process template from within the Mockup group.
- From the File menu, select Save As and save it in the new Signature Booklets group.
You may want to name it according to the output format or output device—for example, 1-up_8.5x11_Turn_HP5Si or 2-up_Digital_PDFRaster_100dpi.
- In the Output To list, select the output format of the signature booklet.
- If you are outputting to a black-and-white printer, expand the ColorConvert section and set the following options:
| Options | Instructions |
|---|
Match Colors in Page Content | Clear the check box. No input profiles are required. |
Proof Process (Destination) profile | Select the output ICC profile as follows: - Click Browse.
- In the File Browser dialog box, browse to the ICC profile:
%ServerName%\%AraxiHome%\CreoAraxi\data\ICC-Profiles\gray\GenericGray.icm
|
- Expand the Layout section and set the following options:
- In the Media area:
| Options | Instructions |
|---|
Size | Select the paper size: - If outputting to a printer, select Cut Sheet.
- If outputting to a file, select Digital.
|
Max Width and Max Height | These options apply only if you are outputting directly to a printer. - In the Max Width box, type the width of the paper and select the unit of measure from the list.
- In the Max Height box, type the length of the paper and select the unit of measure from the list.
The values you type in these boxes must match the laser printer's paper orientation (portrait or landscape). Portrait: 
Landscape: 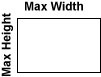
- For example, for a 1-up portrait orientation, you would type
210 mm (8.5 inches) in Max Width and 297 mm (11 inches) in Max Height. - For example, for a 2-up landscape orientation, you would type
420 mm (17 inches) in Max Width and 297 mm (11 inches) in Max Height.
|
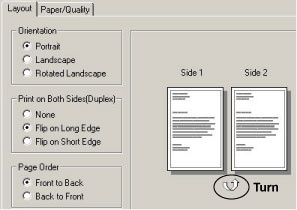
Duplexing | This option applies only if you are outputting to a printer. Match the laser printer's duplexing style as follows: - If the paper orientation is set to portrait and the duplex style is set to flip on the long edge, select Turn.
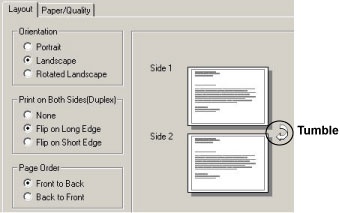
- If the paper orientation is set to landscape and the duplex style is set to flip on the long edge, select Tumble.
|
- In the Placement area:
| Options | Instructions |
|---|
Orientation | Select 0º. |
Center Along Width | Select this check box to center the page horizontally. This check box must be selected for the signature booklet to output correctly. |
Center Along Height | Select this check box to center the page vertically. This check box must be selected for the signature booklet to output correctly. |
- In the Scaling area:
| Options | Instructions |
|---|
All options | Clear all options in this area. |
- In the Signature Booklet area:
| Options | Instructions |
|---|
Enable Signature Booklet | Select the check box to make the signature booklet options available. |
Type | Select how many pages will output on the sheet: - To output two PDF pages per sheet (one front and one back) in reader order by signature, select 1-up.
- To output four PDF pages per sheet (two front and two back) in reader order by signature, select 2-up.
|
Document Binding | This list becomes available when you select 2-up from the Type list. Select Left, Right, Top or Bottom. |
Use and with Offset | Select Bleed Box or Trim Box. Determines how much of the area around the page's bleed or trim box to include when printing. You can increase the offset amount to see the bleed area, gutters, imposition and page marks, and parts of neighboring imposed pages. Be sure the output sheet is large enough to accommodate both the pages and the bleed or trim offset amount. - To print with only the final bleed or trim, type
0.0. - To image content outside the page's bleed or trim box, type a positive value and select a measurement from the list. The offset amount you choose depends on the size of the gutter. Typically 6 to 13 mm (0.25 to 0.5 inches) is sufficient.
|
Duplex Offsets | This option applies only if you are outputting to a duplexing printer. Adjust for the mechanical misalignment in the laser printer's unit. There are alignment test targets that you can run that measure how far off the front and back are from center. Use the Front X and Y and Back X and Y values to compensate for any misalignments. Select the units of measure in the list. |
Page Marks | Identify the name and location of a PDF file containing the page marks. Click Browse to locate and select the marks file. The variable mark $[PagePositionNumber] or $[PPN] can be used to verify that the pages are in the correct page set positions in the imposition. |
Calibrate | Select this check box to apply calibration curves to the marks. The calibration curve is set in the Calibration Curve list in the Calibration & Screening section. |
Locate Page Marks Adjacent To | Select where to place the page marks in relation to the page's trim box. When you select Right or Left, the page marks rotate as follows: - Left—rotates the mark 90º counterclockwise
- Right—rotates the mark 90º clockwise
- Bottom—no rotation
- Top—no rotation

|
at Distance | Place the page marks just outside the bleed box. Otherwise, the page mark may get associated with an adjoining page, or it may overprint onto another page. You may need to increase the Use > Trim Box with offset amount to see the page marks. |
- Expand the Render section and set the following options:
| Options | Instructions |
|---|
JTP | Select a proofing job ticket processor (JTP). |
Resolution X and Resolution Y | Select the output resolution for both the X (horizontal) and Y (vertical) axes. |
- Complete any remaining options in the Render section according to the output device.
- Configure the Calibration & Screening section according to your output device.
- Expand the Device section and set the following options:
| Options | Instructions |
|---|
Output Type | Select the output type and specify its location: - If outputting to a printer, select Absolute File or Printer and either type the printer name or click Browse and browse to the printer location.
- If outputting to a file that will be stored on a mounted volume, select Absolute File or Printer, click Browse and browse to the location.
- If outputting to a file that will be stored in the job folder, select Job-Relative File and type the folder name.
Important: Do not select Submit as Multiple Print Job. If this check box is selected, the signature booklet will output one page at a time. |
- Expand the Processed File Options section and set the following options:
| Options | Instructions |
|---|
Use Prinergy-define File Naming | If outputting to a printer, select Use Prinergy-defined File Naming and keep the remaining options at their default settings. |
Use Custom File Naming | If outputting to a file, do one of the following: - Select Use Prinergy-defined File Naming and keep the remaining options at their default settings.
- Select Use Custom File Naming and in the Filename Template box, type the file name tags.
Exception: If you are outputting to single-page PDF files, you must select Use Custom File Naming and include the variable tag %outputsheetnum% as part of file name template in the Filename Template box. Otherwise, the pages will overwrite each other. |
- Expand the Marks section and set the following options:
| Options | Instructions |
|---|
Draw Trim and Bleed Marks | Select the On Content option. |
Locate Crop Mark of Length | Type the length of the crop mark, and select the unit of measure from the list. |
at Distance | Type the distance of the crop mark from the trim box. |
- If you selected a PDF file format in the Output To list (for example, PDF Raster or PDF Vector), expand the File Format section and set the following options:
| Options | Instructions |
|---|
Document Format | Select how you want the PDF files saved: - If you want all pages of the signature booklet in one file, select Multi Page.
- If you want each page in the signature booklet saved as a separate file, select Single Page.
Important: If you select Single Page, include the variable tag %outputsheetnum% in the Filename Template box. (in the Processed File Options section—see the Exception above.) Otherwise, each page will overwrite the previously saved page. |
- Complete the remaining options in the Device section according to the requirements of the output type selected in the Output To list.
Note: The available options in the File Format section change depending on what you select in the Output To list.
- From the File menu, select Save.
- From the File menu, select Close.