Add collation marks to identify the planned sequence of the sections in a product assembly, based on the binding style. If you change the page count or renumber the pages, the collation marks adjust automatically. You can place collation marks in the trim or content areas, anchored to low, high, or mid folio pages of product sections. The marks can be trimmed off after the collation is checked at the bindery.
You can also create static collation marks.
Binding
Select the binding style, which determines the placement of the marks. Select None to define collation marks without binding style restrictions, based solely on the position with respect to the page, on all sides of page 1 in the press run.
Note: A collation mark whose binding style does not match that of the section will not image.
Type
Select a mark type that provides the desired character rotation and text-mark font.
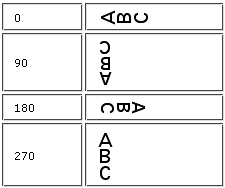
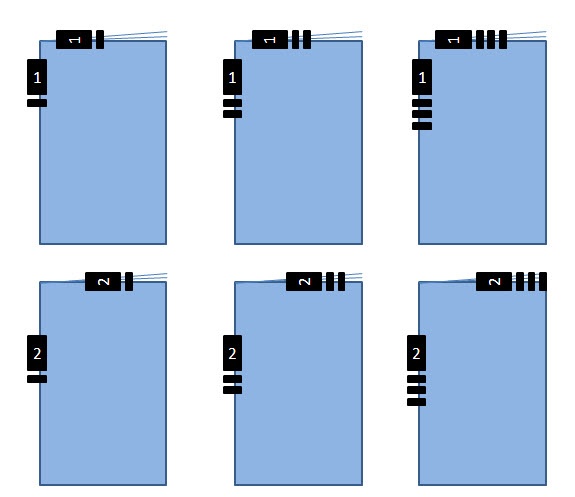
Collation Mark A: Numeric collation indicator inside the mark, rotated 90 degrees
Collation Mark B: Numeric collation indicator inside the mark, no rotation
Collation Mark C: No collation indicator inside the mark
Collation Mark A-123: Numeric indicator that shows the signature number stacked in a column, when the value is two digits or higher; available when creating a new smart collation mark
JA, ZH, ABC: Japanese, Simplified Chinese, Roman characters. Your selection applies the corresponding text-mark font that is defined on the Marks tab in the Preferences dialog box.
Collation Mark A-JA (rotated 90 degrees): | Collation Mark B-ZH (no rotation): |
Origin
Select the edge from which to offset the collation mark. The available options are determined by the binding style.
Note: You can also set a Step collation mark from offset origin option on the Marks tab in the Preferences dialog box.
Width
Specify how wide each mark will be.
Length
Specify the distance from the starting point that can be used by the stepped collation marks, after which the next mark is placed at the starting point again.
Step distance
Specify the distance between the optional text and collation mark, which can be positive or negative, but not zero.
Optional Text
Type any text that is to trail the mark, and print in the same color as the mark. You can use regular text and text-mark variables.
Note: The font used in the optional text is not affected by the type of collation mark.
Script
Select Roman or CJK to set the corresponding text-mark font that is defined on the Marks tab in the Preferences dialog box.
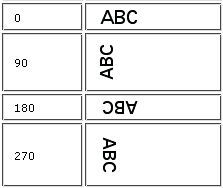
Vertical Text
Select this check box if vertical characters will be used in the marks. The appearance of vertical characters depends on the mark rotation.
Rotation when Vertical Text is selected:
Rotation when Vertical Text is not selected:
Step optional text with mark
Select this check box if you want the trailing text to step along with the mark. Clear this check box if you want the text to appear at the same position on all job signatures, such as for multi-section impositions.
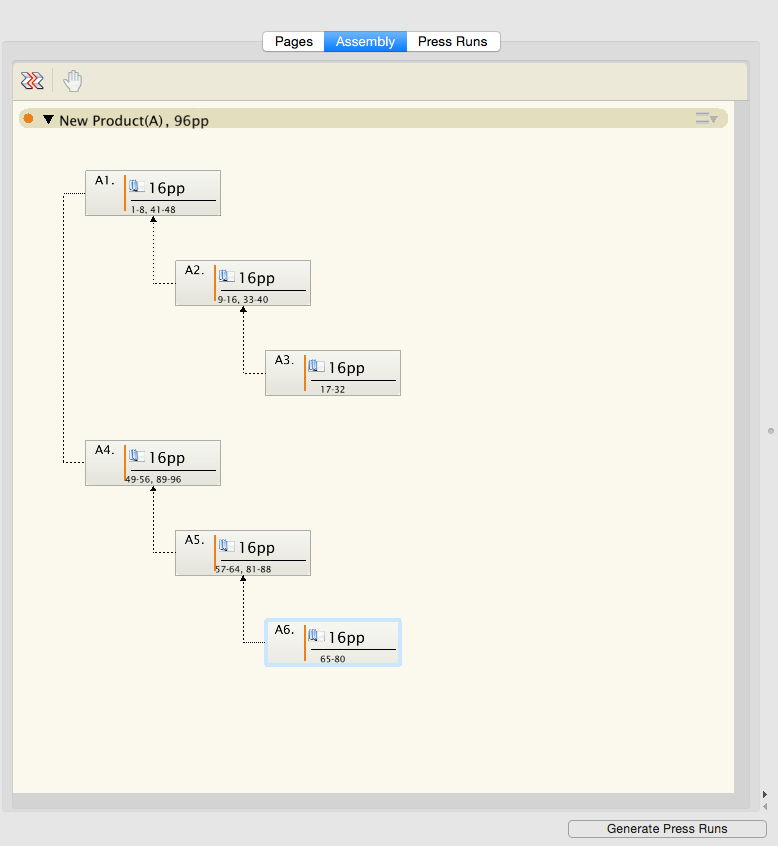
Mixed Binding Collation mark
This can be used when your production includes signatures made up from different binding styles—for example, you have two perfect bound signatures that are made up from three saddle stitched signatures each. The perfect bound signatures are the top level and each will get a signature number for the collation mark. The saddle stitched signatures get the same signature number as the parent and a tic line below indicating its number within the parent signature. The image depicts the scenario in the example: the collation marks added with the section assembly.
Static collation marks
You can also add static collation marks to Preps jobs or templates. These marks can only be added through the Resources > New Mark > Static Collation Mark menu item and they cannot be saved as a resource—they can only be saved in a template or a job. They cannot be used in mark rules. You will need to specify the following parameters:
Type
See above.
Mark Position
Select the Center mark on point check box to center the mark on an X and Y access position on the sheet. Clear the check box to position the mark from the Left and Bottom of the sheet.
Left or X Ctr
Enter the distance that you would like the mark to start from the left edge of the sheet or the X Ctr value to center the mark on a point.
Bottom or Y Ctr
Enter the distance that you would like the mark to start from the bottom edge of the sheet or the Y Ctr value to center the mark on a point.
Width
Specify how wide each mark will be.
Length
Specify the distance from the starting point that can be used by the stepped collation marks, after which the next mark is placed at the starting point again.
Step distance
Specify the distance between the optional text and collation mark, which can be positive or negative, but not zero.