You manage access to the system by creating Users and assigning them Roles which grants permissions for specific actions.
A User can be a Staff User, an employee of the Access host company, or a Customer User who accesses the services of the host company.
Configuring Users for PRINERGY Access
You can manually add Users one at a time, or you can use the Import function to import a list of names from an Excel Spreadsheet.
Importing Users
Go to the Administration tab in PRINERGY Portals
- Select Users
- Click Import to get the following dialog:
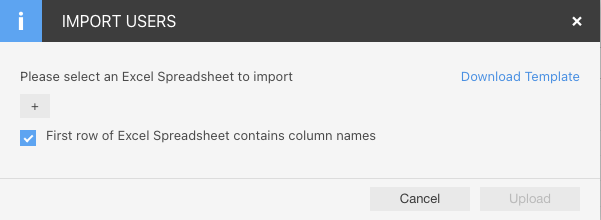
- You can press the + button to open a User Import Template that has been populated with User Names and relevant information.
- You can click the Download Template button to get a sample pre-formatted spreadsheet, to use as a guide for entering User information.

- Make sure to check First row of Excel Spreadsheet contains column names
- Users will be imported
- Imported Users can be selected and edited.
Manual Entry of Users
Go to the Administration tab in PRINERGY Portals
- Select Users
- Click Add to create a new User, or click on an existing User Name to edit the User.
- The User Info tab will be selected by default
- Select Staff User or Customer User from the User Type drop-down menu. The choices you then have depend on the User Type selected.
Staff User
User Info tab
- Select Staff User as the User Type
- Enter a Username.
- Enter First Name and Last Name.
- The Company will be hard coded to the Tenant Host name and cannot be changed.
- Ink Manufacturer is used only for PRINERGY Portals Ink Analytics, and is not relevant to PRINERGY Access.
- Select Is Contractor if a user is only going to be temporary, and set from and to dates to limit their access.
- Plant is used only for PRINERGY Portals Analytics, and is not relevant to PRINERGY Access.
- Enter the user Email address
- Select the Email Language from the drop-down menu
- Enter any relevant Comments in the entry box
- Proceed to the Email Subscriptions tab
Email Subscriptions tab
- Check Enable Event Notifications if the User is going to be an Administrator and wants to be alerted to User edit events
- Optionally select
- User Created
- User Info Modified
- User Deleted
POD Role tab (PRINERGY Portals Roles)
- Select a Role for the User by clicking the radio button beside the Role name.
• As you select each Role, the rights for each Role will display in the Rights of customer user panel on the right•
• You can only select one Role for each user.
• There is only one mandatory Right that must be selected in a Role for a PRINERGY Access User and that is PRINERGY Access - View
• Roles cannot be created or modified in this tab. POD Roles are created and edited under Roles in the Administration tab.
PA Role tab (PRINERGY Access Roles)
- For Staff Users, you can set PA Roles for all customers, or you can set different Access Roles for different Companies.
- The default setting assigns a PA Role for All customers.
- Click on Customer Access... if you wish to configure different User Roles for different Customers
- Select a Role for All customers/Individual Customers by clicking on the drop-down menu under the Role column.
- To see the Rights of each PA Role, click on the Info icon
 beside each Role
Customer User
User Info tab
- Select Customer User as the User Type
- Enter a Username.
- Enter First Name and Last Name.
- Enter the user Email address
- Select the Email Language from the drop-down menu
- Enter any relevant Comments in the entry box
PA Role tab (PRINERGY Access Roles)
- Click on Customer Access... to select the Company of the User
- Select a Role by clicking on the drop-down menu under the Role column beside the Customer
- To see the Rights of the assigned PA Role, click on the Info icon