You can color approve or reject files in Smart Review or on the web UI, if enabled for your customer.
Requirements:
- You must have a project role that includes the Use Matchprint Virtual user right.
- To set the status for color approval tasks, your project role must include the Approve Tasks user right.
Note: For more information about viewing your tasks, viewing tasks on the Manage Tasks page, and viewing files in Smart Review, see the InSite Creative Workflow Quick Start Guide.
Using the Safari web browser, from the My Tasks view, the Manage Tasks view, or the Projects view, click a thumbnail of an element you want to review for color accuracy.
The element opens in Smart Review.
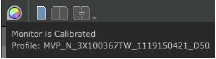
Important: Make sure that the active task that is displayed in the Task list is for your color approval task.On the view and zoom toolbar, make sure that the MV indicator shows the monitor as calibrated and there is not a big red X covering the element.
Click the Color Target icon that appears under the MV indicator and make sure that it displays the color target that is in use.
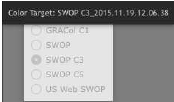
Note: It is not possible to change the color target during a color task when a color approval task is active.
If you want to see the annotations that have been added, click Preferences and in the Full Screen area, select the Show Annotations check box. Then, click Done.
Click the Full Screen button.
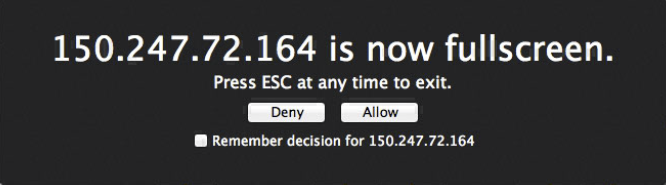
To view the page in full screen, click Allow. (Optional) Click the Remember decision for <server name> check box if you want to always allow full screen mode on this server.
The element appears in actual size (1 inch on the monitor is equal to 1 inch on the element). If your monitor is smaller than the actual size of the element, you must move the element around to view color. To move the element around, click the element, and, when a hand icon appears, drag the element to view another section.Important: It is not possible to annotate in Full Screen mode since Safari does not allow keyboard input due to security issues.
Review the element for color quality. To annotate the element as well as approve or reject color, exit Full Screen mode by pressing Esc (Escape). If you want to continue to review additional elements, click the right arrow key. To return to the previous element, click the left arrow key.
For more information about using Smart Review, see the Smart Review Help.
Smart Review
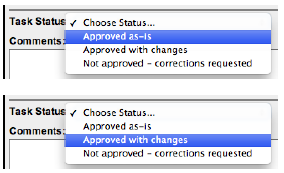
Approving color
Approve | Reject |
|---|---|
|
|

Web UI
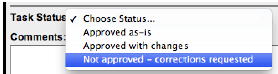
Approving Color
Approve | Reject |
|---|---|
Note: If the voting restriction option is selected for the customer, you cannot set the status to Approve as-is if you have added an annotation. Also, you cannot add comments |
Note: If the voting restriction option is |