The MVCalibrator Light Box tool allows you to achieve an excellent visual alignment between hard copy and virtual proofs.
To set the correct luminance of the viewing booth, the monitor must have a fixed luminance, correct light source selected, and calibrated to that fixed luminance and light source.
- Place the reference SWOP C3 or Fogra39 white paper in the same position that you use for viewing hard copy proofs (flat on the viewing surface for press consoles, or vertical on the back wall of desktop viewers).
Note: The reference white paper is available in the Kodak Reference Proof kit. - At the Dock, click the Matchprint Virtual folder icon
 .
. - Select MVCalibrator and from the Light Box menu, select Light Box Tool.
- Follow the instructions on screen for zeroing your measuring device.
This step sets the baseline of the measuring device.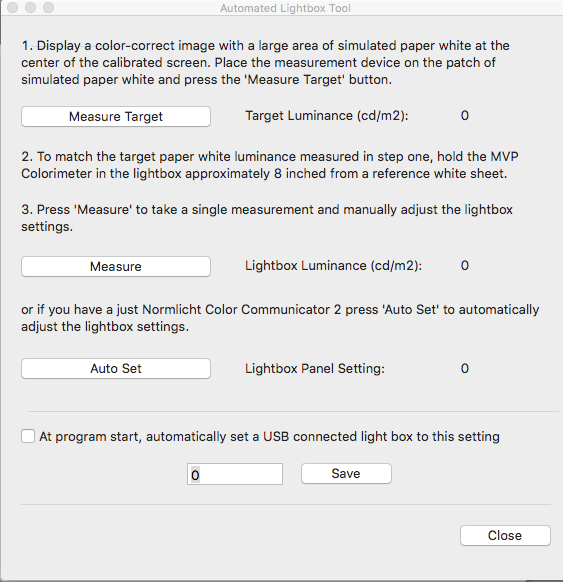
- If you are using a GTI viewing booth:
- In Smart Review or PressProof, open the MV Color Reference Proof.
Note: If you use PressProof and perform this step when in Full Screen Mode, click Command + F6 to access the Lightbox Measure tool. - Zoom in and move the image to have a large white area of 3 inches square or larger in the center of the screen.
- Position the measuring device on the monitor over the white section of the page.
- Click Measure Target.
To measure the reference white paper, perform one of the following:
For a portable light booth, secure the reference white paper to the back wall of the booth and hold the measuring device approximately 8 inches (20 cm) away from and perpendicular to the center of the reference white paper.
For a press viewing station, place the reference white paper on the table surface and hold the measuring device at a 45 degree angle approximately 8-10 inches away while pointing at the center of the reference white paper.
- Click Measure to take a luminance reading of your light booth. It is recommended that you take three to five readings to make sure that you are not moving your measuring device around.
- If the light booth luminance does not match (within 2-4 cd/m2), your target luminance, raise or lower the luminance of the light booth with the dimmer buttons.
- Wait about two minutes, and repeat the two previous steps until you get a match.
- When you have achieved light booth luminance, click Close.
- In Smart Review or PressProof, open the MV Color Reference Proof.
- if you are using JNL viewing booth, follow the instructions below:
- In Smart Review or PressProof, open the MV Color Reference Proof.
Note: If you use PressProof and perform this step when in Full Screen Mode, click Command + F6 to access the Lightbox Measure tool. - Zoom in and move the image to have a large white area of 3 inches square or larger in the center of the screen.
- Position the measuring device on the monitor over the white section of the page.
- Click Measure Target.
To measure the reference white paper, perform one of the following:
For a portable light booth, secure the reference white paper to the back wall of the booth and hold the measuring device approximately 8 inches (20 cm) away from and perpendicular to the center of the reference white paper.
For a press viewing station, place the reference white paper on the table surface and hold the measuring device at a 45 degree angle approximately 8-10 inches away while pointing at the center of the reference white paper.
Click Auto Set.
The viewing booth darkens. Do not move the colorimeter, it is adjusting the light. A spinning icon appears next to Lightbox Panel Setting, the icon indicates that the light booth luminance is still being adjusted and the value is changing. Do not move your measuring device until the icon disappears.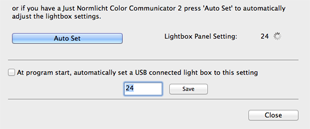
- (Optional) You can enable the option to automatically set the viewing booth at start up. The measuring device must be plugged in when using this option at all times.
- In Smart Review or PressProof, open the MV Color Reference Proof.
- When the required viewing booth luminance is achieved, in the Measure Lightbox dialog box, click Close.