Create a Layout Using Output PDF Process Template Options
In steps 5 and 6, your printing and finishing requirements should inform the options you select in the Page Placement and Layout Placement areas of the Layout section. Or, you can use the options suggested for the practice activity.
- In Prinergy Evo process template Editor, select the default OutputPDF-VPSFactory process template that was installed with the system. Open the process template and save it with a new name.
- From the Output To list, select PDF (Vector Output).
- Select and expand the Layout section in the new process template.
- In the Layout section, set the following options in the Media to set the size of your final output media (proofing media, film, or plate).
- In the Size list, select Cut Sheet.
- In the Max Width area, type
25 inchor625 mm. - In the Max Height area, type
28 inchor700 mm.
- In the Layout section, set options in the Page Placement area to determine how your PDF digital master files will be arranged relative to one another. For this activity, select the following options:
- Next to Type, select Top Left to Bottom Right.
- Next to Style, select N-Up.
- In the Number of Pages Across box, type
2, and in the Down box, type2. - Clear the Auto Distribute Vertically, Auto Distribute Horizontally, and Reduce Gutters if Required boxes.
- Set Vertical Gutter Width to
1 inchor25 mm.
This will allow you to see bleeds and marks included in PDF digital master files. - Set Horizontal Gutter Height to
1 inchor25 mm.
This figure illustrates gutter settings: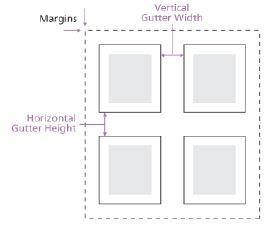
- In the Layout section, set options in the Layout Placement area to determine how your layout will be aligned and placed relative to the selected imaging media. For this activity, select the following options:
- In the Align Horizontally list, select Center.
- In the Vertically list, select Bottom.
These settings place your layout centered along the bottom or punch edge of a plate or film flat. The figure shows how the alignment settings position your layout relative to the media area.
- Set Shift Vertically to
1 inchor25 mmto allow space for plate bend.
You can change these settings to accommodate the production requirements of particular devices and printing presses in your working environment. The figure shows how Shift Along settings position your layout relative to the media area.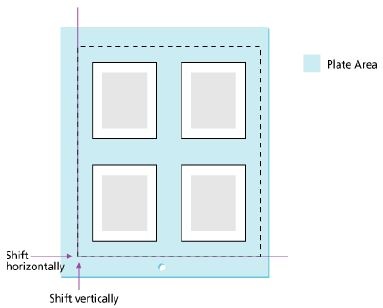
- Do not change other Layout Placement default settings.
- In the Layout section, in the Scaling area, clear all settings.
These settings may be suitable for some proofing output, but are not suitable for final output to film or plate. - In the Layout section, in the Marks area, set margins to control the area of the media beyond the limits of page trim size. This allows space for marks to print between the layout and the edge of the print sheet. For this activity, complete the Extra Margins for Marks and Bleed boxes as follows:
- Left:
0 inchor0 mm - Right:
0 inchor0 mm - Top:
3 inchor75 mm - Bottom:
0 inchor0 mm
- Left:
- Place a sheet mark at the top of the layout by selecting the following options in the Marks area:
- Next to Sheet Marks, click Browse and locate one of your company’s production marks. Or,, browse to the following default mark on your Prinergy Evo server computer: [PgyEvoConfig]\MarkSets\Sheet Marks\ColorProofers\Separated Proofs\SheetMark-Color-Sep.pdf.
- Select the mark and click Open.
- In the Locate Sheet Marks Adjacent to lists, select Top.
- In the at a Distance of list, type
0.5 inchor10 mm. - Do not change other Marks area default settings.
- Set the Processed Files Location to your desired location for completed files.
- Save and close the process template.
You can now use this process template to automatically lay out and output groups of PDF digital master files. This will allow you to streamline the production of jobs that have simple imposition requirements.
Output PDF using layout settings
- Refine input files to PDF digital master files that are ready for proof or final output.
If you do not have a sample file of your own, use theEvoITP_Fat.psfile from the ITP Files\Input Files folder. - From the Process Viewer Window menu, select Template Browser.
- In the Template Browser, locate the new process template created in the previous procedure.
- Locate your PDF digital master files and drag them to the new output PDF process template in the Template Browser.
- Monitor processing in Process Viewer. When the process is finished, locate your completed files.
Prinergy Evo has used the settings in the Layout section of the output PDF process template to create one PDF flat file for each four-page surface. You can now submit these PDF flat files to a suitable 4-up output device, such as a proofer, a platesetter, or a filmsetter.
If you used the supplied files, your output files will be named:EvoITP_Fat.1A.PDF,EvoITP_Fat.1B.PDF,EvoITP_Fat.2A.PDF, andEvoITP_Fat.2B.PDF. - Open and view the plate-ready PDF flat files in Acrobat.