Overview
Output from PDF differs from output from imposition, mostly in that output from PDF is assumed to be single-sided and is usually used for page proofing. If you create imposed output using layout software such as QuarkXPress and InDesign, Prinergy Evo treats those flats as single pages, and you should use output from PDF to create your output. Multiple pages can be output to a single piece of media with loose-page output, but they are generally not used for finished products.
Page Positioning Using Output from PDF
Because output from PDF works with individual pages, Prinergy Evo builds single-sided layouts on-the-fly based on instructions in the process template. These settings include the type of layout (single page, n-up,auto-fit), gutter, margin settings, and so on. Depending on the media type that you select (Digital, Cut sheet, Roll fed) different layout options are available. All of these settings determine how the pages are positioned together on the output media or file.
A layout is created based on pages submitted together to a process. Once the software determines the layout, it uses the alignment and orientation settings to position the layout to the media defined in the process template. If not all the pages fit on the defined media, then pages are grouped into multiple surfaces.
When you select Digital, the size of the submitted pages and the layout settings determine the output size and how pages are arranged relative to each other. As the layout is assembled, the output size is defined.
Cut sheet defines an area that the layout is positioned within. In otherwords, the layout is created and then positioned and fit to the output size.
You can choose to use the trim box or the media box of submitted PDF files when creating your layout. Using the PDF Box To Use list in the Media area of the process template, you can define where gutters and margins start from in the layouts using either the trim box or media box of the page(s). If you select Media Box in the list, layouts are larger and appear to have larger gutters and margins than those using trim boxes because the media boxes start farther out from the page content.
In contrast, for files created in output from imposition process templates, pages are positioned within the layout based on the imposition software.
Layout Types
Prinergy Evo offers a number of different ways to create the layout. These are Top Left to Bottom Right, Saddle Stitched Booklet, and Step and Repeat. Each has multiple options, which are covered in the following sections.
Top Left to Bottom Right
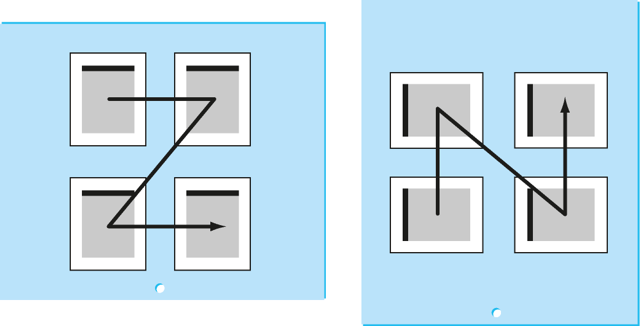
Top Left to Bottom Right positions submitted pages into columns and rows in a grid, with the size of each column and row defined by the largest page in that column or row. The layout starts by positioning the first page at the top left of the layout (not the defined media). If you apply a heads-left rotation to the layout, then the top left of the layout appears in the bottom left of the defined media. The layout is essentially independent of the defined media.
There are two ways layouts are created for this setting: N-up and Auto-Fit. They represent two ways that pages can be positioned witheach other.
N-up (top left to bottom right)
N-up is available for Digital and Cut sheet media. N-up defines a set number of pages to be fit into a layout. The default setting is 1 ×1, which creates single-page output. If you type 2 × 2, this creates 4-up output. The sizes of the pages submitted to the layout settings determines the actual size of the layout. For example, a layout made from a 2 × 2 selection of letter size pages would be significantly larger than a 2 × 2 selection of business cards, as shown in the diagram below.
In the Digital case, the media size adjusts to fit the N-up layout. In Cutsheet, it is possible to create N-up layouts that are too large for the defined media. In that case you can choose to crop the output or set it to fail if it doesn’t fit.
With a 2 × 2 layout, if you submit 16 pages you get four individual sets of output with four pages each.
Auto Fit (top left to bottom right)
Because Auto Fit requires a fixed media size, it is only available for Cut sheet media. Auto Fit is not available for Digital, because Digital expands to fit whatever is submitted to it.
Auto Fit requires a media size to determine the amount of space that is available. Auto Fit also fits pages to a grid based on the largest page size in any given column or row. For the most efficient use of media, submit pages of similar sizes. For example, submitting business cards and posters to an Auto Fit process template is very inefficient because the smallest page is positioned within the space of the largest page in a row or column.
Auto Fit fits a different number of pages to the defined media based on how pages fit to a grid. Prinergy Evo fits the pages in the order submitted to the process, starting in the top left and moving in horizontal rows across the media until no more pages will fit. The software then starts a new layout, until it runs out of space again, creating another layout, and so on.
Auto fit can be used with Auto distribute to create Cut sheet media layouts that are defined entirely on the fly, based on the media size and page size sused.
Saddle Stitched Booklet
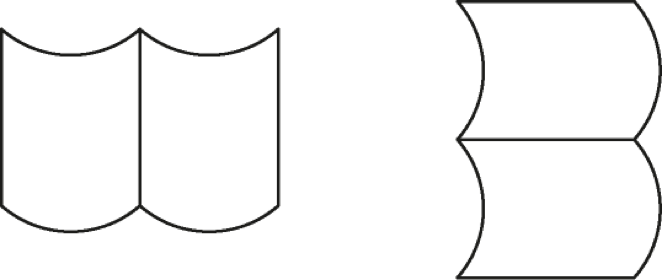
Saddle Stitched Booklet can be used with Digital or Cut sheet media sizes. Saddle Stitched Booklet allows you to define 2 × 1 (vertical fold) or 1 × 2 (horizontal fold) layouts.
Step and Repeat
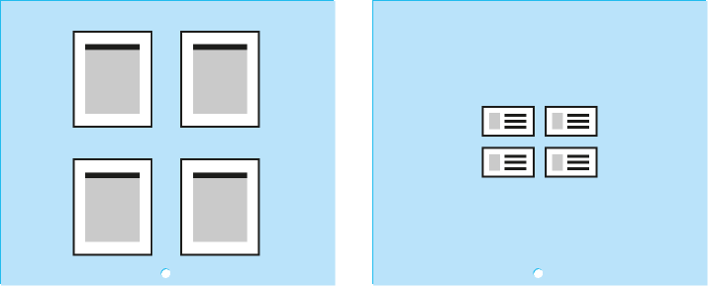
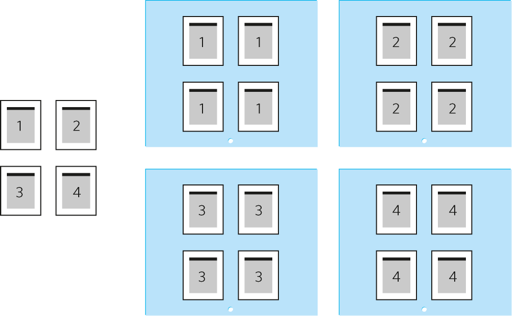
Step and Repeat allows you to specify multiple copies of the same page to be stepped out in the layout. The result is a separate output for each page submitted. Where a 2 × 2 Top Left to Bottom Right output would create four outputs from 16 pages submitted, the same layout used with Step and Repeat would create 16 outputs with four copies of each page submitted.
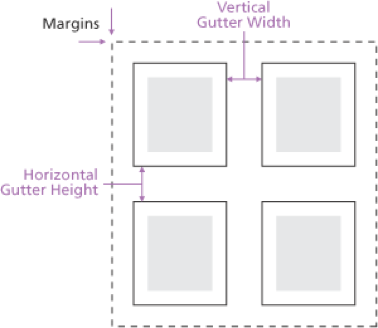
Gutters
Gutters, which are available for Digital or Cut sheet media, define the space between pages within a layout. They differ from margins that define space around the entire layout. Gutters affect how much of the content outside the trim box (including marks and bleed) appear between the pages in the layout, and also affect the overall size of the layout. Gutters allow you to specify an exact amount of space between pages. Optionally, you can specify a minimum size for gutters and define them to shrink to fit oversized pages.
Auto Distribute
The Auto distribute feature is available for Cut sheet and Roll fed media, but not for Digital, because Auto distribute requires a set media size to apply adjustments.
Auto distribute evenly positions pages in a grid within each axis of the defined media. It creates variable gutter widths on the fly, based on the size of the input pages and how they fit to the defined media.
Auto distribute can be applied independently for each axis, so that if you require a set width for the gutters, but variable height, that can be configured. This also means that it can be used with Roll fed layouts.
Auto distribute can be used with N-up or Auto Fit, and performs the same function for both. When used incombination with Auto Fit, the positioning of pages is performed entirely on the fly, based on the page sizes and media size used.
Layout Positioning
Once the layout is created, it is the positioned to the media. If you select Digital media, then the layout defines the media, plus any margins added to the layout. If you select Cut sheet, then the media is defined by the Cut sheet settings, and it becomes a container for the layout to be positioned within. Alignment and shift along settings can be used with Cut sheet media.
Alignment Settings
When you select Cut sheet, alignment settings can be used to position the layout to the media. In the Layout Placement section, you can select nine different positions for the layout, as shown in the following diagram.
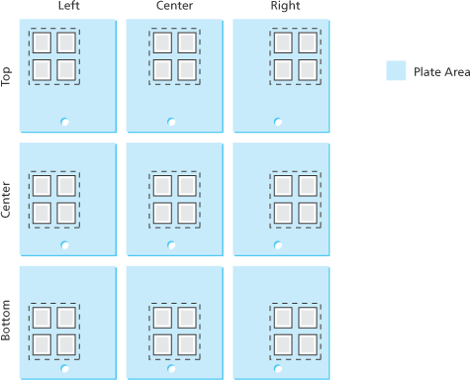
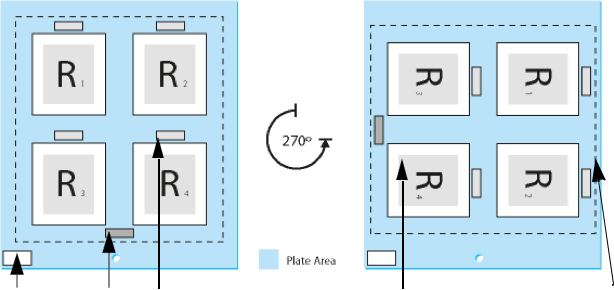
Note: When aligning a layout it is important to remember that elements move, while the media remains stationary.
Whether a layout is heads-up or heads-right, aligning to the bottom-center of the media will put the content in the same location of the plate: layout is rotating within the alignment position.
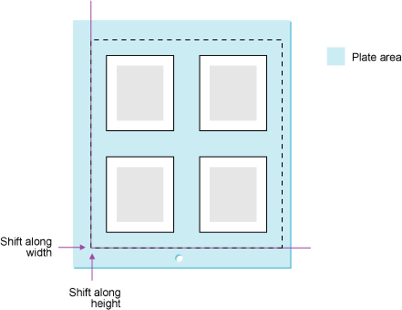
Shift Settings
Select the Shift Along Width box to shift the layout, signature, or page from the left edge of the media along the horizontal axis. Select the Shift Along Height box to shift the layout, signature, or page from the bottom edge of the media along the vertical axis. Adding positive values in the boxes moves the layout away from the original edge. Adding negative values in the boxes moves the layout closer to the original edge.
Orientation Settings
Orientation settings are used to rotate the layout. With regard to how you use the layout controls, orientation can be thought of as being applied last to the layout. In the case of Cut sheet media, orientation isused to rotate content within a fixed media size. This comes back to the pasteboard analogy. The orientation settings rotate the layout (the placed element) against the fixed Cut sheet media (the stationary pasteboard).
Heads Direction Controls
The heads direction controls are used to rotate the entire layout in increments of 90 degrees. The heads direction radio buttons for outputfrom PDF show four options: heads-up  , heads-down
  , heads-right
  , and heads-left
  . This defines the heads direction of the output. Inoutput from PDF this defines the direction for every page, since pagescannot be rotated independently of the layout.

Flat Rotation
Flat rotation is a setting that allows you to apply a small angle rotation to the layout to compensate for printing artifacts caused by content, or to compensate in the image for plate cocking. Plate cocking is a small rotation of the image on a plate, intended to compensate for misregistration caused by worn or misaligned press components.
Margins
Margins are areas of additional space added to the outside of a layout.
They are similar to gutters, except gutters define space between pages inthe layout and margins define space around the layout. Margins can be used as areas that contain page and sheet marks. Margins function aspart of the layout though, so they rotate with the content.
When you select Digital, margins can be used to change the size of the output. With Cut sheet, margins change the position of the edge of the layout, so they can effectively change how the layout fits within the media.
For example, a heads-up layout with a bottom margin of 0” and a vertical shift of 0” will be positioned with its bottom edge against the bottom of the Cut sheet. If all margins were changed to 0.5”, the bottom edge of the layout would still be at the edge of media (the vertical shift is still 0”) but the content of the non-margin portion of the layout would appear 0.5” away from the bottom edge of the media because the margin is pushing it up.
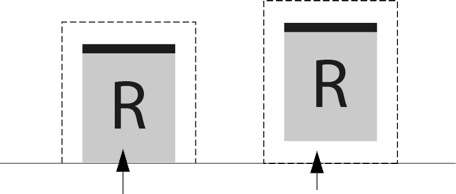
- Left: Bottom margin is 0"
- Right: Bottom margin is 0.05"
As in Digital, margins rotate with content in Cut sheet media layouts. A margin can appear to push layouts off-center if they are rotated within the media, and the two margins for that axis are not equal.
Sheet, Page, and Slugline Marks
- When using marks with an output from imposition process template, you can position page marks at the left, right, bottom, or top of a page. By default, page marks are positioned at the top of a page.
- You can position the sheet marks on the left, right, bottom, or top of a sheet.
- When a layout is rotated, page and sheet marks are also rotated. Slugline marks, however, are attached to the media and do not rotate.
- When adding page and sheet marks to imposition proofs, make sure the marks are the correct size to fit in the margins and gutters defined in the imposition or layout. Marks that are too large will appear over content.
- Slugline mark
- Sheet mark
- Page mark
- Page
- Edge of sheet
Page and Sheet Mark Positioning
The at Distance boxes in the Layout section control the positioning of page and sheet marks. In the following example, both the page and sheet mark are positioned at the top. Pagemarks are positioned on the outside edge of a page; sheet marks are positioned on the inside edge of the sheet edge.
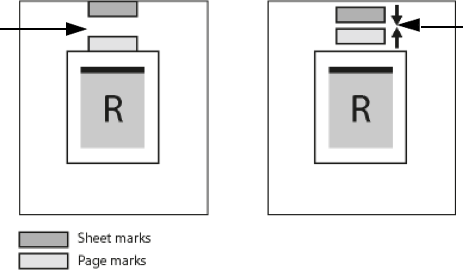
- Left: If you type 0 in the at Distance boxes, Prinergy Evo positions the page and sheet marks so they are adjacent to the page and the edge of the sheet.
- Right: By adding 0.5 in the at Distance boxes, Prinergy Evo moves the page mark away from the page and the sheet mark away from the edge of the sheet (pushing the marks closer together).
In the following example, the page mark is positioned at the top and thesheet mark is positioned at the bottom.
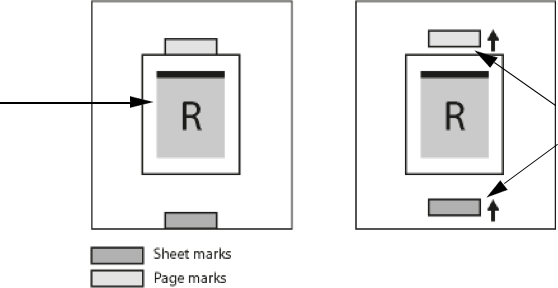
- Left: If you type 0 in the at Distance boxes, Prinergy Evo positions the page and sheet marks so they are adjacent to the page and the edge of the sheet.
- Right: By adding 0.5 in the at Distance boxes, Prinergy Evo moves the page mark away from the page and the sheet mark away from the edge of the sheet.