You want to create an RBA rule set to refine an input file, soft proof the refined PDF pages, archive and purge the entire job, and then automatically send an email to a prepress scheduler to communicate that the job is complete.
Note: This activity can't realistically achieve the archive, purge, and email processes; however, you will gain experience selecting these actions in an RBA rule.
Note: If you didn't complete the first part of this activity (Use an RBA sample rule tasks), complete Tasks 1 and 2 before completing the following. Tasks 1 and 2 in the first part of the activity, Use an RBA sample rule tasks, contain preparatory steps required for this scenario.
RBA uses customized rules to help you automate virtually every step of your workflow. From job creation to job storage, RBA lets you create a workflow that automates routine tasks and created automated detailed workflows.
Rules definition
An RBA rule is an association between an event and an action. For example, when <this event> occurs, then perform <this action>. Events trigger actions in the Prinergy system. The RBA automation engine watches for events to happen and when they do, an action is triggered.
For example:
- when the event—Job Completed—occurs
- the action—Archive—is performed
Events definition
An event is an incident or an outcome that can happen in a Prinergy workflow. An event is the trigger for a rule. Every event has properties that describe it. Properties could define a user, the time of an event, or a job object. For example, an archive event could be: archive is unsuccessful or archive is successful.
Actions definition
An action is any work that can be performed in the Prinergy system. An action must be triggered by an event. An action has parameters that define the processing. Parameters could define a process template, or outline files to move and the destination that they should move to. Parameters provide information that a job needs in order to process something. For example, when an input file is added to a job (event), it is refined into PDF pages (action). Most actions will cause additional events to occur. By creating rules that respond to secondary events, you can create complex rule sets to manage your printing workflow.
Flow definition
You can add a flow action to a rule to change the way that Prinergy event data is handled or to control the circumstances under which a subsequent Prinergy action is performed.
- The loop flow actions allow Prinergy to perform actions on one item at a time from a group of items, or to repeat the same actions multiple times on one item or an entire group of items.
- Use a timer flow action to delay execution of a rule. For example, pages can be automatically deleted 30 days after they are created from input files.
- A branch flow action is like asking a "yes/no" question in a rule set. If the answer is Yes, the action connected to the Yes result is triggered and all items from the previous event are passed on. If the answer is No, the action connected to the No result is triggered and all items from the previous event are passed on.
- Use a filter to specify conditions that must be met for data to be considered Selected. The Filter Items action and the Select One Item action consists of a property (such as Job Status), an operator (such as Is), and a value (such as Completed).
 Create a job rule
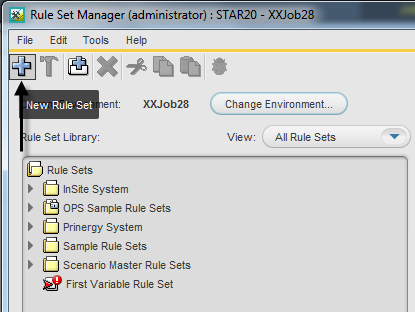
- From the Tools menu, choose Rule Set Manager.
- Click the New Rule Set icon.
 Set a refine action
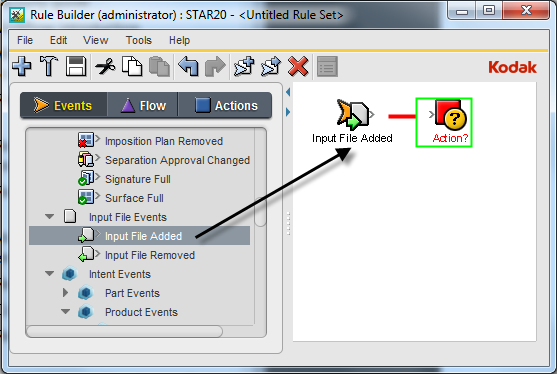
- From the Events tab, drag the Input File Added event:
Input File Events > Input File Added to the Rule Builder window.
A green box will appear around the action.
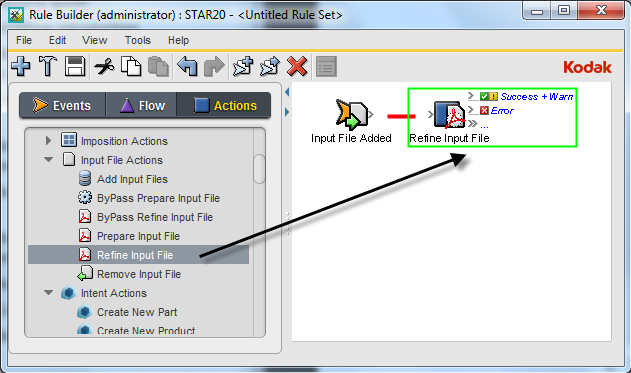
- From the Actions tab, drag the Refine Input File action: Input File Actions > Refine Input File to the center of the green box (action).
- Double-click the red line separating the event and action.
- In the Rule Parameters Editor dialog box, click the text (Enter a Value) beside Process Template Path. Click the Edit Value button (...) to access the Parameter Value dialog box.
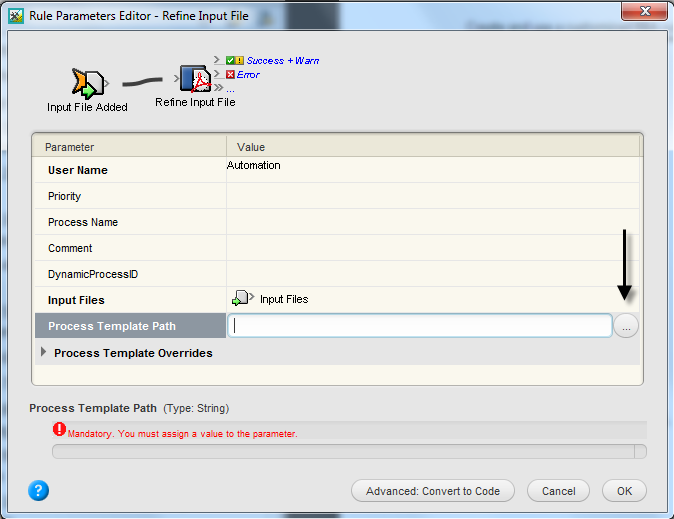
- In the Parameter Value dialog box, select the process template: Refine > Refine > 1stRef-Normz. Click OK.
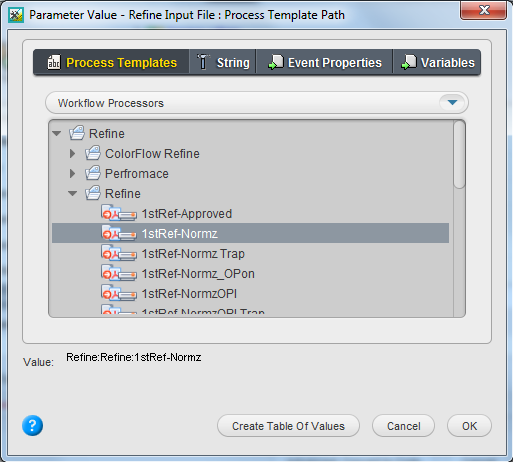
- Click OK to close the Rule Parameters Editor dialog box.
 Set a loose proof action
- From the Events tab, drag the Input File Refine OK event: Process Completed Events > Refine Done > Input File Refined Success.
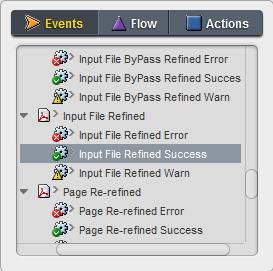
to the Rule Builder window as a second row. A green box will appear around the action.
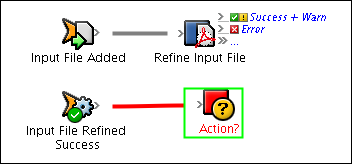
- From the Actions tab, drag the Perform Loose Page Output action: Page Actions > Perform Loose Page Output to the center of the green box (action).
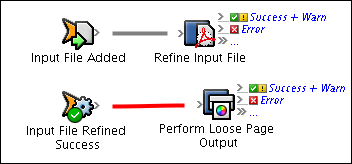
- Double-click the red line separating the event and the action.
- In the Rule Parameters Editor dialog box, click the text (Enter a Value) beside Process Template Path.
Click the Edit Value button (...) to access the Parameter Value dialog box. - In the Parameter Value dialog box, select the process template: Loose Page Proof > Virtual Proof > Virtual Proof.LoosePage. Click OK.
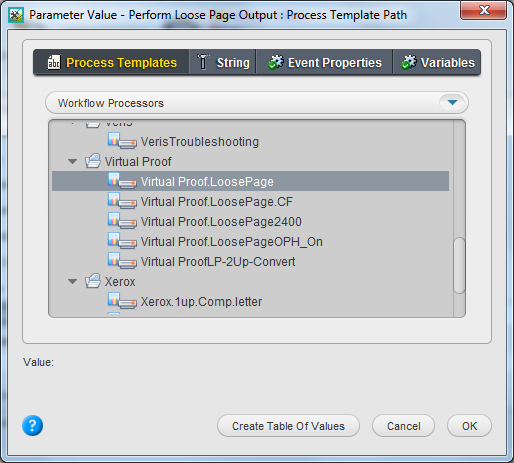
- Click OK to close the Rule Parameters Editor dialog box.
 Set an archive action
- From the Events tab, drag the Job Completed event: Job Events > Job Changed Events > Job Status Changed > Job Completed to the Rule Builder window as a third row.
- From the Flow tab, drag Timer (Relative) to the center of the green box (action).
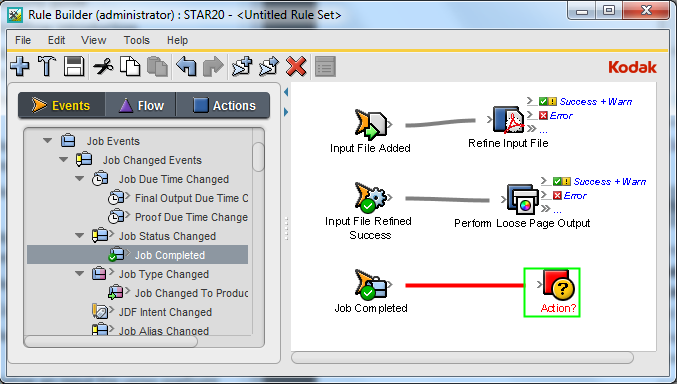
- Double-click the red line separating the event and action.
- In the Rule Parameters Editor, click the text (Enter a Value) beside Interval. Click the Edit Value button (...) to access the Parameter Value dialog box.
- In the Parameter Value dialog box, In the Minutes list, select 5. Click OK.
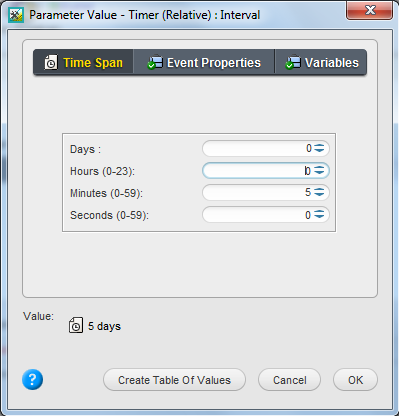
- Click OK to close the Rule Parameters Editor dialog box.
- From the Actions tab, drag the Archive action: Job Actions / Archive to the Expired status of the Timer.
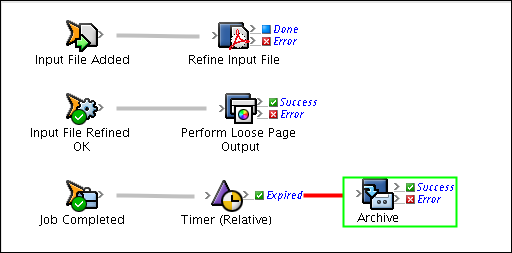
- Double-click the red line separating Expired and the Archive action.
- In the Rule Parameters Editor dialog box, click the text (Enter a Value) beside Process Template Path. Click the Edit Value button (...) to access the Parameter Value dialog box.
- In the Parameter Value dialog box, select ArchiveSelected. Click OK.
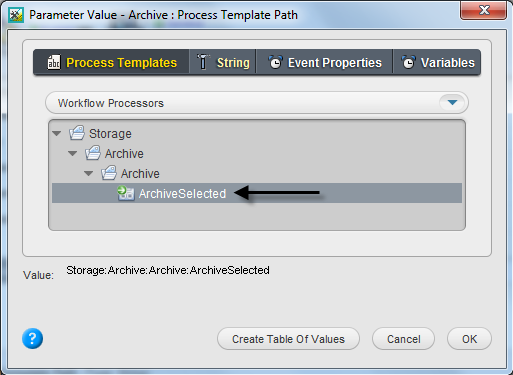
- Click OK to close the Rule Parameters Editor dialog box.
 Set a purge action
- From the Actions tab, drag the Purge action: Job Actions > Purge to the Success status of the Archive action.
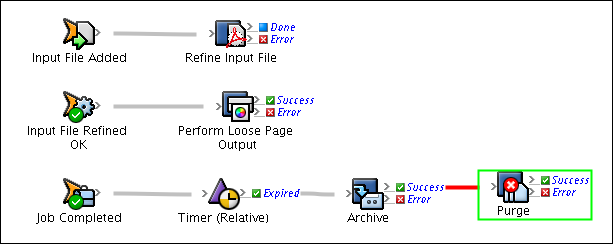
- Double-click the red line separating Success and the Purge action.
- In the Rule Parameters Editor dialog box, click the text (Enter a Value) beside Process Template Path. Click the Edit Value button (...) to access the Parameter Value dialog box.
- In the Parameter Value dialog box, select PurgeSelected. Click OK.
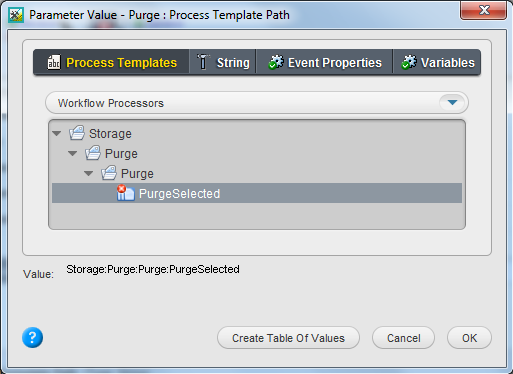
- Close the Rule Parameters Editor dialog box, by clicking OK.
- From the Actions tab, drag the Email action System Actions > Email to the Success status of the Purge action.
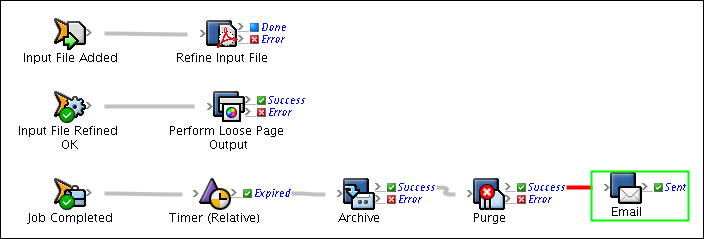
- Double-click the red line separating Success and the Email action.
- In the Rule Parameters Editor, click the text (Enter a Value) beside To.
- Type an email address.
Note: The email address is used only for example purposes for this activity. An email won't be sent to the address entered in this field. - In the Rule Parameters Editor, click the text (Enter a Value) beside Subject.
- Type Job successfully archived and purged.
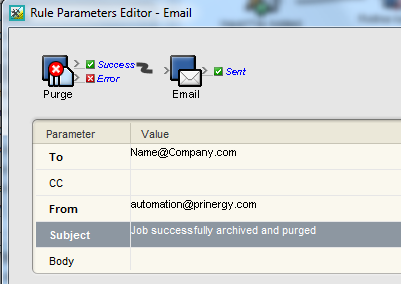
- Close the Rule Parameters Editor dialog box, by clicking OK.
 Save and activate a job rule
- From the File menu, select Save.
- In the Save Rule Set As dialog box:
- Select Save in: Rule Sets
- Name your rule set: XXRule (where XX represents your initials). Click Save.
- Close the Rule Builder window.
- In the Rule Set Manager, select you rule set XXRule and click Enable.
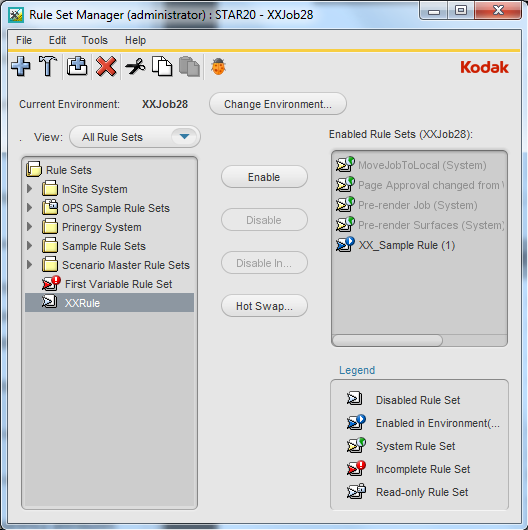
- Close Rule Set Manager.
 Trigger a job rule
- In Job Manager, right-click the Input Files pane and choose Add Input Files.
- In the Add Input Files dialog box, click the Job Folder button and locate: UserDefinedFolders/Input Files / Input File / Preps Brochure.pdf.
- Click the Add Selected button to add the file to the Files to Add list.
Note: Verify in the Options section that Process Selected Files Using Process Template is disabled. - In the Add Input Files dialog box, click OK.
- Monitor the automated addition of input files, the automated refine process, and the automated creation of VPS proofs.
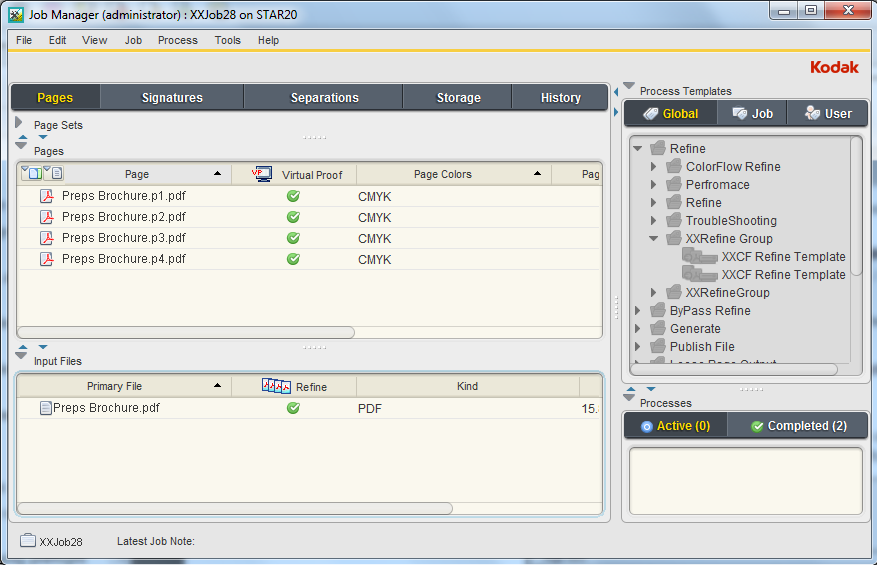
- Using the History view, monitor the processing events and actions completed.
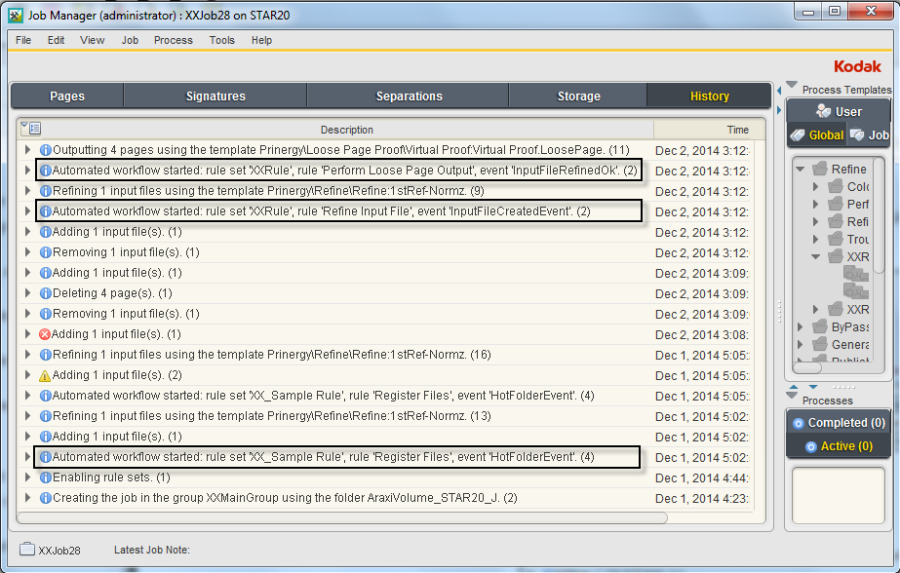
Note: Based on the rule actions, in five minutes the job will be automatically archived and then purged. Following the purge process, an email will be sent notifying the job was successfully archived and purged.
 Delete the job rule
- From the Tools menu, choose Rule Set Manager.
- In the Rule Sets list, select your rule set XXRule. Click the Disable button.
- Right-click your rule set XXRule and select Delete. Verify that you want to delete the rule.
- Close the Rule Set Manager.
- Close XXJob28 Job Manager.


