 Create a job
- If it is not already open, start Prinergy Workshop.
- In Job Finder, right-click your main group, and choose New Job.
- In the Create New Job dialog box, select the server name and volume.
- Type the job name
XX_Bypass (where XX represents your initials). - Click Create.
- Minimize the Job Manager window.
 Copy an input file to the job folder and add input files to the job
- From your workstation, locate:
Prinergy Activity Practice Files / Act_03_Refine PDF / Input File - Restore Job Manager.
- Open the
Input File folder. - Drag the
Prinergy Connect Brochure.pdf to the Job Manager's Input Files area. - In the Add Input Files dialog box that appears, under Options, clear the Process Selected Files Using Process Template check box.
- Click OK.
Your file is copied to the UserDefinedFolders folder. - Minimize the Job Manager window.
 View the status of the job
- View Job Finder.
- From the View menu, choose Visible Columns.
- In the Job Columns section, place a check mark beside Job Status. This creates a column in Job Finder that reflects the status of a job.
- In the Custom Fields Columns section, turn off all options. Click OK.
- View the status of your XX_Bypass job. All new jobs are automatically placed in a state of In Prepress.
 View Workshop preferences
- Restore Job Manager for XX_Bypass.
- From the Workshop menu, choose Preferences.
- View the preference tabs and options used to customize Prinergy Workshop. These tabs include Startup, General, and View.
- Select the View tab.
- In the Measurement Unit list, choose a preferred unit of measurement.
- Click OK to close the Preferences dialog box.
 Create a job note
The following task illustrates how detailed messages can be attached to Prinergy jobs for communication purposes. Job notes can be added, edited, or deleted from a job. All users can see the notes that others have added and view a time stamp to show when they were last modified.
InSite job notes that are visible to all users are also visible in Workshop. Job notes created in Workshop are visible to InSite administrators.
- From the Job menu, choose Notes.
- Click your cursor in the Add a new note section of the Job Notes dialog box and type:
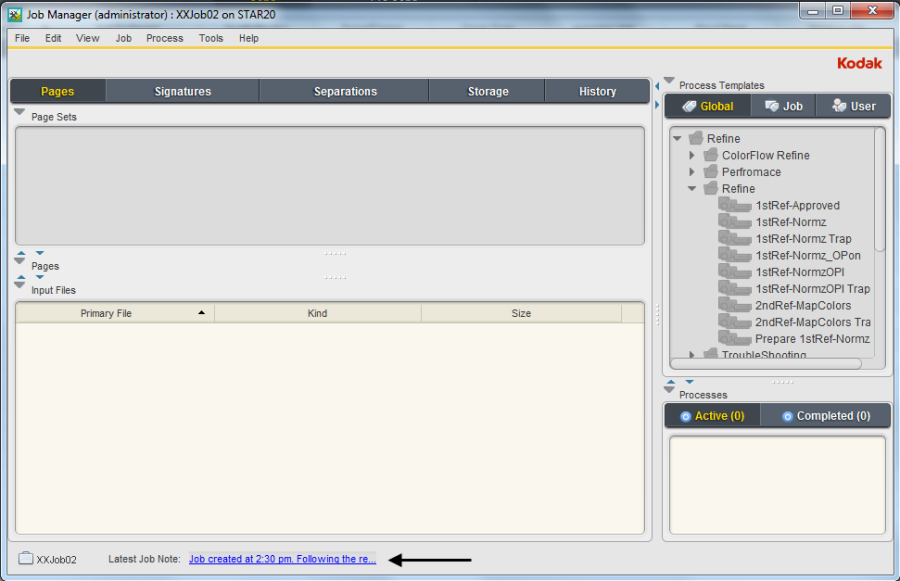
Job created at 2:30 pm. Following the refine process, PDF pages will be sent to customer for approval. - Click Add.
- Close the Job Notes dialog box.
- View the Job Note entry appearing in the bottom of Job Manager.

 Add the PDF input file to the job
- From the File menu, choose Add Input Files.
- In the Add Input Files dialog box, click the Job Folder button and locate:
UserDefinedFolders/Input Files/ Prinergy Connect Brochure.pdf.
Note: The best practice for locating an input file that was copied to the UserDefinedFolders folder is to use the Job Folder button. This is the fastest method to access all job subfolders. - Select the
Prinergy Connect Brochure.pdf file and click the Add Selected button to add the file to the Files to Add list.
Note: Confirm that nothing is selected in the Options section of the Add Input Files dialog box. - Click OK.
 Refine the input file
- In the Process Template pane, select the Global tab. This enables you to view all process templates that are available in your system.
- In the Input Files pane, select Prinergy Connect Brochure.pdf.
- Drag the PDF page to the Process Template pane, and release it on the process template: Refine > Refine > 1stRef-Normz
- In the Start Process dialog box, click OK.
Note: The Process Info window displays the status of the refine process. Close this window when the process is complete.
Important: During the refine process, a warning icon is displayed in the Processes pane. This icon warns that low-resolution contone images have been detected. For the purposes of this training, all images have been intentionally saved at a lower resolution to avoid longer processing times. Ignore this warning message.
 Create a Prinergy VPS proof
Use Prinergy VPS software to create a virtual proof of a PDF page.
- In the Process Template pane, select the Global tab. This enables you to view all process templates that are available in your system.
- In the Pages pane, select
Prinergy Connect Brochure.p1.pdf. - Drag the PDF page to the Process Template pane, and release it on the process template:
Loose Page Output > Virtual Proof > Virtual Proof.LoosePage - In the Start Process dialog box, click OK.
Note: The Process Info window appears and displays the status of the proof file process. Close this window when the process is complete. - In the Pages pane, right-click Prinergy Connect Brochure.p1.pdf and select Open VPS files.
- From the Window menu in Prinergy VPS, choose the Navigation and Separations Palette. Proof the entire page. At completion, quit Prinergy VPS.
 Create a hard loose page proof
Proof using an output device.
- Restore Job Manager for XX_Bypass.
- In the Pages pane, select
Prinergy Connect Brochure.p1.pdf. - Drag the PDF page to the Process Template pane, and release it on the process template:
Loose Page Output > Laser Print.
Note: Verify this printer device name with your instructor, service representative, or your own system administrator. Before you can output a hard loose page proof, a printer must be configured as part of the device path in an output process template. If a printer has not been configured, you won't be able to complete this task. - In the Start Process dialog box, click OK.
Note: The Process Info window appears and displays the status of the output process. Close this window when the process is complete. - Verify that the PDF page was printed from the designated output device.
 Approve the PDF pages
This task is based on the confirmation and approval of PDF pages by your customer.
- In the Pages pane, select Prinergy Connect Brochure.p1.pdf.
- From the Edit menu, choose Customer Approval > Approve.
- In the Approval Comment box, type:
Approved by customer. No further changes required. - Click OK.
Note: If you are using Prinergy with InSite Prepress Portal, use the page approval cycle in Prepress Portal to approve the pages. - From the View menu, choose Visible Columns. In the Pages Columns section, select Customer Approval. Click OK.
- View the Pages pane to locate the column named Customer Approval. Right-click the Approved status and select Get Info.
- Locate the Customer Approval Comment line to view the approval comment you added. Close the Get Info dialog box.
In Job Manager, select the Latest Job Note: entry:
Job created at 2:30 pm. Following the refine process, PDF pages will be sent to customer for approval.
- In the Add a new note section, type:
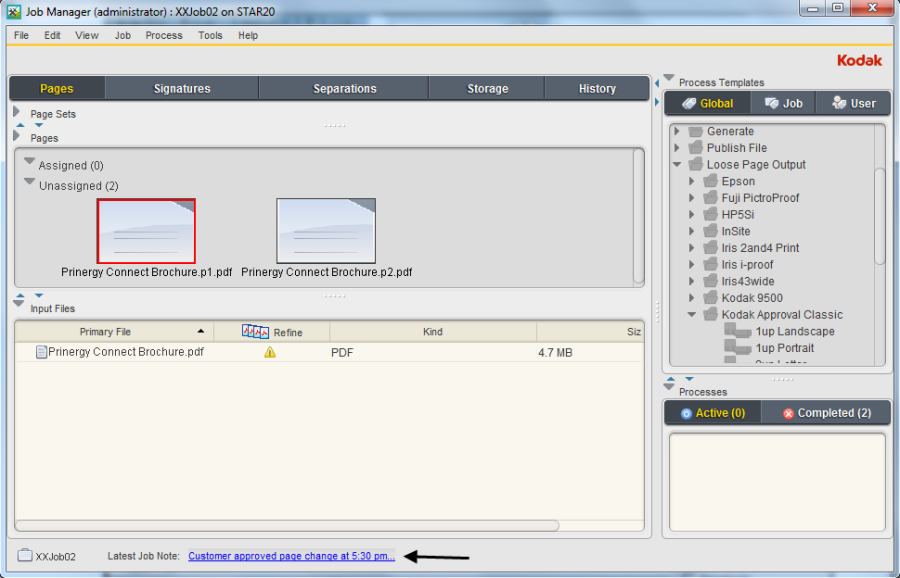
Customer approved page change at 5:30 pm. PDF pages ready for imposition. - Click Add.
- Close the Job Notes dialog box.
- View the edited Job Note entry appearing in the bottom of Job Manager.

- If continuing to Scenario 2, keep Job Manager open. Otherwise, close Job Manager.

