The following task procedures will have you create a custom field used to identify the name of a prepress operator responsible for working on a specific job.
- Manage custom fields
- Proof PDF pages to view custom field value
- Verify the file size of the refined PDF pages
- Edit the refine process template
- Generate a low resolution PDF file using Publish to PDF
- Delete the process template and process template group
Manage custom fields
- From the Tools menu, choose Custom Fields Manager.
- In the Custom Fields Manager dialog box, select Job.
- Click Add.
- In the Custom Field dialog box, in the Name box, type
Sales Person. - In the Type list, select Text.
- Leave the Default Value window blank.
- Click Add.
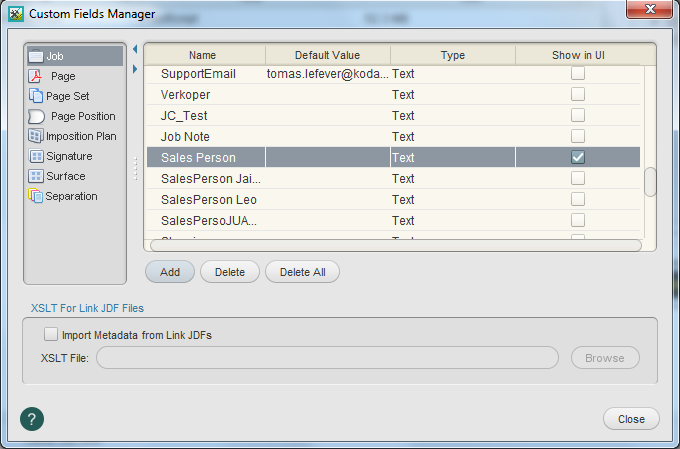
- Close Custom Fields Manager.
- Minimize the Job Manager window.
- Restore Job Finder.
- From the View menu, choose Visible Columns.
- In the Custom Field Columns section, select SalesPerson. Click OK.
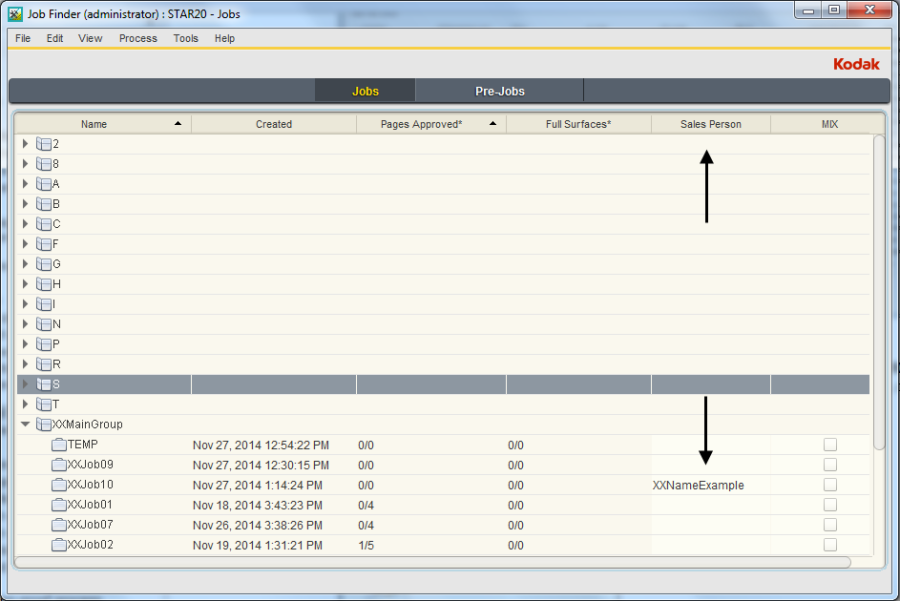
- View the SalesPerson custom field column in Job Finder.
- Place your cursor in the SalesPerson custom field for XX_Create_Refine_PT. Type
XXNameExample (where <XX> represents your initials).
Proof PDF pages to view custom field value
- Restore Job Manager.
- In the Pages view, right-click
Wells Brochure.p1.pdfand choose: Loose Page Output > Virtual Proof > Virtual Proof.LoosePage - In the Start Process dialog box, click the Edit Process Template button.
- Open the Marks section.
- In the Slugline mark window, type:
$[CustomFieldJob_SalesPerson] - In the Place on media: options, enter:
- 1.25 inch (31.75 mm) from left
- .5 inches (12.7 mm) from bottom

- Click OK.
- In the Start Process dialog box, click OK.
- In the Pages pane, right-click
Wells Brochure.p1.pdfand choose Open VPS files. - View the bottom left corner of the black separation page to view the custom field value.
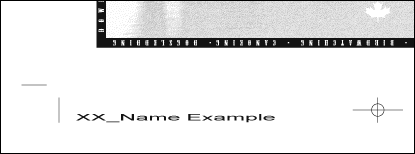
- Close Prinergy VPS software.
Verify the file size of the refined PDF pages
- Select the Pages pane.
- From the View menu, choose Visible Columns.
- Place a check mark beside the Size option. Click OK.
- View the file size of each individual PDF page.
- Calculate the combined size of all eight PDF pages (approximately 25 MB).
Edit the refine process template
- From the Tools menu, choose Process Template Editor.
- Locate and open your refine process template: Refine > XXRefineGroup > XXRefineTemplate
- Open the Optimize section.
- In the Color & Grayscale Alternate Images area, ensure the Generate box is selected, and make the following changes:
Change ...at 72 ppi to ...at 56 ppi
Change ...if Above 108 ppi to ...if Above 56 ppi
Change Compression: ZIP (lossless) to JPEG (lossy) - From the File menu, select Save.
- Close the process template and the Process Template Editor.
Generate a low resolution PDF file using Publish to PDF
- Right-click
Wells Brochure.p1.pdfand choose Select All Pages. - From the File menu, choose Publish to PDF File.
- In the Publish PDF Files dialog box, make the following selections:
Save PDF files to folder: Job Folder/UserDefinedFolders (for your job)
Images: Low-resolution proof
Output to: PDF
Save to Multipage PDF File
File name: Low Resolution Proof.pdf - Click Save.
- Right-click the
XX_Create_Refine_PTjob folder icon in the lower left corner of Job Manager. Select Open Job Folder in File Browser. - Open UserDefinedFolders.
- Locate the Low Resolution Proof.pdf file. The file size should be substantially less in size compared to the original PDF pages (approximately four MB).
- Open the file in Adobe Acrobat. Verify that all eight pages are combined as part of the PDF file.
- At the completion of the proof process, quit Adobe Acrobat.
Delete the process template and process template group
- From the Tools menu, choose Process Template Editor.
- In the Refine group, open your refine group XXRefineGroup.
- Right-click your process template XXRefineTemplate and select Delete. The process template is deleted.
- Right-click your refine group XXRefineGroup and select Delete. The process template group is deleted.
- Close the Process Template Editor.
- Close XX_Create_Refine_PT Job Manager.