Lesson overview
Why you should complete this lesson
This lesson provides practical experience submitting an input file to a Rules-Based Automation (RBA) rule. Tasks covered in this lesson focus on creating and using digital submission RBA rules accessible in Digital Submit. For the purpose of this lesson, submissions will be made to a managed HP SmartStream Production Pro simulator.
This lesson provides guidance using Rules-Based Automation, and is meant to be flexible to fit your environment and learning needs. It isn't necessary to complete the procedure steps in this lesson. If preferred, use the procedure steps as a guide to better understand the software and how it will operate with your own system.
Submit an input file directly to a digital press using an RBA rule tasks
You want to submit an input file directly to a digital press using an RBA rule. To accomplish this, you need to create an automated RBA rule and make it accessible in Digital Submit. The RBA rule needs to identify a target press, a print queue associated with that target press, and a JDF template.
If you didn't complete Lesson 5, consult the Lesson Preparations section in that lesson for information about accessing Prinergy Digital Print Practice Files.
Note: This lesson describes how to submit job files to an installed device. Determine if you want to actually submit the job to your press. If so, pay special attention to printing options outlined, as they may not match options realistic to your own environment.
Important: To complete this lesson, a digital press and digital front end simulator must be installed and configured in Prinergy. Based on naming preferences, names used in this lesson won't be consistent with names used in your own environment.
The following procedures describe how to complete this lesson.
- Create an RBA rule
- Submit an input file to the RBA rule
- Monitor and remove the document
- Create an RBA rule that will direct documents to print to a specific print queue based on the name of the Prinergy job tasks
Create an RBA rule
The following tasks describe how to create an RBA rule that will automatically create a document and submit the document to a digital press to be printed.
- Start Workshop.
- From the Tools menu in Job Finder, select Rule Set Manager.
- In RBA, click the New Rule Set icon.
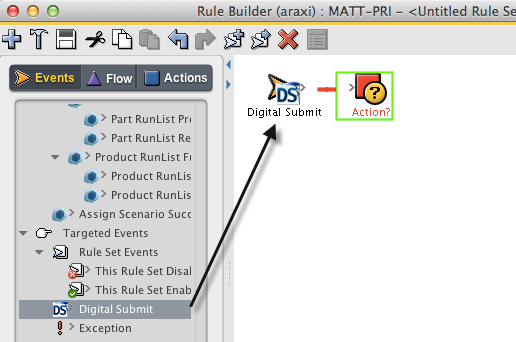
- From the Events tab, select and drag the Digital Submit event to the Rule Builder window.
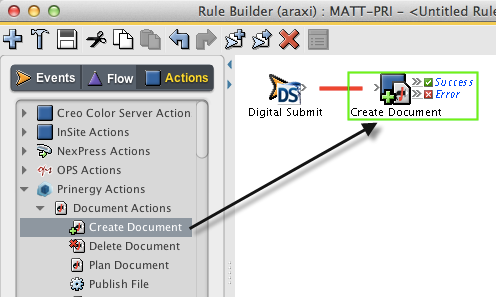
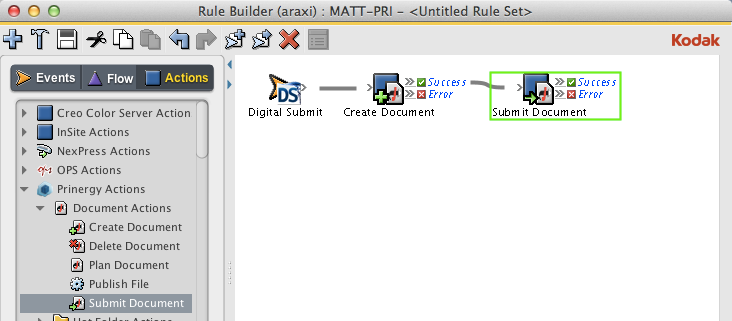
- From the Actions tab, select and drag the Create Documents action to the rule Action (surrounded by the green box) in the Rule Builder window.
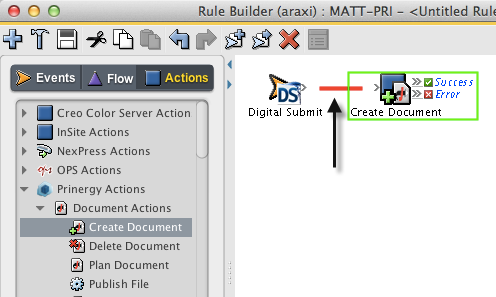
- Double-click the red line separating the Digital Submit event and the Create Document action to set action parameters.
- In the Rule Parameters Editor dialog box, click the text (Enter a Value) beside Digital Print Queue. Click the Edit Value button (...) to access the Parameter Value dialog box.
- In the Parameter Value dialog box, browse to the digital press to use, and select a digital print queue. Click OK. In this example, the digital press is called HP SmartStream Production Pro simulator, and the print queue is called SaddleStitch.

- In the Rule Parameters Editor dialog box, click the text (Enter a Value) beside JDF Template. Click the Edit Value button (...) to access the Parameter Value dialog box.
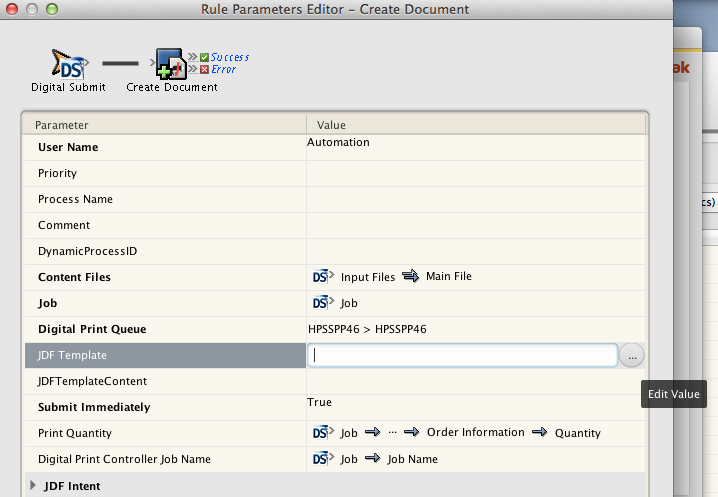
- In the Parameter Value dialog box, browse to:
AraxiHome\MATT_PRI\DigitalPrintTemplates\HPSmartStream\HP SimpleTicket.jdf. Click OK.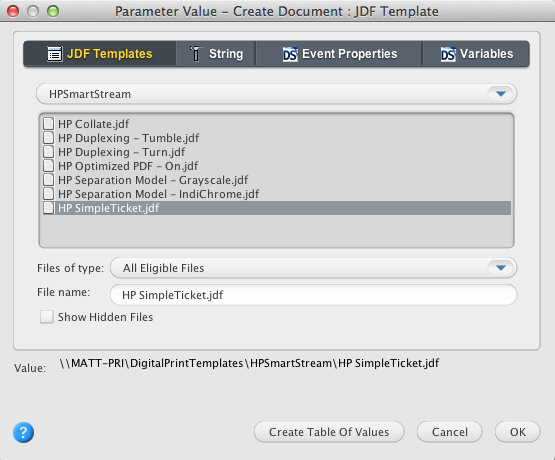
- View the parameter settings and click OK.

- In the Actions tab, drag the Submit Document action to the Success box attached to the Create Document action.
- View the completed rule.
- From the File menu, choose Save. Name the RBA rule XX_Digital Print Rule_1 (where XX is your initials). Close the Rule Builder window.
- In Rules Set Manager, select your rule and click Enable.
Note: As this is a system rule, it can effect every job in the system. For this reason, you'll need to enter a User Name and Password to enable the rule.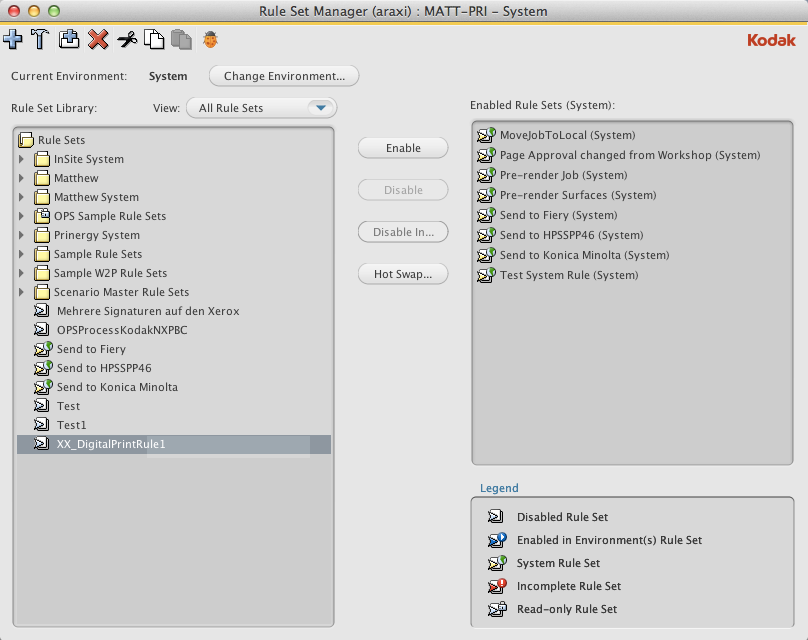
- Close Rule Set Manager.
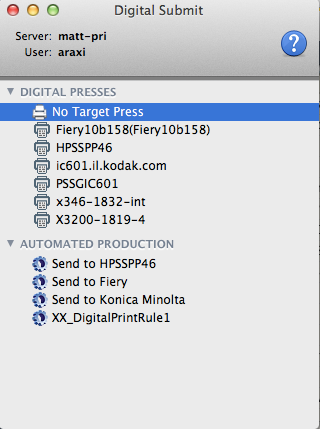
- View your enabled RBA rule in Digital Submit.
Submit an input file to the RBA rule
In this task, you will submit an input file to the RBA rule created in Task 1. Once submitted, a document will be automatically uploaded to Digital Direct and submitted to a print queue identified in the RBA rule.
- From your workstation, locate:
Prinergy Digital Print Practice Files > RBA Rules - Drag the input file
Hearthstone.pdfto the RBA rule XX_Digital Print Rule_1 in Digital Submit. - In the New Job Submission dialog box, complete the following:
- In the Name box, type
XX_RBA Test 1(where <XX> is your initials). - In the Add Input Files box, verify that the correct input file was submitted.
Note: When using an RBA rule to submit input files, it isn't necessary to identify a digital print queue or JDF template. Both print queue and JDF template are identified as part of the RBA rule - In the Set Job Properties section, select a Quantity of 1.
- Using the calendar and time settings, enter Print, Ship, and Due dates.
- Add shipping information.
- In the Name box, type
- At completion, click the Submit button.
- View the File Submission Process. At completion, click OK.
Monitor and remove the document
In this task, you will verify that the document printed automatically to the print queue identified in the RBA rule.
- Start Digital Direct.
- From the Presses list, select the target press identified in the RBA rule. In this example, the target press is HP SmartStream Production Pro simulator.
- In the Active tab, monitor the RIPing and printing of the document.
- In the Storage tab, check the status of the printed document.

- In the Storage tab, right-click the document XX_RBA_Test 1 and select Delete Document.
Create an RBA rule that will direct documents to print to a specific print queue based on the name of the Prinergy job tasks
You want to create an RBA rule that will direct documents to print to a specific print queue based on the name of the Prinergy job. The rule will identify Prinergy job naming criteria, a target press name, and two print queues associated to the target press.
The following procedures describe how to complete this lesson.
- Edit an RBA rule
- Submit to print queue A
- Submit to print queue B
- Delete RBA rules
- Delete Prinergy jobs and RBA groups
Edit an RBA rule
The following tasks describe how to edit an existing RBA rule. The edit will include the creation of a table of values.
- Start Workshop.
- From the Tools menu in Job Finder, select Rule Set Manager.
- In Rule Set Manager, select your enabled RBA rule XX_Digital Print Rule_1.
- Click the Disable button.
Note: As this is a system rule, it can effect every job in the system. For this reason, you'll need to enter a User Name and Password to disable the rule. - Double-click XX_Digital Print Rule_1 to open it in Rule Builder.
- From the File menu, select Save As.
- Name the new rule XX_Digital Print Rule_2 (where XX is your initials). Click Save.
- In the Rule Builder window, double-click the line separating Digital Submit and Create Document.
- In the Rule Parameters Editor dialog box, click the text beside Digital Print Queue. Click the Edit Value button (...).
- In the Parameter Value dialog box, click the Create Table of Values button.

- In the If this is true column, click the red text (Enter an Expression), and the tab will open. In the (Select a Property) window, click the blue down arrow. View the different property selections available.
In the property selection list, select Job > Job Name.
- In the criteria list, select Ends With (ignore case). Enter a name that will be used as part of the Prinergy job name. In this example, the job name identifier is SaddleStitch. This defines the Prinergy job naming criteria that the RBA rule will be looking for.
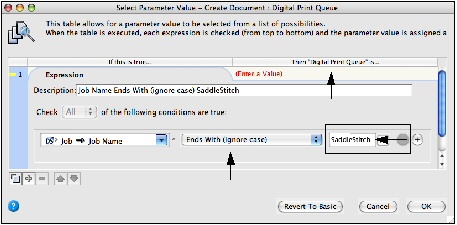
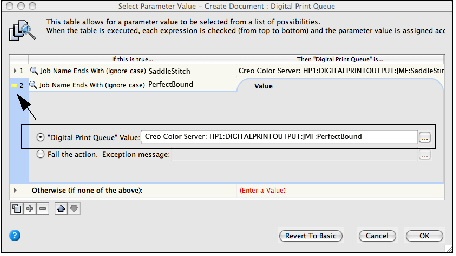
- In the Then "Digital Print Queue" is column, click the red text (Enter a Value), and the tab will open.
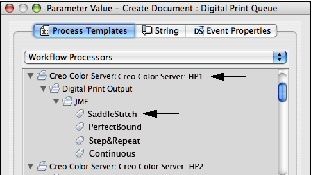
- In the Digital Print Queue window, select the appropriate target press and print queue. In this example, the press name is HP SmartStream Production Pro simulator and the print queue name is SaddleStitch (Print Queue A). Click OK.
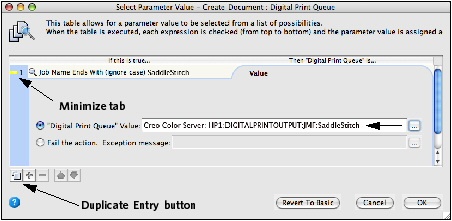
- Click the yellow square beside entry 1. This will minimize the tab. Click the Duplicate Entry button to duplicate the information appearing in entry 1.
- In entry 2, change the job name identifier from SaddleStitch to PerfectBound. This defines the Prinergy job naming criteria that the RBA rule will be looking for. Click the second entry in the Then "Digital Print Queue" is column.
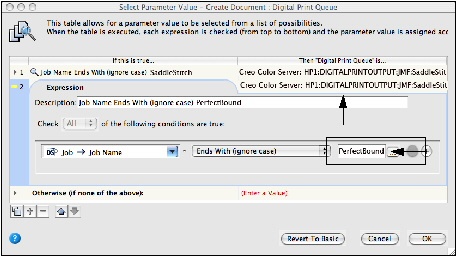
- In the Digital Print Queue window, select the appropriate target press and print queue. In this example, the press name is HP SmartStream Production Pro simulatorand the print queue name is Perfect Bound (Print Queue B). Click OK.
- Click the yellow square beside entry 2. This will minimize the entry.
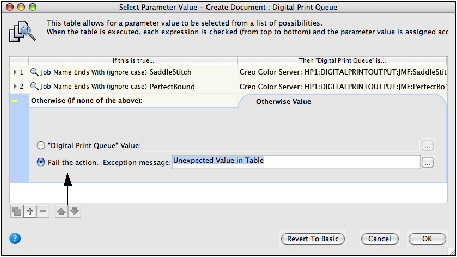
- In the third entry line Otherwise (if none of the above): click the red text (Enter a Value).
- Select the Fail the action option. Click OK. Selecting this option will fail a job that doesn't match the parameter values identified.
- Click OK.
- Save the changes to the edited Rule Set and close Rule Builder.
- In Rule Set Manager, select your rule XX_Digital Print Rule_2 and click the Enable button. Enter a User Name and Password. Click Enable.
- Close Rule Set Manager.
Submit to print queue A
In this task, you will submit an input file to the edited RBA rule. The document will be automatically submitted to a defined print queue (Print Queue A) based on the name of the Prinergy job.
- From your workstation, locate:
Prinergy Digital Print Practice Files > RBA Rules - Drag the input file Hearthstone.pdf to the RBA rule XX_Digital Print Rule_2 in Digital Submit.
- In the New Job Submission dialog box, complete the following:
- In the Create Job window, type
XX_RBA Test 2 SaddleStitch(where <XX> is your initials).
Using SaddleStitch in the Prinergy job name, will trigger RBA to send the document to a defined print queue associated to a specific target press.
In this example, the target press is named HP SmartStream Production Pro simulator and the print queue is named SaddleStitch. - In the Add Input Files window, verify that the correct input files were submitted.
- In the Set Job Properties section, select a Quantity of 1.
- Using the calendar and time settings, enter Print, Ship, and Due dates.
- Add shipping information.
- In the Create Job window, type
- Click the Submit button.
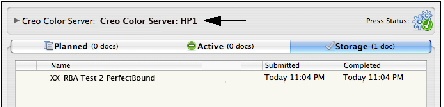
- Start Digital Direct.
- From the Presses list, select the target press identified in the RBA rule. In this example, the target press is HP SmartStream Production Pro simulator.
- In the Active tab, monitor the automatic RIPing and printing of the document.
- In the Storage tab, check the status of the printed document. Click the History icon to verify that the correct print queue was used.

- In the Storage tab, right-click the document XX_RBA_Test 2 SaddleStitch and select Delete Document.
Submit to print queue B
In this task, you will submit an input file to the edited RBA rule. The document will be automatically submitted to a defined print queue (Print Queue B) based on the name of the Prinergy job.
- From your workstation, locate:
Prinergy Digital Print Practice Files > RBA Rules - Drag the input file Hearthstone.pdf to the RBA rule XX_Digital Print Rule_2 in Digital Submit.
- In the Digital Submit dialog box, complete the following:
- In the Create Job box, type
XX_RBA Test 2 PerfectBound(where <XX> is your initials).
Using PerfectBound in the Prinergy job name, will trigger RBA to send the document to a defined print queue associated to a specific target press.
In this example, the target press is called HP SmartStream Production Pro simulator and the print queue is called PerfectBound. - In the Add Input Files window, verify that the correct input files were submitted.
- In the Set Job Properties section, select a Quantity of 1.
- Using the calendar and time settings, enter Print, Ship, and Due dates.
- Add shipping information.
- In the Create Job box, type
- Click the Submit button.
- Start Digital Direct.
- From the Presses list, select the target press identified in the RBA rule. In this example, the target press is HP SmartStream Production Pro simulator.
- In the Active tab, monitor the automatic RIPing and printing of the document.
- In the Storage tab, check the status of the printed document. Click the History icon to verify that the correct print queue was used.
- In the Storage tab, right-click the document XX_RBA_Test 2 PerfectBound and select Delete Document.
Delete RBA rules
- Start Workshop.
- From the Tools menu in Job Finder, select Rule Set Manager.
- In Rule Set Manager, select your RBA rule XX_Digital Print Rule_2.
- Click the Disable button.
Note: As this is a system rule, it can effect every job in they system. For this reason, you'll need to enter a User Name and Password to disable the rule. - Select both of your RBA rules:
XX_Digital Print Rule_1
XX_Digital Print Rule_2 - Click the Delete icon.
- Close Rule Set Manager.
Delete Prinergy jobs and RBA groups
- In Job Finder, locate and open your RBA group named XX_Digital Print Rule_1.
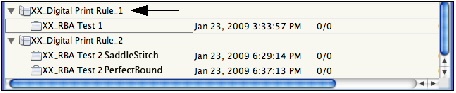
- Right-click your Prinergy job XX_RBA Test 1 and select Destroy Entire Job. Enter a User Name and Password.
- Right-click your RBA group XX_Digital Print Rule_1 and select Delete Group.
- Complete the same steps as above to delete your RBA group XX_Digital Print Rule_2 and the jobs associated to the group.