Adjusting the dark point allows for more accurate rendition across the lightness scale when you are converting from one gamut to another, where the dark points are substantially different. This occurs when you are using a rendering intent other than perceptual, as the perceptual rendering intent maps the dark point.
Note: One exception is if you use the Black Point compensation which also maps the dark point from the source to the destination profile.
You can adjust the dark point for a profile at one of four dark points: Solid K (input tints 0, 0, 0, 100), Solid CMY (input tints 100, 100, 100, 0), Solid CMYK (input tints 100, 100, 100, 100), or the darkest pixel of a preview image. Editing the dark point of a device profile is often used for newspaper proofing because the dark colors on the newspaper print often appear darker than on a proof, even though they have the same measured colors. - When you adjusting the simulation or conversion DeviceLink, in the DeviceLink tab, click Dark Point.
- To adjust a solid dark point of the DeviceLink profile, from the Dark Point Select list, select one of the following:
- Solid K
- Solid CMY
- Solid CMYK
The Out values in the DeviceLink Tints section shows the corresponding output values of the DeviceLink.
- To adjust the darkest pixel of a preview image:
- From the Dark Point Select list, choose From preview image.
- Select the image file, and then click Open.
The image file appears in the Preview mode. - Click Update.
In the DeviceLink Tints section, In values are updated to show the tints values of the pixel from the selected preview image that produces the lowest L* value in the DeviceLink source space. Out values show the corresponding output values of the DeviceLink.
- If you want to apply the dark point adjustments to the other CMYK input tints that produce the same color as the selected dark point, for example, if you are adjusting dark point from a preview image with the input tint values (85, 75, 75, 85), to apply your adjustments to Solid K tints, Solid CMY tints, and Solid CMYK tints with similar colors, select the Adjust all inputs with selected color appearance check box.
-
The color patch displays the output color. If the displayed color does not visually align to the color on your proof or press sheet, you can adjust the displayed color in the color patch:
- Select the Adjust Displayed Colors check box.
- Use the lightness (L*) slider and the cast (a*b*) selector to change the displayed color to align to the color on your proof or press sheet. This color change does not affect any curves or color control elements. You are only adjusting the displayed color of the patches.
- To reset the display to the default displayed color, click the Reset icon
 .
. - When you achieve the correct color, clear the Adjust Displayed Colors check box.
- The displayed color patch demonstrates the effect of your adjustments.
The color produced before your adjustment is shown on the left. Your adjustment is shown on the right.

- To display the color patch in a larger view for easier color comparison, click anywhere in the color patch.
- Adjust color cast, lightness, or both by the following:
- Use the lightness (L*) slider
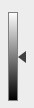 to make the color darker or lighter. You can also enter the L* value directly in the Color Change columns.
 - Use the cast (a*b*) selector
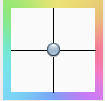 to adjust the color cast. You can also enter the a*, b* values directly in the Color Change columns.
- Enter the C, M, Y, and K values directly in the Out columns.
-
You can:
- To save your changes, click Apply.