Page tree

Versions Compared

Key

  • This line was added.
  • This line was removed.
  • Formatting was changed.
Comment: Published by Scroll Versions from space PT and version 2.10
Sv translation
languageen

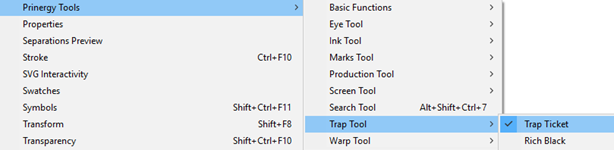
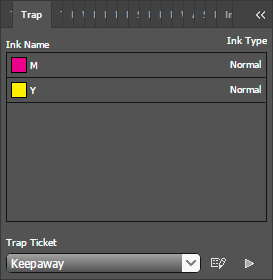
Colored areas can be made up of a mixture of process inks that overprint each other. Registration problems can cause a noticeable “color edge” if lighter inks extend beyond the edge of a darker ink. To avoid this unwanted edge, it is necessary to use a Keepaway Trap to choke the lighter inks back from the edge of objects.

The goal of this activity is to use the Prinergy Tools Keepaway function to trap a file.

Task 1: Apply Keepaway Trapping to a file
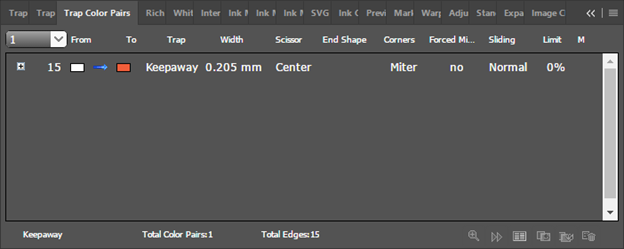
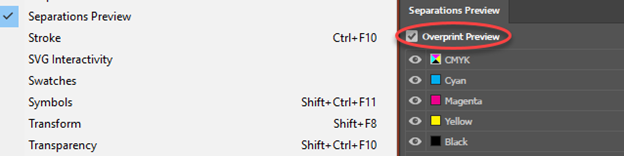
  1. Launch the Adobe Illustrator application.
  2. Open this document: 
    View file
    nameKeepaway.ai
    height150
  3. In the Illustrator menu bar, from the Window menu, select Prinergy ToolsTrap ToolTrap Ticket.


  4. In the Trap Ticket dialog box, click the new trap ticket option .
  5. Select the Keepaway Setting tab.
  6. In the Keepaway Width setting, type 0.205 mm.
  7. To create the Trap Ticket, in the Ticket Name, type Keepaway.
  8. In the Illustrator menu bar, from the Window menu, select Prinergy ToolsInk ToolInk Manager.


  9. To update the inks in the Ink Manager dialog box, click the update ink list icon .
  10. In the Adobe Illustrator menu bar, from the Window menu, select Prinergy ToolsTrap Tool > Auto Trapping.


  11. In the Trap dialog box, from the Trap Ticket list, select the Keepaway trap ticket that you created earlier.


  12. Click the Trap button: 
    If no objects have been selected, a message window will appear asking if you want to select all objects.


  13. To apply trapping to the entire file, click Yes.
    After trapping, a new trapping layer will be automatically generated, and the dialog box of the trapping color pairs will appear. When this dialog box appears, the automatic trapping has finished and you have applied keepaway trapping to the file.

Task 2: View the trapped objects

To view the trapped objects, in the Illustrator menu bar, from the Window menu, select Separations Preview with Overprint Preview turned on. If Overprint Preview is not enabled, Keepaway traps will appear as a white border on objects.


Sv translation
languagede

Farbige Bereiche können aus einer Mischung von Prozessdruckfarben bestehen, die sich gegenseitig überdrucken. Registrierungsprobleme können eine deutliche „Farbkante“ verursachen, wenn die hellere Druckfarbe über die Kante einer dunkleren Druckfarbe hinausragt. Um diese unerwünschte Kante zu vermeiden, muss eine Keepaway-Überfüllung verwendet werden, um die helleren Druckfarben von der Kante der Objekte zurück zu unterfüllen.

Das Ziel dieser Übung ist die Verwendung der Keepaway-Funktion von Prinergy Tools zum Überfüllen einer Datei.

Aufgabe 1: Keepaway-Überfüllung auf eine Datei anwenden

  1. Starten Sie die Adobe Illustrator-Anwendung.
  2. Öffnen Sie dieses Dokument: 
    View file
    nameKeepaway.ai
    height150
  3. Wählen Sie in der Illustrator-Menüleiste im Menü Fenster die Option Prinergy ToolsÜberfüllungs-WerkzeugÜberfüllungs-Voreinstellung aus.


  4. Klicken Sie im Dialogfeld „Überfüllungs-Voreinstellung“ auf die Option „Neue Überfüllungs-Voreinstellung“ .
  5. Wählen Sie die Registerkarte Keepaway-Einstellung aus.
  6. Geben Sie in das Feld Keepaway-Breite den Wert 0.205 mm ein.
  7. Um die Überfüllungs-Voreinstellung zu erstellen, geben Sie im Feld Voreinstellungsname Keepaway ein.
  8. Wählen Sie in der Illustrator-Menüleiste im Menü Fenster die Option Prinergy ToolsDruckfarben-WerkzeugDruckfarbenmanager aus.


  9. Um die Druckfarben im Dialogfeld „Druckfarbenmanager“ zu aktualisieren, klicken Sie auf das Symbol „Druckfarbenliste aktualisieren“.
  10. Wählen Sie in der Menüleiste von Adobe Illustrator im Menü Fenster die Option Prinergy ToolsÜberfüllungs-Werkzeug > Automatische Überfüllung aus.


  11. Wählen Sie im Dialogfeld „Überfüllung“ in der Liste Überfüllungs-Voreinstellung die zuvor erstellte Keepaway-Überfüllungs-Voreinstellung aus.


  12. Klicken Sie auf die Schaltfläche „Überfüllen“: 
    Wenn keine Objekte ausgewählt wurden, wird ein Meldungsfenster angezeigt, in dem Sie gefragt werden, ob Sie alle Objekte auswählen möchten.


  13. Um die Überfüllung auf die gesamte Datei anzuwenden, klicken Sie auf Ja.
    Nach dem Überfüllen wird automatisch eine neue Überfüllungsebene erzeugt, und das Dialogfeld der Überfüllungsfarbpaare wird angezeigt. Wenn dieses Dialogfeld angezeigt wird, ist die automatische Überfüllung abgeschlossen, und Sie haben Keepaway-Überfüllung auf die Datei angewendet.

Aufgabe 2: Überfüllte Objekte anzeigen

Um die überfüllten Objekte anzuzeigen, wählen Sie in der Illustrator-Menüleiste im Menü Fenster die Option Auszugsvorschau mit aktivierter Überdruckvorschau aus. Wenn Überdruckvorschau nicht aktiviert ist, werden Keepaway-Überfüllungen als weißer Rand auf Objekten angezeigt.


Sv translation
languagefr

Des zones de couleurs peuvent se composer d'un mélange d'encres traitées superposées les unes au-dessus des autres. Des problèmes d'enregistrement peuvent provoquer un « bord de couleur » remarquable si des encres plus claires s'étendent au-delà de la bordure d'une encre plus sombre. Pour éviter ce bord indésirable, il est nécessaire d'utiliser un recouvrement inversé pour amaigrir les encres les plus claires du coin des objets.

L'objectif de cette activité est d'utiliser la fonction inverse des outils Prinergy pour recouvrir un fichier.

Tâche 1 : Appliquer le recouvrement inversé à un fichier.

  1. Lancez l'application Adobe Illustrator.
  2. Ouvrez ce document : 
    View file
    nameKeepaway.ai
    height150
  3. Dans la barre de menus d'Illustrator, dans le menu Fenêtre, sélectionnez Outils PrinergyOutil recouvrementBillet de recouvrement.


  4. Dans la boîte de dialogue Billet de recouvrement, cliquez sur la nouvelle option Billet de recouvrement .
  5. Sélectionnez l'onglet Paramètre inverse.
  6. Dans le paramètre Largeur inverse, saisissez 0.205 mm.
  7. Pour créer le billet de recouvrement, dans le nom du ticket, saisissez Keepaway.
  8. Dans la barre de menus d'Illustrator, dans le menu Fenêtre, sélectionnez Outils Prinergy > Outil Encre > Gestionnaire d'encre.


  9. Pour mettre à jour les encres dans la boîte de dialogue Gestionnaire d'encre, cliquez sur l'icône mettre à jour la liste des encres.
  10. Dans la barre de menus d'Adobe Illustrator, dans le menu Fenêtre, sélectionnez Outils PrinergyOutil recouvrement > Recouvrement automatique.


  11. Dans la boîte de dialogue Recouvrement, depuis la liste Billet de recouvrement, sélectionnez le billet de recouvrement inversé que vous avez créé précédemment.


  12. Cliquez sur le bouton Recouvrir : 
    Si vous n'avez sélectionné aucun objet, une fenêtre message apparaîtra pour vous demander si vous souhaitez sélectionner tous les objets.


  13. Pour appliquer le recouvrement à l'ensemble du fichier, cliquez sur Oui.
    Après le recouvrement, une nouvelle couche de recouvrement sera générée automatiquement et la boîte de dialogue du recouvrement automatique apparaîtra. Lorsque cette boîte de dialogue apparaît, le recouvrement automatique est terminé et vous avez appliqué le recouvrement inverse au fichier.

Tâche 2 : Afficher les objets recouverts

Pour afficher les objets recouverts, dans la barre de menus Illustrator, depuis le menu Fenêtre, sélectionnez Prévisualiser les séparations en ayant activé la Prévisualisation des surimpressions. Si vous n'avez pas activé la prévisualisation des surimpressions, les recouvrements inversés apparaîtront sous la forme d'une bordure blanche sur les objets.


Sv translation
languagees

Las áreas coloreadas se pueden componer de una mezcla de tintas de proceso que se sobreimprimen entre sí. Los problemas de registro pueden provocar un "borde de color" apreciable en las tintas más claras que se extienden más allá del borde de una tinta más oscura. Para evitar este borde no deseado, es necesario utilizar un Solapamiento de alejamiento para retraer las tintas más claras hacia atrás desde el borde de los objetos.

El objetivo de esta actividad es utilizar la función Alejamiento de Prinergy Tools para solapar un archivo.

Tarea 1: Aplicar Solapamiento de alejamiento a un archivo

  1. Inicie la aplicación Adobe Illustrator.
  2. Abra este documento: 
    View file
    nameKeepaway.ai
    height150
  3. En la barra de menús de Illustrator, en el menú Ventana, seleccione Prinergy ToolsHerramienta de solapadoNota de solapado.


  4. En el cuadro de diálogo Nota de solapado, haga clic en la opción Nueva nota de solapado .
  5. Seleccione la pestaña Configuración de alejamiento.
  6. En la configuración Anchura de alejamiento, escriba 0.205 mm.
  7. Para crear la nota de solapado, en el Nombre de nota, escriba Keepaway.
  8. En la barra de menús de Illustrator, en el menú Ventana, seleccione Prinergy ToolsHerramienta de tintaAdministrador de tintas.


  9. Para actualizar las tintas en el cuadro de diálogo Administrador de tintas, haga clic en el icono Actualizar lista de tintas.
  10. En la barra de menús de Adobe Illustrator, en el menú Ventana, seleccione Prinergy ToolsHerramienta de solapado > Solapamiento automático.


  11. En el cuadro de diálogo Solapamiento, en la lista Nota de solapado, seleccione la nota de solapado Alejamiento que ha creado anteriormente.


  12. Haga clic en el botón Solapamiento: 
    Si no se han seleccionado objetos, aparecerá una ventana de mensaje que se pregunta si desea seleccionar todos los objetos.


  13. Para aplicar solapamiento a todo el archivo, haga clic en .
    Después del solapamiento, se generará una nueva capa de solapamiento y aparecerá el cuadro de diálogo de los pares de colores de solapamiento. Cuando aparece este cuadro de diálogo, el solapamiento automático ha finalizado y ha aplicado el solapamiento de alejamiento al archivo.

Tarea 2: Ver los objetos solapados

Para ver los objetos solapados, en la barra de menús de Illustrator, en el menú Ventana, seleccione Vista previa de separaciones con la opción Vista previa de sobreimpresión activada. Si la opción Vista previa de sobreimpresión no está activada, los solapamientos de alejamiento aparecerán como un borde blanco en los objetos.


Sv translation
languagezh

彩色区域可以由相互叠印的印刷油墨混合组成。如果浅色油墨延伸并超过深色油墨的边缘,套准问题会导致明显的“彩色边缘”。要避免这种不想要的边缘,必须使用强制分离陷印让浅色油墨从对象边缘反向收缩。

本练习的目标是使用印能捷工具强制分离陷印功能陷印文件。

任务 1:对文件应用强制分离陷印

  1. 启动 Adobe Illustrator 应用程序。
  2. 打开此文档: 
    View file
    nameKeepaway.ai
    height150
  3. 在 Illustrator 菜单栏的窗口菜单中,选择印能捷工具 > 陷印工具 > 陷印传票


  4. 在“陷印传票”对话框中,单击新建陷印传票选项
  5. 选择强制分离设置选项卡。
  6. 强制分离宽度设置中,键入 0.205 mm
  7. 要创建陷印传票,请在传票名称中键入 Keepaway
  8. 在 Illustrator 菜单栏的窗口菜单中,选择印能捷工具 > 油墨工具 > 油墨管理器


  9. 要更新“油墨管理器”对话框中的油墨,请单击更新油墨列表图标
  10. 在 Adobe Illustrator 菜单栏的窗口菜单中,选择印能捷工具 > 陷印工具 > 自动陷印 


  11. 在“陷印”对话框中,从陷印传票列表中选择您之前创建的强制分离陷印传票。


  12. 单击“陷印”按钮:
    如果未选择任何对象,则会出现一个消息窗口,询问您是否要选择所有对象。


  13. 要将陷印应用到整个文件,请单击
    陷印后,将自动生成新的陷印图层,并将出现陷印颜色对的对话框。当出现此对话框时,自动陷印已完成,并且您已对文件应用了强制分离陷印。

任务 2:查看陷印的对象

要查看陷印的对象,请在 Illustrator 菜单栏的窗口菜单中选择分色预览并启用叠印预览。如果未启用叠印预览,则强制分离陷印将在对象上显示为白色边框。