Page tree

Versions Compared

Key

  • This line was added.
  • This line was removed.
  • Formatting was changed.
Comment: Published by Scroll Versions from space PT and version 2.10
Sv translation
languageen
  1. Choose an embedded bitmap in the current file.
  2. Launch the Adobe Illustrator software and open the file you want to work with.
  3. In the Adobe Illustrator menu bar, in the Window menu, select Prinergy Tools > Tool > Bitmap Outline.
    The Bitmap Outline dialog box appears.
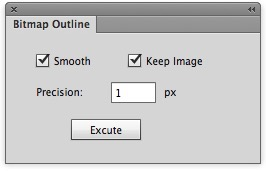
  4. Type a value in the Precision box.
    The Precision setting controls the outline smoothness. The lower the precision value is, the edge is closer to pixel effect.
  5. If you clear the Keep Image check box, the original image will be deleted after bitmap outline.
  6. Click Execute.
    The jagged edge of the bitmap will be converted to vector outline.



Sv translation
languagede
  1. Wählen Sie eine eingebettete Bitmap in der aktuellen Datei aus.
  2. Starten Sie die Adobe Illustrator-Software, und öffnen Sie die Datei, mit der Sie arbeiten möchten.
  3. Wählen Sie in der Menüleiste von Adobe Illustrator im Menü „Fenster“ die Option Prinergy Tools > Werkzeug > Bitmapkontur aus.
    Das Dialogfeld „Bitmapkontur“ wird angezeigt.
  4. Geben Sie einen Wert in das Feld Genauigkeit ein.
    Die Genauigkeitseinstellung steuert die Konturglätte. Je niedriger der Genauigkeitswert ist, desto näher ist die Kante dem Pixeleffekt.
  5. Wenn Sie das Kontrollkästchen Bild beibehalten deaktivieren, wird das ursprüngliche Bild nach der Bitmapkontur gelöscht.
  6. Klicken Sie auf Ausführen.
    Die gezackte Kante der Bitmap wird in eine Vektorkontur konvertiert.


Sv translation
languagefr
  1. Choisissez un bitmap intégré au fichier en cours.
  2. Lancez le logiciel Adobe Illustrator et ouvrez le fichier sur lequel vous souhaitez travailler.
  3. Dans la barre de menu d'Adobe Illustrator, dans le menu Fenêtre, sélectionnez Outils Prinergy > Outil > Contour Bitmap.
    La boîte de dialogue Contour Bitmap apparaît.
  4. Saisissez une valeur dans le champ Précision.
    Les paramètres de précision contrôlent le lissage des contours. Plus la valeur de précision est basse, plus le bord est proche d'un effet pixélisé.
  5. Si vous décochez la case Garder l'image, l'image originale sera supprimée après le contour Bitmap.
  6. Cliquez sur Exécuter.
    Le côté dentelé du bitmap sera converti en cadre vectorisé.


Sv translation
languagees
  1. Elija un mapa de bits incrustado en el archivo actual.
  2. Inicie el software Adobe Illustrator y abra el archivo con el que desea trabajar.
  3. En la barra de menús de Adobe Illustrator, en el menú Ventana, seleccione Prinergy Tools > herramienta > Esquema de mapa de bits.
    Aparece el cuadro de diálogo Esquema de mapa de bits.
  4. Escriba un valor en el cuadro Precisión verificación.
    La configuración de Precisión controla la uniformidad del contorno. Cuando menor sea el valor de precisión, más se acercará el borde del efecto de píxel.
  5. Si desactiva la casilla de verificación Mantener imagen, la imagen original se eliminará después del esquema de mapa de bits.
  6. Haga clic en Ejecutar.
    El borde dentado del mapa de bits se convertirá a un contorno vectorial.


Sv translation
languagezh
  1. 选择当前文件中的嵌入位图。
  2. 启动 Adobe Illustrator 软件并打开要处理的文件。
  3. 在 Adobe Illustrator 菜单栏的窗口菜单中,选择印能捷工具 > 工具 > 位图略图
    将出现“位图略图”对话框。
  4. 精度框中键入一个值。
    “精度”设置用于控制略图平滑度。精度值越低,边缘越接近像素效果。
  5. 如果未选中保留图像复选框,原始图像将在位图略图后删除。
  6. 单击执行
    位图的锯齿边缘将转换为矢量略图。