Page tree

Versions Compared

Key

  • This line was added.
  • This line was removed.
  • Formatting was changed.
Comment: Published by Scroll Versions from space PRINERGY and version 9.0
Sv translation
languageen

Since some press interfaces require additional details in the PrintLink PPF file that are not included in the CIP3 specification, you can customize the CIP3 tags with variables and change the default press interface settings in the PrintLink configuration file.


Customizable tags

In the PrintLink configuration file, you can customize the following tags with Prinergy custom file naming variables:

/CIP3AdmJobName

/CIP3AdmJobCode

/CIP3AdmSheetName (explained below)

/PageSection (explained below)

For example, if your Prinergy job name is Docket12345, and the PrintLink configuration file says AdmJobName=%job%, the CIP3 tag in the PPF file prints /CIP3AdmJobname (Docket12345).


Variables specific to PrintLink

You can customize the CIP tags with any valid custom file naming variables, but the following are specific to PrintLink.

Variable

Description

%jobcode%

This variable takes the job code value as defined in the Prinergy job attributes. You can use this variable in the /CIP3AdmJobName and /CIP3AdmJobCode tags.

%Side%

This variable prints F for front or B for back. Use this variable with the /CIP3AdmSheetName tag.

%SideJapanese%

This variable prints O for Omote (front) and U for Ura (back). Use this variable with the /CIP3AdmSheetName tag for Japanese output.

%Lowpagenumber%

This variable prints the low page folio on any given surface. It is the default variable for the /PageNumber tag, however, some newspaper press consoles require the low page folio in the /CIP3AdmJobName tag.

%SignatureLetter%

This variable replaces the Prinergy signature number with a letter. For example, signature 1 is replaced with an A, signature 2 is replaced with a B, and so on.
Use this variable with the /PageSection tag.


Changing default press interface settings

You can edit the PrintLink configuration file to override the following press interface defaults. You activate the tag by removing the crosshatch (#) and then changing the default value (for example, from =false to =true).

#AdmInkColors=true (to add spot colors in L*a*b*. This is useful for Brisque customers who are migrating to Prinergy and use Heidelberg Reader Stations.)

#AlwaysFront=true (to output backs to fronts.)

#SwapFrontswithBacks=true (to output so that back data appears before front data)

#ReplaceUnderscoresFromJobName=false

#RotateWithPreviewMatrix=false

#OutputJDF=false

#OutputLowPageNumber=false

#UseImpoNameForAdmJobName=true

#UseSigNumInSheetNum=false

#UseImpoNameInFilename=true

#MirrorWithPreviewMatrix=false

#AdmJobName=%job%

#AdmSheetName=%signature%/%sheet%%side%

#PageSection=%signatureletter%

#OutputLowPageNumber=false (to output special newspaper tags in the PPF file)

#AdmInkColors=false (to output the AdmInkColors tag in the PPF file)

#OutputKBATags=false (to output special KBA tags in the PPF file)

#KBAPlateType=Broadsheet

#KBAPageType=Broadsheet


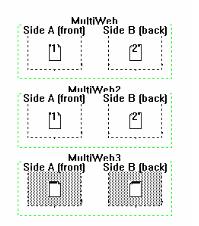
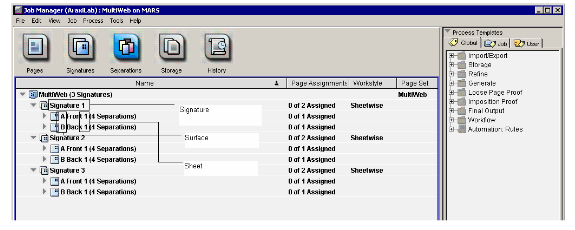
Multi-Web impositions and Printlink

Some ink key reader stations need the /CIP3AdmSheetName tag to define the web and sheet numbers in a web.sheet format. This usually takes the form of 1.1 and 2.1 (1.1 = web 1 sheet 1 and 2.1 = Web 2 sheet 2). For multiweb impositions to work with PrintLink and Prinergy you must first create each web as its own signature in Preps.


Note: The screen shots below are the only multi-web impositions that will work to achieve the tag values mentioned above.

Each web will need to be defined as its own signature in Preps (see screen shots below). Some customers create an imposition for each web or create multiple webs in 1 signature (we cannot populate the sheetname tag when the imposition is created in this way).

Figure 1: Multi Web Template in Preps

Figure 2: Preps template imported into Prinergy (Prinergy Separation View)

For the above template, the ink reader station requires the /Cip3admsheetname value of “1.1”. Where the number before the “dot” represents the Web, and the number after the “dot” represents the Sheet. To achieve this enter the following line in your Printlink configuration file: AdmSheetName=%signature%.%sheet%.

This results in the following values in PPF files. The examples below are for Side A. Side B would be the same values, since it is considered part of the same sheet.

Then edit the PrintLink configuration file to read:

/CIP3AdmSheetName=%signature%.%sheet%

The PPF File prints the following values.

For web/signature 1:
/CIP3AdmSheetName (1.1)
where
1.1 = web 1, sheet 1

For web/signature 2:
/CIP3AdmSheetName (2.1)
where
2.1 = web 2, sheet 1

For web/signature 3:
/CIP3AdmSheetName (3.1)
where
3.1 = web 3, sheet 1


/PageSection tag

The /PageSection tag is populated when you activate it in the PrintLink configuration file and select Generic Newspaper Press Interface in the Press Interface list in the PrintLink section of the process template.
Because Prinergy does not use sections, substitute signatures instead. Create each section as a signature in Preps. Then use the variable %SignatureLetter% to change the signature number to a letter—for example, signature 1 to pagesection A, signature 2 to pagesection B, and so on.

For example, when you edit the PrintLink configuration file to read:

/PageSection=%SignatureLetter%

The PPF file prints:

/PageSection (A)
where
A = signature 1
Alternatively, you can set up sheets or surfaces as sections, and use the %sheet% or %surface% variables.

Less common settings (these override the settings in the press interface)

#ReplaceUnderscoresFromJobName=false

#RotateWithPreviewMatrix=false

#OutputJDF=false

#UseImpoNameForAdmJobName=true

#UseSigNumInSheetNum=false

#UseImpoNameInFilename=true

#OutputLowPageNumber=false

Note: You can change the value of the above settings to override the press interface defaults.


Sv translation
languagefr

Comme certaines interfaces de la presse exigent des détails supplémentaires dans le fichier PrintLink PPF qui ne sont pas inclus dans la spécification CIP3, vous pouvez personnaliser les balises CIP3 avec des variables et modifier les paramètres par défaut de l'interface de la presse dans le fichier de configuration PrintLink.

Balises personnalisables

Vous pouvez, dans le fichier de configuration PrintLink, personnaliser les balises suivantes à l'aide des variables de dénomination de fichiers personnalisée Prinergy :

/CIP3AdmJobName
/CIP3AdmJobCode
/CIP3AdmSheetName (expliquée ci-dessous)
/PageSection (expliquée ci-dessous)

Par exemple, si le nom du travail Prinergy est Docket12345 et que le fichier de configuration PrintLink indique AdmJobName=%job%, la balise CIP3 du fichier PPF imprime /CIP3AdmJobname (Docket12345).


Variables propres à PrintLink

Vous pouvez personnaliser les balises CIP en utilisant n'importe quelle variable de dénomination de fichiers personnalisée valide, mais les variables suivantes sont propres à PrintLink.

Variable

Description

%jobcode%

Cette variable utilise la valeur du code du travail telle que définie dans les attributs de travail Prinergy. Cette variable peut être utilisée dans les balises /CIP3AdmJobName et /CIP3AdmJobCode.

%Side%

La variable imprime F pour le recto (front) ou B pour le verso (back). Utilisez cette variable avec la balise /CIP3AdmSheetName.

%SideJapanese%

Cette variable imprime O pour Omote (recto) et U pour Ura (verso). Utilisez cette variable avec la balise /CIP3AdmSheetName pour une impression en japonais.

%Lowpagenumber%

Cette variable imprime le bas folio de page sur toute surface donnée. Il s'agit de la variable par défaut de la balise /PageNumber, toutefois, certaines consoles de presse de journaux exigent que le bas folio de page figure dans la balise /CIP3AdmJobName.

%SignatureLetter%

Cette variable remplace le numéro de cahier Prinergy par une lettre. Par exemple, le cahier 1 est remplacé par un A, le cahier 2 est remplacé par un B, etc.
Utilisez cette variable avec la balise /PageSection.


Modification des paramètres par défaut de l'interface de la presse

Vous pouvez modifier le fichier de configuration PrintLink pour remplacer les valeurs par défaut de l'interface de la presse suivantes. Pour activer la balise, il suffit de supprimer le signe marqué d'un carré (#), puis de modifier la valeur par défaut (par exemple, en changeant =false par =true).

#AdmInkColors=true (ajout de couleurs d'accompagnement dans L*a*b*. Très utile pour les clients Brisque migrant vers Prinergy et utilisant Heidelberg Reader Stations.)

#AlwaysFront=true (pour sortir les recto en verso.)

#SwapFrontswithBacks=true (pour la sortie de telle sorte que les données de l'arrière apparaissent devant les données de l'avant)

#ReplaceUnderscoresFromJobName=false

#RotateWithPreviewMatrix=false

#OutputJDF=false

#OutputLowPageNumber=false

#UseImpoNameForAdmJobName=true

#UseSigNumInSheetNum=false

#UseImpoNameInFilename=true

#MirrorWithPreviewMatrix=false

#AdmJobName=%job%

#AdmSheetName=%signature%/%sheet%%side%

#PageSection=%signatureletter%

#OutputLowPageNumber=false (pour sortir les balises spéciales de journaux dans le fichier PPF)

#AdmInkColors=false (pour sortir la balise AdmInkColors dans le fichier PPF)

#OutputKBATags=false (pour sortir les balises KBA spéciales dans le fichier PPF)

#KBAPlateType=Broadsheet

#KBAPageType=Broadsheet


Balise /CIP3AdmSheetName

Certains lecteurs à vis d'encrage requièrent la balise /CIP3AdmSheetName pour définir les numéros de feuille et de bande au format web.sheet. En ce qui concerne les impositions complexes à manipuler avec PrintLink et Prinergy, vous devez créer au préalable chaque bande en tant que cahier propre dans Preps.

Modifiez ensuite le fichier de configuration PrintLink pour qu'il s'affiche comme suit :

/CIP3AdmSheetName=%signature%.%sheet%

Le fichier PPF imprime les valeurs suivantes.

Pour bande/cahier 1 :
/CIP3AdmSheetName (1.1)

1.1 = bande 1, feuille 1

Pour bande/cahier 2 :
/CIP3AdmSheetName (2.1)

2.1 = bande 2, feuille 1

Pour plus d'informations sur la configuration des impositions complexes, consultez le bulletin technique Configurable PrintLink (PrintLink configurable).


Balise /PageSection

La balise /PageSection est remplie lorsque vous l'activez dans le fichier de configuration PrintLink et lorsque vous sélectionnez Interface de la presse de journal générique dans la liste Interface de la presse de la section PrintLink du modèle de processus.

Dans la mesure où Prinergy n'utilise pas de sections, remplacez par des cahiers. Créez chaque section sous la forme d'un cahier dans Preps. Utilisez ensuite la variable %SignatureLetter% pour remplacer le numéro du cahier par une lettre -par exemple, cahier 1 par pagesection A, cahier 2 par pagesection B, etc.

Par exemple :

lorsque vous modifiez le fichier de configuration PrintLink pour qu'il s'affiche comme suit :

/PageSection=%SignatureLetter%

Le fichier PPF imprime :

/PageSection (A)

A = cahier 1

Si vous le souhaitez, vous pouvez également configurer les feuilles ou les côtés en tant que sections en utilisant les variables %sheet% ou %surface%.

Sv translation
languagezh

由于某些印刷机接口需要从 PrintLink PPF 文件中获得其他详细信息,而这些详细信息并未包括在 CIP3 规范中,因此您可以用变量自定义 CIP3 标记,并更改 PrintLink 配置文件中的默认印刷机接口设置。

可自定义的标记

在 PrintLink 配置文件中,可以使用印能捷自定义文件命名变量自定义下列标记:
/CIP3AdmJobName
/CIP3AdmJobCode
/CIP3AdmSheetName (下面进行了解释)
/PageSection(下面进行了解释)

例如,如果您的印能捷作业名称为 Docket12345,并且 PrintLink 配置文件显示 AdmJobName=%job%,那么 PPF 文件中的 CIP3 标记打印 /CIP3AdmJobname (Docket12345)


PrintLink 特定变量

可以使用有效自定义文件命名变量自定义 CIP 标记,但是下列标记为 PrintLink 专用的。

变量

说明

%jobcode%

该变量取印能捷作业属性中定义的作业代码值。可以在 /CIP3AdmJobName/CIP3AdmJobCode 标记中使用此变量。

%Side%

该变量对于正面为 F,对于反面为 B。在 /CIP3AdmSheetName 标记中使用该变量。

%SideJapanese%

该变量对正面印刷 O,对背面印刷 U。对于日语输出,在 /CIP3AdmSheetName 标记中使用该变量。

%Lowpagenumber%

该变量在任何给定的印面上打印低页码。它是 /PageNumber 标记的默认变量,但是,一些报纸印刷控制台需要 /CIP3AdmJobName 标记中使用低页码。

%SignatureLetter%

该变量将印能捷折标数字替换为字母。例如,帖 1A 替换,帖 2B 替换, 以此类推。
该变量和 /PageSection 标记一起使用。


更改默认印刷机接口设置

可以编辑 PrintLink 配置文件以覆盖以下印刷机接口默认值。可以通过移去井号 (#) 然后更改默认值(例如,从 =false 更改为 =true)而激活标记。

#AdmInkColors=true(向 L*a*b* 添加专色。这对于想要迁移到印能捷并使用 Heidelberg Reader Station 的必胜客户很有用。)

#AlwaysFront=true(将反面输出到正面。)

#SwapFrontswithBacks=true(输出时背面数据显示在正面数据之前)

#ReplaceUnderscoresFromJobName=false

#RotateWithPreviewMatrix=false

#OutputJDF=false

#OutputLowPageNumber=false

#UseImpoNameForAdmJobName=true

#UseSigNumInSheetNum=false

#UseImpoNameInFilename=true

#MirrorWithPreviewMatrix=false

#AdmJobName=%job%

#AdmSheetName=%signature%/%sheet%%side%

#PageSection=%signatureletter%

#OutputLowPageNumber=false(输出 PPF 文件中的特殊报纸标记)

#AdmInkColors=false(输出 PPF 文件中的 AdmInkColor 标记)

#OutputKBATags=false(输出 PPF 文件中的特殊 KBA 标记)

#KBAPlateType=Broadsheet

#KBAPageType=Broadsheet


/CIP3AdmSheetName 标记

一些读者配置的油墨值需要 /CIP3AdmSheetName 标记以 web.sheet 格式定义轮转和单张编号。要使多轮转拼版用于 PrintLink 和印能捷,必须先在 Preps 中将每个轮转创建为其自己的帖。

然后将 PrintLink 配置文件编辑为:

/CIP3AdmSheetName=%signature%.%sheet%

PPF 文件打印下列值:

对于轮转/帖 1:
/CIP3AdmSheetName (1.1)
其中
1.1 = 轮转 1,单张 1

对于轮转/帖 2:
/CIP3AdmSheetName (2.1)
其中
2.1 = 轮转 2,单张 1

有关如何设置多轮转拼版的详细信息,请参见技术公告"可配置的 PrintLink"。


/PageSection 标记

当在 PrintLink 配置文件中激活 /PageSection 标记并在处理模板的 PrintLink 部分的印刷机接口列表中选择通用报纸印刷机接口时,该标记就会填写内容,
因为印能捷不使用部分,请替换为帖。在 Preps 中将每个部分创建为一个帖。然后使用变量 %SignatureLetter% 将帖更改为一个字母,例如帖 1 更改为页面部分 A,帖 2 更改为页面部分 B,以此类推。

例如:

当将 PrintLink 配置文件编辑为:

/PageSection=%SignatureLetter%

PPF 文件为:

/PageSection (A)
其中
A = 帖 1

或者,可以将印张或印面设置为部分,并使用 %sheet%%surface% 变量。

Sv translation
languagede

Da einige Druck-Interfaces zusätzliche Informationen aus der PrintLink-PPF-Datei erfordern, die nicht in der CIP3-Spezifikation vorhanden sind, können Sie die CIP3-Tags mithilfe von Variablen anpassen und die Standardeinstellungen für das Druck-Interface in der PrintLink-Konfigurationsdatei verändern.

Anpassbare Tags

In der PrintLink-Konfigurationsdatei können Sie die folgenden Tags mithilfe von Variablen zur Änderung von Prinergy-Dateinamen anpassen:

/CIP3AdmJobName
/CIP3AdmJobCode
/CIP3AdmSheetName (unten erläutert)
/PageSection (unten erläutert)

Wenn Ihr Prinergy-Job beispielsweise den Namen Docket12345 hat und die PrintLink-Konfigurationsdatei AdmJobName=%job% enthält, wird das CIP3-Tag in der PPF-Datei als /CIP3AdmJobname (Docket12345) gedruckt.


PrintLink-spezifische Variable

Sie können die CIP-Tags mit allen gültigen benutzerdefinierbaren Variablen zur Dateibenennung anpassen. Die für PrintLink spezifischen Variablen finden Sie nachfolgend aufgeführt.

Variable

Beschreibung

%jobcode%

Diese Variable greift auf den in den Prinergy-Job-Attributen definierten Job-Code-Wert zurück. Sie kann in den Tags /CIP3AdmJobName und /CIP3AdmJobCode verwendet werden.

%Side%

Die Variable druckt F für Front (vorn) bzw. B für Back (hinten). Sie kann in dem Tag /CIP3AdmSheetName verwendet werden.

%SideJapanese%

Diese Variable gibt ein O für Omote (Vorderseite) und ein U für Ura (Rückseite) aus. Sie kann im Rahmen einer japanischen Ausgabe für den Tag /CIP3AdmSheetName verwendet werden.

%Lowpagenumber%

Diese Variable druckt die niedrige Folio-Seitennummerierung auf jede festgelegte Form. Sie ist die Standardvariable für den Tag /PageNumber. Andere Zeitungs-Druckmaschinenkonsolen hingegen erfordern die niedrige Folio-Seitennummerierung im Tag CIP3AdmJobName.

%SignatureLetter%

Diese Variable ersetzt die Prinergy-Signaturnummer durch einen Buchstaben. Beispiel: Signatur 1 wird ersetzt durch ein A, Signatur 2 wird ersetzt durch ein B, usw.
Verwenden Sie diese Variable zusammen mit dem Tag /PageSection.


Ändern der Standardeinstellungen für das Druck-Interface

Sie können die PrintLink-Konfigurationsdatei bearbeiten, um die folgenden Druck-Interface-Standardeinstellungen zu überschreiben. Tags werden aktiviert, indem Sie das Nummernzeichen (#) entfernen und den voreingestellten Wert ändern (z. B. von = falsch zu =wahr).

#AdmInkColors=true (Option zum Hinzufügen von Sonderfarben in L*a*b*. Dies ist nützlich für Kunden von Brisque, die eine Migration auf Prinergy durchführen und Heidelberg-Stationen verwenden.)

#AlwaysFront=true (Option zum Drucken von der Rückseite zur Vorderseite)

#SwapFrontswithBacks=true (Option zum Drucken der Daten auf der Rückseite vor den Daten der Vorderseite)

#ReplaceUnderscoresFromJobName=false

#RotateWithPreviewMatrix=false

#OutputJDF=false

#OutputLowPageNumber=false

#UseImpoNameForAdmJobName=true

#UseSigNumInSheetNum=false

#UseImpoNameInFilename=true

#MirrorWithPreviewMatrix=false

#AdmJobName=%job%

#AdmSheetName=%signature%/%sheet%%side%

#PageSection=%signatureletter%

#OutputLowPageNumber=false (Option zum Drucken von besonderen Zeitungs-Tags in der PPF-Datei)

#AdmInkColors=false (Option zum Drucken des Tags „AdmInkColors" in der PPF-Datei)

#OutputKBATags=false (Option zum Drucken von besonderen KBA-Tags in der PPF-Datei)

#KBAPlateType=Broadsheet

#KBAPageType=Broadsheet


Tag „/CIP3AdmSheetName"

Einige Stationen benötigen das Tag /CIP3AdmSheetName, um die Bahn- und Bogennummern im Bahn.Bogen-Format zu definieren. Um auch Ausschießschemata mit mehreren Bahnen mit PrintLink und Prinergy bearbeiten zu können, müssen Sie zunächst für jede Bahn in Preps eine eigene Signatur erstellen.

Definieren Sie die PrintLink-Konfigurationsdatei wie folgt:

/CIP3AdmSheetName=%signature%.%sheet%

Die PPF-Datei druckt die folgenden Werte:

Für Bahn/Signatur 1:
/CIP3AdmSheetName (1.1)
wobei:
1.1 = Bahn 1, Bogen 1

Für Bahn/Signatur 2:
/CIP3AdmSheetName (2.1)
wobei:
2.1 = Bahn 2, Bogen 1

Weitere Informationen zur Einrichtung von Ausschießschemata mit mehreren Bahnen finden Sie im technischen Merkblatt „Configurable PrintLink" (Konfigurierbares PrintLink).


Tag „/PageSection"

Das Tag /PageSection wird mit Seitenverweisen versehen, wenn Sie dieses in der PrintLink-Konfigurationsdatei aktivieren und wenn Sie die Option Generisches Interface für Zeitungsdruckmaschinen in der Liste Druck-Interface des Prozessvorlagenbereichs PrintLink auswählen.

Da Prinergy keine Abschnitte verwendet, sind diese durch Signaturen zu ersetzen. Erstellen Sie jeden Abschnitt in Preps als Signatur. Verwenden Sie dann die Variable %SignatureLetter%, um die Signaturnummer in einen Buchstaben umzuwandeln, z. B. Signatur 1 in Seitenabschnitt A, Signatur 2 in Seitenabschnitt B usw.

Beispiel:

Wenn die PrintLink-Konfigurationsdatei wie folgt konfiguriert wird:

/PageSection=%SignatureLetter%

druckt die PPF-Datei:

/PageSection (A)
wobei:
A = Signatur 1

Alternativ dazu können Sie Bogen oder Formen als Abschnitte einrichten, und dementsprechend die Variable %sheet% bzw. %surface% verwenden.

Sv translation
languageja

一部のプレス インターフェイスでは、CIP3 仕様に含まれていない、PrintLink PPF ファイルの追加の詳細情報が必要です。そのため、CIP3 タグを変数でカスタマイズし、PrintLink 設定ファイルのデフォルトのプレス インターフェイス設定を変更することができます。

カスタマイズ可能なタグ

PrintLink 設定ファイルでは、以下のタグを Prinergy カスタム ファイル命名変数でカスタマイズできます。

/CIP3AdmJobName
/CIP3AdmJobCode
/CIP3AdmSheetName(以下で説明)
/PageSection(以下で説明)

たとえば、Prinergy ジョブ名がDocket12345で、PrintLink の設定ファイルでAdmJobName=%job%と指定されている場合は、PPF ファイルの CIP3 タグは、/CIP3AdmJobname (Docket12345)となります。


PrintLink に特有の変数

CIP タグは、任意の有効なカスタム ファイル命名変数でカスタマイズできますが、以下にあげるのは PrintLink に特有のものです。

変数

説明

%jobcode%

Prinergy ジョブ属性に定義されているジョブ コード値をとります。この変数は/CIP3AdmJobNameタグと/CIP3AdmJobCodeタグで使用できます。

%Side%

変数は表面ではF、裏面ではBを出力します。この変数は/CIP3AdmSheetNameタグで使用します。

%SideJapanese%

この変数は、表にO、裏にUを印刷します。この変数は、日本語の出力を行う際に/CIP3AdmSheetNameタグで使用します。

%Lowpagenumber%

この変数は、任意の与えられた面に一番小さいページ フォリオを出力します。これは/PageNumberタグのデフォルト変数ですが、一部の新聞用のプレス コンソールでは /CIP3AdmJobNameタグに一番小さいページ フォリオが必要です。

%SignatureLetter%

この変数は、Prinergy 折丁番号を文字に置き換えます。たとえば、折丁1Aで置き換えられ、 折丁2Bで置き換えられます (以下同様)。
日本語で出力する場合は、この変数に/PageSectionタグを付けてください。


デフォルトのプレス インターフェイス設定の変更

PrintLink 設定ファイルを編集して、以下のプレス インターフェイスのデフォルトを上書きできます。タグをアクティブにするには、シャープ記号(#)を削除し、デフォルト値を変更します。たとえば、=falseを =trueに変更します。

#AdmInkColors=true(L*a*b* でスポット カラーを追加)。これは、Prinergy に移行し、Heidelberg Reader Stations を使用しようとしている Brisque ユーザーにとって有用です。

#AlwaysFront=true(裏を表に出力)

#SwapFrontswithBacks=true(裏のデータを表のデータより先に出力)

#ReplaceUnderscoresFromJobName=false

#RotateWithPreviewMatrix=false

#OutputJDF=false

#OutputLowPageNumber=false

#UseImpoNameForAdmJobName=true

#UseSigNumInSheetNum=false

#UseImpoNameInFilename=true

#MirrorWithPreviewMatrix=false

#AdmJobName=%job%

#AdmSheetName=%signature%/%sheet%%side%

#PageSection=%signatureletter%

#OutputLowPageNumber=false(新聞用の特別なタグを PPF ファイルに出力)

#AdmInkColors=false(AdmInkColors タグを PPF ファイルに出力)

#OutputKBATags=false(特別な KBA タグを PPF ファイルに出力)

#KBAPlateType=Broadsheet

#KBAPageType=Broadsheet


/CIP3AdmSheetName タグ

一部のインキ キー リーダー ステーションでは、/CIP3AdmSheetNameタグを使用して原反とシートの番号を <原反>.<シート> 形式で定義する必要があります。PrintLink と Prinergy で複数の原反の面付けを使用するには、まず Preps で各原反をそれ自体の折丁として作成する必要があります。

次に、PrintLink 設定ファイルを以下のように編集します。

/CIP3AdmSheetName=%signature%.%sheet%

PPF ファイルでは以下の値が出力されます。

原反/折丁 1:
/CIP3AdmSheetName (1.1)
ここでは以下のようになります。
1.1 = web 1, sheet 1

原反/折丁 2:
/CIP3AdmSheetName (2.1)
ここでは以下のようになります。
2.1 = web 2, sheet 1

複数の原反を使用した面付けの設定方法の詳細については、技術報告『Configurable PrintLink(設定可能な PrintLink)』(英語)を参照してください。


/PageSection タグ

/PageSectionタグは、PrintLink 設定ファイルでこのタグをアクティブにし、プロセス テンプレートのPrintLinkセクションにあるプレス インターフェイスリストで標準プレス インターフェイスを選択した場合に使用されます。
Prinergy ではセクションは使用されないため、代わりに折丁に置き換えます。Preps で各セクションを折丁として作成します。次に変数%SignatureLetter%を使用して、折丁番号を文字に変換します。たとえば、折丁 1 を ページセクション A に、折丁 2 をページセクション B になどに変換します。

例を次に示します。

PrintLink 設定ファイルを以下のように編集します。

/PageSection=%SignatureLetter%

PPF ファイルでは以下のように出力が行われます。

/PageSection (A)

ここでは以下のようになります。
A = signature 1

代わりに、シートや面をセクションとして設定し、%sheet%変数、または%surface%変数を使用することもできます。

Sv translation
languagees

Puesto que algunas interfaces de prensa requieren detalles adicionales en el archivo PPF de PrintLink que no se incluyen en la especificación CIP3, es posible personalizar las etiquetas CIP3 con variables y cambiar los valores predeterminados de la interfaz de prensa en el archivo de configuración de PrintLink.

Etiquetas que se pueden personalizar

En el archivo de configuración de PrintLink puede personalizar las siguientes etiquetas con el archivo personalizado de Prinergy nombrando variables:

/CIP3AdmJobName
/CIP3AdmJobCode
/CIP3AdmSheetName (se explica a continuación)
/PageSection (se explica a continuación)

Por ejemplo, si el nombre de trabajo de Prinergy es Docket12345 y el archivo de configuración de PrintLink es AdmJobName=%job%, la etiqueta CIP3 del arhivo PDF imprimirá /CIP3AdmJobname (Docket12345).


Variables específicas para PrintLink

Puede personalizar las etiquetas CIP con cualquier variable de denominación en archivos personalizados válidos, pero las que aparecen a continuación son específicas para PrintLink.

Variable

Descripción

%jobcode%

Esta variable toma el valor del código de trabajo tal y como se define en los atributos del trabajo de Prinergy. Puede utilizar esta variable en las etiquetas /CIP3AdmJobName y /CIP3AdmJobCode.

%Side%

La variable puede ser F para el anverso (front) o B para el reverso (back). Utilice esta variable con la etiqueta /CIP3AdmSheetName.

%SideJapanese%

Esta variable imprime O para Omote (delantero) y U para Ura (trasero). Utilice esta variable con la etiqueta /CIP3AdmSheetName para salidas en japonés.

%Lowpagenumber%

Esta variable imprime el folio inferior de la página en cualquier superficie. Es la variable predeterminada para la etiqueta /PageNumber, sin embargo, algunas consolas de prensa de periódicos requieren el folio inferior de la página en la etiqueta /CIP3AdmJobName.

%SignatureLetter%

Esta variable sustituye el número de pliegos de Prinergy con una letra. Por ejemplo, el pliego 1 es sustituido por A, el pliego 2 es sustituido por B, y así sucesivamente.
Utilice esta variable con la etiqueta /PageSection.


Cambio de los valores predeterminados de interfaz de prensa

Puede editar el archivo de configuración de PrintLink para que anule los valores predeterminados de interfaz de prensa que aparecen a continuación. Si desea activar la etiqueta, elimine la almohadilla (#) y cambie el valor predeterminado (por ejemplo, de =false para =true).

#AdmInkColors=true (para agregar colores planos en L*a*b*. Resulta útil para los clientes de Brisque que estén migrando a Prinergy y utilicen estaciones lectoras Heidelberg.)

#AlwaysFront=true (para generar salida de los reversos como anversos)

#SwapFrontswithBacks=true (Para generar salidas de forma que los datos del reverso aparezcan antes que los datos del anverso)

#ReplaceUnderscoresFromJobName=false

#RotateWithPreviewMatrix=false

#OutputJDF=false

#OutputLowPageNumber=false

#UseImpoNameForAdmJobName=true

#UseSigNumInSheetNum=false

#UseImpoNameInFilename=true

#MirrorWithPreviewMatrix=false

#AdmJobName=%job%

#AdmSheetName=%signature%/%sheet%%side%

#PageSection=%signatureletter%

#OutputLowPageNumber=false (para generar la salida de etiquetas de periódico especiales en el archivo PPF)

#AdmInkColors=false (para generar la salida de la etiqueta AdmInkColors en el archivo PPF)

#OutputKBATags=false (para generar la salida de etiquetas KBA especiales en el archivo PPF)

#KBAPlateType=Hoja de periódico de gran formato

#KBAPageType=Hoja de periódico de gran formato


Etiqueta /CIP3AdmSheetName

Algunas estaciones lectoras de valores de tinta exigen la etiqueta /CIP3AdmSheetName para definir la bobina y los números de hoja en un formato bobina.hoja. Para que las imposiciones de varias bobinas funcionen con PrintLink y Prinergy, debe crear en Preps cada bobina como su propio pliego.

A continuación, edite el archivo de configuración de PrintLink para que se lea lo siguiente:

/CIP3AdmSheetName=%signature%.%sheet%

El archivo PPF imprime los siguientes valores.

Para bobina/pliego 1:
/CIP3AdmSheetName (1.1)
donde:
1.1 = Web 1, hoja 1

Para bobina/pliego 2:
/CIP3AdmSheetName (2,1)
donde:
2,1 = Web 2, hoja 1

Para obtener más información acerca de la configuración de las imposiciones de varias bobinas, consulte el boletín técnico sobre PrintLink configurable.


Etiqueta /PageSection

La etiqueta /PageSection se rellena cuando la activa en el archivo de configuración de PrintLink y selecciona Interfaz genérica de prensa de periódicos en la lista Interfaz de prensa dentro de la sección PrintLink de la plantilla de proceso.
Puesto que Prinergy no utiliza secciones, sustitúyalas por pliegos. Cree cada sección como un pliego en Preps. A continuación, utilice la variable %SignatureLetter% para cambiar el número de pliegos por una letra; por ejemplo, pliego 1 por pagesection A, pliego 2 por pagesection B, etc.

Por ejemplo,

Edite el archivo de configuración de PrintLink para que se lea lo siguiente:

/PageSection=%SignatureLetter%

El archivo PPF imprime:

/PageSection (A)
donde:
A = pliego 1

Como alternativa, puede configurar hojas o superficies como secciones y utilizar las variables %sheet% o %surface%.