| Sv translation | ||
|---|---|---|
| ||
This process template section defines how Prinergy places the pages on the output media during CT/LW output to a Karat digital press. Media Media Configuration This area is unavailable. The settings for the Karat device determine the type of paper to be used. Size Determines the size of the media to which you will output the final files. Min Width Sets the minimum width for the specified media in the unit of measure selected in the list. Min Height Sets the minimum height for the specified media in the unit of measure selected in the list. Max Width Sets the maximum width for the specified media in the unit of measure selected in the list. Max Height Sets the maximum height for the specified media in the unit of measure selected in the list. Duplexing This option is available for composite files; it is unavailable for separated files. Front Shift and Back Shift The Front Shift Along Width...Along Height and Back Shift Along Width...Along Height options give finer adjustment when aligning two-sided proofs than with Center Along Width/Height. Use these measurements to shift and align front and back pages along their turn or tumble axes, depending on the page or imposition/layout orientation (portrait or landscape). Layout is 90° Different Than Media Available when you select Cut Sheet or Roll Fed from the Size box. This option is unavailable when you select Digital from the Size box or when you select the Reduce to Fit Media check box. Center and crop page to media size Select this check box when the sheet size of the device is smaller than the media box of the PDF page. PDF Box to Use Select the Trim Box or the Media Box to use as the area of output content. Placement Type Select the type of placement. Style Determines how many pages Prinergy places on each sheet.
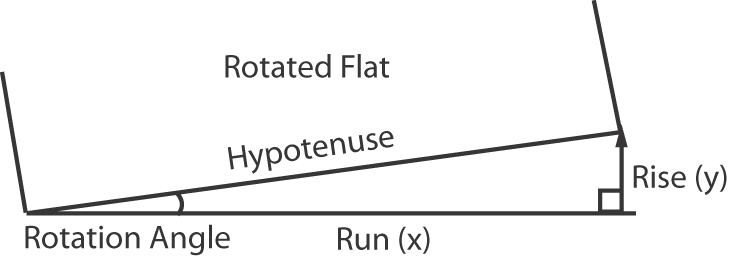
Number of Pages Across Available when N-up is selected in the Style box. Down Available when N-up is selected in the Style box. Vertical Gutter Width Available when Auto Fit is selected in the Style box or N-up is selected in the Style box and the Number of Pages Across box contains a value greater than 1. Horizontal Gutter Height Available when Auto Fit is selected in the Style box, or N-up is selected in the Style box and the Down box contains a value greater than 1. Orientation (See Example: orientation) Flat Rotation Makes a small angle rotation of the flat or output image. Also called plate cocking. Derive the (0.0) percentage value, or gradient, in one of two ways:
To convert an angle to a gradient, use this formula: gradient = tangent of the angle of rotation x 100, where:
Note: To convert a gradient to an angle, enter the gradient into the calculator and apply the inverse tangent function. Example: 2.2% is entered as 0.022 + Inv(erse) key + Tan key = 1.26°.
Scaling Scale Vector Applies scaling to the layout prior to screening the file. The scaling is based on vector data (PDF data). Scale Raster Applies raster scaling to the layout. Raster scaling is an optional feature that will allow you to apply distortion after the files are screened. Spacing Add Extra Horizontal Space (See Example: add extra horizontal space)
Add Extra Vertical Space (See Example: add extra vertical space)
Reduce Gutters if Required Allows gutter values (set in the Horizontal Gutter Height and Vertical Gutter Width boxes in the Placement section) to be reduced if required to fit pages. If selected, gutters will be reduced only to the values set in the Min Horizontal Gutter Height and Min Vertical Gutter Width boxes. Min Vertical Gutter Width Available if the Reduce Gutters if Required check box is selected, N-up is selected in the Style box, and the Down box contains a value greater than 1. Min Horizontal Gutter Height Available if the Reduce Gutters if Required check box is selected, N-up is selected in the Style box, and the Number of Pages Across box contains a value greater than 1. |
| Sv translation | ||
|---|---|---|
| ||
Cette section du modèle de processus définit comment Prinergy place les pages sur le support de sortie pendant la sortie CT/LW vers une presse numérique Karat. Support Configuration de support Cette zone n'est pas disponible. Les paramètres du périphérique Karat déterminent le type de papier à utiliser. Taille Détermine les dimensions du support sur lequel seront imprimés les fichiers finaux. Largeur minimale Définit la largeur minimale du support spécifié dans l'unité de mesure sélectionnée dans la liste. Hauteur minimale Définit la hauteur minimale du support spécifié dans l'unité de mesure sélectionnée dans la liste. Largeur maximale Définit la largeur maximale du support spécifié dans l'unité de mesure sélectionnée dans la liste. Hauteur maximale Définit la hauteur maximale du support spécifié dans l'unité de mesure sélectionnée dans la liste. Recto verso Cette option est disponible pour les fichiers composites, mais pas pour les fichiers séparés. Décalage avant et arrière Les options Décaler recto horizontalement/verticalement et Décaler verso horizontalement/verticalement permettent un meilleur alignement des épreuves recto verso que les options Centrer horizontalement/verticalement. Utilisez ces mesures pour décaler et aligner les pages recto et verso sur leur axe horizontal ou vertical, selon l'orientation de la page ou de l'imposition/mise en page (portrait ou paysage). Différence de mise en page de 90° par rapport au support Disponible lorsque vous sélectionnez Feuille prédécoupée ou En bobine dans le champ Format. Cette option n'est pas disponible lorsque vous sélectionnez Numérique dans le champ Format ou lorsque vous cochez la case Ajuster aux dimensions du support. Centrer et rogner la page à la taille du support Cochez cette case si le format de la feuille sur le périphérique est inférieur à la zone de support de la page PDF. Zone PDF à utiliser Sélectionnez le cadre de rognage ou les zones de support à utiliser en tant que zone pour le contenu de sortie. Positionnement Type Sélectionnez le type de positionnement. Style Détermine combien de pages Prinergy place sur chaque feuille.
Nombre de pages en largeur Cette option est disponible si vous sélectionnez N-poses dans le champ Style. Bas Cette option est disponible si vous sélectionnez N-poses dans le champ Style. Largeur de double coupe verticale Cette option est disponible si vous sélectionnez Ajustement auto dans le champ Style ou si vous sélectionnez N-poses dans le champ Style et que la valeur du champ Nombre de pages en largeur est supérieure à 1. Hauteur de double coupe horizontale Cette option est disponible si vous sélectionnez Ajustement auto dans le champ Style ou N-poses dans le champ Style avec une valeur supérieure à 1 définie dans le champ Hauteur. Orientation (Reportez-vous à la section Exemple : orientation) Fait pivoter une imposition d'un seul bloc. Rotation à plat Crée une faible rotation de l'angle du montage ou de l'image de sortie. Également appelé réglage du travers. Pour trouver la valeur de pourcentage (0,0), ou gradient, procédez suivant l'une des deux méthodes suivantes :
Procédure de conversion d'un angle en gradient : gradient = tangente de l'angle de rotation x 100, où :
Remarque : pour convertir un gradient en angle, entrez le gradient dans la calculatrice et appliquez la fonction tangente inverse. Exemple : 2,2 % est entré sous la forme 0,022 touche Inv(erse) touche Tan = 1,26°.
Remarque : le modèle de processus ne vous permet pas de sélectionner une rotation à plat et un étirement de bande en même temps. Cependant, une fois l'étirement de la bande appliqué, il est possible de spécifier la rotation à plat dans le profil d'étirement de la bande. Mise à l'échelle Vecteur de gamme Applique la mise à l'échelle à la mise en page avant le tramage du fichier. La mise à l'échelle est basée sur des données vectorielles (données PDF). Trame de gamme Applique la mise à l'échelle du tramage à la mise en page. Il s'agit d'une option facultative permettant d'appliquer une distorsion une fois les fichiers tramés. Espacement Ajouter un espace horizontal (Reportez-vous à la section Exemple : ajouter un espace horizontal) Détermine à quel endroit un espace horizontal inutilisé doit être placé.
Ajouter un espace vertical (Reportez-vous à la section Exemple : ajouter un espace vertical) Détermine à quel endroit un espace vertical inutilisé doit être placé.
Réduire les doubles coupes si nécessaire Permet de réduire les valeurs de doubles coupes (définies dans les champs Hauteur des doubles coupes horizontales et Largeur des doubles coupes verticales de la section Positionnement) afin de les ajuster à la page. Si vous activez cette option, les doubles coupes seront réduites seulement aux valeurs définies dans les champs Hauteur minimale des doubles coupes horizontales et Largeur minimale des doubles coupes verticales. Largeur minimale des doubles coupes verticales Cette option est disponible si la case à cocher Réduire les doubles coupes si nécessaire est activée, si l'option N-poses est sélectionnée dans le champ Style et si la valeur du champ Vers le bas est supérieure à 1. Hauteur minimale des doubles coupes horizontales Cette option est disponible si la case Réduire les doubles coupes si nécessaire est cochée, si l'option N-poses est sélectionnée dans le champ Style et si la valeur du champ Nombre de pages en largeurest supérieure à 1. |

| Sv translation | ||
|---|---|---|
| ||
此处理模板部分定义印能捷在将 CT/LW 输出到 Karat 数字设备的过程中如何在输出版材上放置页面。 版材 版材配置 此区域不可用。 Karat 设备的设置决定要使用的纸张类型。 大小 决定了输出最终文件的版材尺寸。 最小宽度 根据在列表中选定的度量单位,设置指定版材的最小宽度。 最小高度 根据在列表中选定的度量单位,设置指定版材的最小高度。 最大宽度 根据在列表中选定的度量单位,设置指定版材的最大宽度。 最大高度 根据在列表中选定的度量单位,设置指定版材的最大高度。 双面印刷 该选项对合成文件可用,而对分色文件则不可用。 前移和后移 对齐双面打样时,沿宽度方向前移...沿高度方向前移和沿宽度方向后移...沿高度方向后移选项比沿宽度/高度方向居中提供了更精细的调整。 根据页面或拼版/版式方向(纵向或横向),使用这些方法来沿着页面的转动或翻滚轴移动和对齐正面及背面页面。 版式与版材差 90° 当您在尺寸框中选择单页纸或纸辊进纸时可用。 当您在尺寸框中选择数字或选择收缩至适合版材尺寸复选框时,此选项不可用。 居中页面并裁切到版材尺寸 如果设备的印张尺寸小于 PDF 页面的版材框,则选择此复选框。 要使用的 PDF 框 选择要用作输出内容区域的净尺寸框或版材框。 布局 类型 选择布局类型。 样式 决定印能捷在每一印张上放置多少页面。
横向页面数量 当在风格框中选择 N-up时,该选项可用。 下侧 当在风格框中选择 N-up时,该选项可用。 垂直装订线宽度 当在风格框中选择自动调整,或在风格框中选择 N-up 以及横向页面数量 框内包含大于 1 的数值时,该选项可用。 水平装订线高度 当在风格框中选择自动调整,或在风格框中选择 N-up 以及纵向框内包含大于 1 的数值时,该选项可用。 方向 (请参见Example: orientation) 平面印版旋转 使平面印版或输出图像进行小角度旋转。也称为印版调整。以下列两种方式之一得出 (0.0) 百分比值或倾斜度:
要将角度转换为梯度,请使用该公式:梯度 = 旋转角度的正切函数 x 100,其中:
缩放比例 缩放矢量 将文件加网前向版式应用缩放比例。这种缩放是基于矢量数据(PDF 数据)。 缩放光栅 向版式应用光栅缩放比例。光栅缩放是一项可选功能,当文件加网后,允许您对文件应用变形。 间隔 (请参见Example: add extra horizontal space)
添加额外垂直间隔 (请参见Example: add extra vertical space)
如果需要则缩短装订线 如果需要适合页面,则允许减小装订线数值(在布局部分的水平装订线高度和垂直装订线宽度框中设置)。如果选择这个选项,装订线数值将只会减少到最小水平装订线高度和最小垂直装订线宽度框中设置的数值。 最小垂直页间距高度 假如选择了如果需要则缩短装订线复选框,风格框中选择 N-up,以及纵向框内包含大于 1 的数值时,该选项可用。 最小水平装订线高度 假如选择了如果需要则缩短装订线复选框,风格框中选择 N-up,以及横向页面数量框内包含大于 1 的数值时,该选项可用。 |

| Sv translation | ||
|---|---|---|
| ||
In diesem Bereich der Prozessvorlage ist definiert, wie Prinergy bei der CT/LW-Ausgabe auf einer Karat-Digitaldruckmaschine die Seiten auf dem Ausgabemedium anordnet. Medium Medienkonfiguration Dieser Bereich ist nicht verfügbar. Die Einstellungen für dieses Karatgerät bestimmen den zu verwendenden Papiertyp. Größe Diese Option legt die Größe des Mediums fest, auf dem die Dateien letztendlich ausgegeben werden. Min. Breite Diese Option legt die minimale Breite für das gewählte Medium in der Maßeinheit fest, die in der Liste ausgewählt wurde. Min. Höhe Diese Option legt die minimale Höhe für das gewählte Medium in der Maßeinheit fest, die in der Liste ausgewählt wurde. Maximale Breite Diese Option legt die maximale Breite für das gewählte Medium in der Maßeinheit fest, die in der Liste ausgewählt wurde. Maximale Höhe Diese Option legt die maximale Höhe für das gewählte Medium in der Maßeinheit fest, die in der Liste ausgewählt wurde. Doppelseitig Diese Option gilt für unseparierte Dateien. Sie steht nicht für separierte Dateien zur Verfügung. Nach vorne/hinten verschieben Mit den Optionen Horizontal/Vertikal nach vorne verschieben und Horizontal/Vertikal nach hinten verschieben können doppelseitige Proofs genauer ausgerichtet werden als mit den Optionen Horizontal zentriert/ Vertikal zentriert. Verwenden Sie diese Optionen dazu, Vorder- und Rückseiten an ihren Dreh- bzw. Umstülpachsen zu verschieben und auszurichten, je nach Ausrichtung der Seiten bzw. des Ausschusses/Layouts (Hoch- oder Querformat). Unterschied von 90° zwischen Layout und Medium Diese Option steht zur Verfügung, wenn Sie im Feld Größe die Option Bogen oder Rolle auswählen. Die Option steht nicht zur Verfügung, wenn Sie im Feld Größe die Option Digital auswählen oder das Kontrollkästchen Auf Mediengröße verkleinern aktivieren. Zentrieren und Seite auf Mediengröße beschneiden Aktivieren Sie dieses Kontrollkästchen, wenn das Bogenformat des Geräts kleiner als der Medienrahmen der PDF-Seite ist. Zu verwendender PDF-Rahmen Wählen Sie den Beschnittrahmen oder Medienrahmen als Bereich für die Inhaltsausgabe aus. Wenn Sie den Beschnittrahmen auswählen, wird z. B. eine beschnittene Ausgabe erzeugt, d. h. eine Ausgabe ohne Randanschnitte oder Registermarken. Platzierung Typ Wählen Sie den Positionierungstyp. Methode Diese Option legt fest, wie viele Seiten auf jedem Bogen positioniert werden sollen.
Anzahl Seiten horizontal Diese Option ist verfügbar, wenn N-Up im Feld Methode ausgewählt ist. Längs Diese Option ist verfügbar, wenn N-Up im Feld Methode ausgewählt ist. Vertikale Bundstegweite Diese Option ist verfügbar, wenn unter Methode die Option Automatisch einpassen bzw. N-up ausgewählt ist und das Feld Anzahl Seiten horizontal einen Wert größer als 1 enthält. Horizontale Bundstegweite Diese Option ist verfügbar, wenn unter Methode die Option Automatisch einpassen bzw. unter Methode die Option N-up gewählt wurde und das Feld Vertikal einen Wert größer als 1 enthält. Ausrichtung (Siehe Example: orientation) Dreht ein vollständiges Ausschießschema als eine Einheit. Ganzformdrehung Diese Option bewirkt die Drehung der Ganzform bzw. des Ausgabebilds um einen geringen Winkel. Dies wird auch als "Verfahren zum schrägen Positionieren von Platten" bezeichnet. Den Prozentwert bzw. Gradienten (0,0) können Sie auf eine der folgenden Arten ermitteln:
Verwenden Sie folgende Formel zum Messen eines Gradienten: Gradient = Anstieg/Verlauf x 100, wobei Folgendes gilt:
Verwenden Sie die folgende Formel, um einen Winkel in einen Gradienten umzuwandeln: Gradient = Tangens des Rotationswinkels x 100, wobei:
Anmerkung: Wenn Sie einen Gradienten in einen Winkel konvertieren möchten, geben Sie den Gradienten in den Rechner ein und wenden die umgekehrte Tangensfunktion an. Beispiel: 2,2 % wird eingegeben als 0,022 + Inv(ers)-Taste + tan-Taste = 1,26°.
Anmerkung: In der Prozessvorlage können Sie Ganzformdrehung und Papierausdehnung nicht gleichzeitig auswählen. Wenn jedoch die Papierausdehnung angewendet wird, kann eine Ganzformdrehung im Papierausdehnungsprofil festgelegt werden. Skalierung Skalieren - Vektor Beim Auswählen dieser Option wird vor dem Rastern der Datei eine Skalierung auf das Layout angewendet. Die Skalierung basiert auf den Vektordaten (PDF-Daten). Skalieren - Raster Bei Auswahl dieser Option wird Rasterskalierung auf das Layout angewendet. Rasterskalierung ist eine optionale Funktion, mit der Sie nach dem Rastern der Dateien eine Verzerrung durchführen können. Abstände Zusätzlichen horizontalen Platz hinzufügen (Siehe Example: add extra horizontal space) Diese Option legt die Position der zusätzlichen horizontalen Randzugabe fest.
Zusätzlichen vertikalen Platz hinzufügen (Siehe Beispiel: Zusätzlichen vertikalen Platz hinzufügen) Diese Option legt die Position der zusätzlichen vertikalen Randzugabe fest.
Bundstege verkleinern, falls erforderlich Diese Option dient zum Verringern der Bundstegwerte (unter Horizontale Bundstegweite und Vertikale Bundstegweite des Bereichs Positionierung), um sie an die Seitengröße anzupassen. Wenn diese Option ausgewählt ist, werden die Bundstegmaße nur auf die Werte verkleinert, die unter Minimale horizontale Bundstegweite und Minimale vertikale Bundstegweite angegeben wurden. Minimale vertikale Bundstegweite Diese Option ist verfügbar, wenn das Kontrollkästchen Bundstege verkleinern, falls erforderlich aktiviert ist, im Feld Methode der Eintrag N-up ausgewählt wurde und das Feld Vertikal einen Wert größer als 1 enthält. Minimale horizontale Bundstegweite Diese Option ist verfügbar, wenn das Kontrollkästchen Bundstege verkleinern, falls erforderlich aktiviert ist, im Feld Methode der Eintrag N-up ausgewählt ist und das Feld Anzahl Seiten horizontaleinen Wert größer als 1 enthält. |

| Sv translation | ||
|---|---|---|
| ||
プロセス テンプレートのこのセクションでは、Karat デジタル印刷機への CT/LW 出力時にページが Prinergy により出力メディアに配置される方法を定義します。 メディア メディア設定 この領域は使用できません。 Karat デバイスの設定により、使用される用紙の種類が決定されます。 サイズ 最終ファイルを出力するメディアのサイズを指定します。 最小幅 指定したメディアの幅の最小値を、リストで選択した単位で設定します。 最小長さ 指定したメディアの長さの最小値を、リストで選択した単位で設定します。 最大幅 指定したメディアの幅の最大値を、リストで選択した単位で設定します。 最大長さ 指定したメディアの長さの最大値を、リストで選択した単位で設定します。 面付け型式 このオプションはコンポジット ファイルに使用できます。分版ファイルには使用できません。 フロント シフトおよびバック シフト 幅方向フロント シフト...高さ方向と幅方向バック シフト...高さ方向オプションでは、両面プルーフの位置合わせで横/高さ方向の中央より詳細な調整が可能です。 これらの値を使用して、ページまたは面付け/レイアウト方向(縦または横)に応じて、フロントおよびバックのページをどん天または達磨どん天方向にシフトし、位置合わせをします。 メディアに対してページを 90°回転 サイズボックスでカット紙またはロール紙を選択した場合に使用可能です。 このオプションは、サイズボックスでデジタルを選択した場合、またはメディアに合わせて縮小チェックボックスをオンにした場合は使用できません。 ページをメディアの中央に配置してトリミング デバイスの用紙サイズが PDF ページのメディア ボックスより小さい場合にオンにします。 出力範囲 出力内容の領域として使用するトリミング ボックスまたはメディア ボックスを選択します。 配置 タイプ 配置のタイプを選択します。 スタイル Prinergy で各シートに配置するページ数を指定します。
横のページ数 スタイルでN アップが選択されている場合に使用可能です。 縦のページ数 スタイルでN アップが選択されている場合に使用可能です。 上下のドブ幅 スタイルボックスで自動フィットが選択されている場合、またはスタイルボックスでN アップが選択されていて横のページ数ボックスに 1 より大きい値が設定されている場合に使用可能です。 左右のドブ幅 スタイルボックスで自動フィットが選択されている場合、またはスタイルボックスでN アップが選択されていて縦のページ数ボックスに 1 より大きい値が設定されている場合に使用可能です。 方向 (Example: orientationを参照) フラット回転 フラットまたは出力画像を小さい角度で回転します。プレート コッキングとも呼ばれます。パーセント値、または傾き度(0.0)を以下の 2 つの方法のいずれかで計算します。
勾配を測定するには、次の式を使用します:勾配 = Y 座標の変化÷X 座標の変化 x 100。
角度を勾配に変換するには、次の式を使用します:勾配 = 回転角度のタンジェント x 100。
注: 諧調度を角度に変換するには、計算機に諧調度を入力して、Inv(erse) Tan(gent)(逆タンジェント)関数を適用します。 例:2.2% を 0.022 と入力し、0.022 + Inv(erse)キー + Tan キー = 1.26°になります。
注: プロセス テンプレートでは、フラット回転と見当加減を同時に選択できません。 ただし、見当加減が適用される場合は、フラット回転を見当加減プロファイルで指定できます。 拡大/縮小 スケール(ベクター) ファイルをスクリーニングする前に、レイアウトにスケーリングを適用します。スケーリングはベクター データ(PDF データ)に基づいて実行されます。 スケール(ラスター) ラスター スケーリングをレイアウトに適用します。ラスタ スケーリングはオプション機能で、ファイルがスクリーンされた後で補正を適用できます。 余白 左右に余白を追加 (Example: add extra horizontal spaceを参照) 使用されない左右の余白をどこに配置するかを決定します。
上下に余白を追加 (Example: add extra vertical spaceを参照) 使用されない上下の余白をどこに配置するかを決定します。
必要に応じてドブを減らす ページを配置するために必要であれば、ドブの値(配置領域の左右のドブ幅および上下のドブ幅の設定)を減らすことができます。このオプションを選択した場合、左右の最小ドブ幅および上下の最小ドブ幅ボックスで設定された値まではドブが減らされます。 上下の最小ドブ幅 必要に応じてドブを減らすチェックボックスがオンで、スタイルでN アップが選択され、下へボックスに 1 より大きい値が含まれている場合に使用可能です。 左右の最小ドブ幅 必要に応じてドブを減らすチェックボックスがオンで、スタイルボックスでN アップが選択され、横のページ数ボックスに 1 より大きい値が含まれている場合に使用可能です。 |

| Sv translation | ||
|---|---|---|
| ||
En esta sección de la plantilla de proceso se define cómo colocará Prinergy las páginas en el material de impresión de salida durante la salida CT/LW en una prensa digital Karat. Material Configuración de material Esta área no está disponible. La configuración del dispositivo Karat determinará el tipo de papel que se usará. Tamaño Determina el tamaño del material en el que se generará la salida de los archivos finales. Anchura mínima Define el ancho mínimo para el material especificado en la unidad de medida seleccionada en la lista. Altura mínima Define el alto mínimo para el material especificado en la unidad de medida seleccionada en la lista. Anchura máxima Define el ancho máximo para el material especificado en la unidad de medida seleccionada en la lista. Altura máxima Define el alto máximo para el material especificado en la unidad de medida seleccionada en la lista. Trabajo a doble cara Esta opción está disponible para archivos compuestos; no lo está para archivos separados. Desplazamiento del anverso y del reverso Las opciones Desplazamiento del anverso a lo ancho... a lo alto y Desplazamiento del reverso a lo ancho...a lo alto proporcionan un ajuste más preciso al alinear pruebas de dos caras que las opciones Centrado a lo ancho o Centrado a lo alto. Utilice estas dos medidas para desplazar y alinear el anverso y el reverso de las páginas a lo largo de los ejes de giro o inversión, dependiendo de la orientación de la página o la imposición (horizontal o vertical). El diseño tiene 90° de diferencia con el material Disponible al seleccionar Hoja cortada o Alimentación por rollo en el cuadro Tamaño. Esta opción no está disponible si se selecciona Digital en el cuadro Tamaño o si se activa la casilla de verificación Reducir para ajustar al medio. Centrar y recortar la página según el tamaño del material Marque esta casilla de verificación si el tamaño de hoja del dispositivo es menor al cuadro de material de la página PDF. Cuadro PDF para su utilización Seleccione el cuadro de recorte o el cuadro de materiales para utilizarlo como área del contenido de la salida. Colocación Tipo Seleccione el tipo de colocación. Estilo Determina el modo de colocar varias páginas Prinergy en las hojas.
Número de páginas a lo ancho Disponible cuando N-más está seleccionado en el cuadro Estilo. Apagado Disponible cuando N-más está seleccionado en el cuadro Estilo. Anchura del medianil vertical Disponible cuando Autoajuste se encuentra seleccionado en el cuadro Estilo o cuando en el cuadro Estilo se encuentra seleccionado N-más y el cuadro Número de páginas a lo ancho contiene un valor superior a 1. Altura del medianil horizontal Disponible cuando Autoajuste se encuentra seleccionado en el cuadro Estilo o cuando se selecciona N-más en el cuadro Estilo y el cuadro Hacia abajo contiene un valor mayor que 1. Orientación (Consulte Example: orientation) Rota una imposición completa como una unidad. Rotación de colores planos Realiza una pequeña rotación del ángulo del montaje o la imagen de salida. También se denomina "armado de placas". Derive el valor de porcentaje (0.0), o el gradiente, de una de las dos formas que se indican a continuación:
Para medir un gradiente, utilice esta fórmula: gradiente = eje vertical/eje horizontal x 100, donde:
Para convertir un ángulo en un gradiente, utilice esta fórmula: gradiente = tangente del ángulo de rotación x 100, donde:
Nota: Para convertir un gradiente en un ángulo, introduzca el gradiente en la calculadora y aplique la función inversa de la tangente. Ejemplo: 2,2 % se especifica como 0,022 tecla Inv(erso) tecla Tan = 1,26°.
Nota: La plantilla de proceso no permite seleccionar la rotación de montajes y la dilatación del papel al mismo tiempo. No obstante, cuando se aplica la dilatación del papel, la rotación de montajes se puede especificar en el perfil de dilatación del papel. Escala Vector de escala Aplica la escala al diseño con anterioridad del tramado del archivo. La escala se basa en datos vectoriales (datos PDF). Trazado de escala Aplica la escala de trama al diseño. La escala de trama es una función opcional que permite aplicar la distorsión después de crear las tramas para los archivos. Espaciado Agregar espacio horizontal adicional (Consulte Example: add extra horizontal space) Determina dónde debe ubicarse el espacio horizontal sin usar.
Agregar espacio vertical adicional (Consulte Example: add extra vertical space) Determina dónde debe ubicarse el espacio vertical sin usar.
Reducir los medianiles si es necesario Permite que los valores de los medianiles (definidos en los cuadros Alto del medianil horizontal y Ancho del medianil vertical de la sección Colocación) se reduzcan si es necesario para que encajen las páginas. Si está seleccionada, los medianiles se reducirán, pero sólo a los valores definidos en los cuadros Alto mínimo del medianil horizontal y Ancho mínimo del medianil vertical. Anchura mínima del medianil vertical Disponible si se ha activado la casilla de verificación Reducir medianiles si es necesario, se ha seleccionado N-más en el cuadro Estilo y el cuadro Hacia abajo contiene un valor mayor que 1. Altura mínima del medianil horizontal Disponible si se ha activado la casilla de verificación Reducir los medianiles si es necesario, se ha seleccionado N-más en el cuadro Estilo y el cuadro Número de páginas a lo ancho contiene un valor mayor que 1. |

| Sv translation | ||
|---|---|---|
| ||
This process template section defines how Prinergy places the pages on the output media during CT/LW output to a Karat digital press. Media Media Configuration This area is unavailable. The settings for the Karat device determine the type of paper to be used. Size Determines the size of the media to which you will output the final files. Min Width Sets the minimum width for the specified media in the unit of measure selected in the list. Min Height Sets the minimum height for the specified media in the unit of measure selected in the list. Max Width Sets the maximum width for the specified media in the unit of measure selected in the list. Max Height Sets the maximum height for the specified media in the unit of measure selected in the list. Duplexing This option is available for composite files; it is unavailable for separated files. Front Shift and Back Shift The Front Shift Along Width...Along Height and Back Shift Along Width...Along Height options give finer adjustment when aligning two-sided proofs than with Center Along Width/Height. Use these measurements to shift and align front and back pages along their turn or tumble axes, depending on the page or imposition/layout orientation (portrait or landscape). Layout is 90° Different Than Media Available when you select Cut Sheet or Roll Fed from the Size box. This option is unavailable when you select Digital from the Size box or when you select the Reduce to Fit Media check box. Center and crop page to media size Select this check box when the sheet size of the device is smaller than the media box of the PDF page. PDF Box to Use Select the Trim Box or the Media Box to use as the area of output content. Placement Type Select the type of placement. Style Determines how many pages Prinergy places on each sheet.
Number of Pages Across Available when N-up is selected in the Style box. Down Available when N-up is selected in the Style box. Vertical Gutter Width Available when Auto Fit is selected in the Style box or N-up is selected in the Style box and the Number of Pages Across box contains a value greater than 1. Horizontal Gutter Height Available when Auto Fit is selected in the Style box, or N-up is selected in the Style box and the Down box contains a value greater than 1. Orientation (See Example: orientation) Flat Rotation Makes a small angle rotation of the flat or output image. Also called plate cocking. Derive the (0.0) percentage value, or gradient, in one of two ways:
To convert an angle to a gradient, use this formula: gradient = tangent of the angle of rotation x 100, where:
Note: To convert a gradient to an angle, enter the gradient into the calculator and apply the inverse tangent function. Example: 2.2% is entered as 0.022 + Inv(erse) key + Tan key = 1.26°.
Scaling Scale Vector Applies scaling to the layout prior to screening the file. The scaling is based on vector data (PDF data). Scale Raster Applies raster scaling to the layout. Raster scaling is an optional feature that will allow you to apply distortion after the files are screened. Spacing Add Extra Horizontal Space (See Example: add extra horizontal space)
Add Extra Vertical Space (See Example: add extra vertical space)
Reduce Gutters if Required Allows gutter values (set in the Horizontal Gutter Height and Vertical Gutter Width boxes in the Placement section) to be reduced if required to fit pages. If selected, gutters will be reduced only to the values set in the Min Horizontal Gutter Height and Min Vertical Gutter Width boxes. Min Vertical Gutter Width Available if the Reduce Gutters if Required check box is selected, N-up is selected in the Style box, and the Down box contains a value greater than 1. Min Horizontal Gutter Height Available if the Reduce Gutters if Required check box is selected, N-up is selected in the Style box, and the Number of Pages Across box contains a value greater than 1. |