This help topic explains some of the key concepts behind defining a page layout and controlling layout alignment in relation to the media. Layout is collectively how pages and marks are positioned on the press sheet. In the Layout section, there are a number of settings that influence how pages are positioned in the layout. This topic focuses on a handful of settings, including margins and gutters. | Anchor |
|---|
| Bookmark545_concept3379__section_CBCAD99 | Bookmark545_concept3379__section_CBCAD99 | Defining your mediaIn the output from PDF process template, this topic assumes you're selecting Cut sheet from the Size list in the Layout section to calculate your page placement. You also need to specify the size of your media.
| Anchor |
|---|
Bookmark545_concept3379__section_A790D5A
Bookmark545_concept3379__section_A790D5A | Configuring page placement (or defining your layout)
Use margins for areas that should not be used when determining scaled layouts. The margins are added to the edge of the layout. In the selected unit of measure, specify the left, right, top, and bottom unprintable margins that are appropriate for the output device and media.
In the selected unit of measurement, use vertical and horizontal gutters to determine the distance between pages. If you select the Reduce Gutters If Required check box, type the minimum gutter size as well as the gutter size in the nearby boxes. If you're automatically distributing pages on a sheet, specify only the minimum gutter size.
| Anchor |
|---|
Bookmark545_concept3379__fig_F240673D283 | Bookmark545_concept3379__fig_F240673D283 | | Anchor |
|---|
Bookmark545_concept3379__image_CA2FCDF5D | Bookmark545_concept3379__image_CA2FCDF5D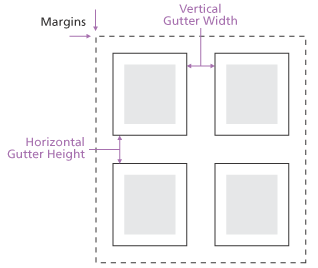
In the output from PDF process template, in the Marks area of the Layout section, define your margins using the Extra Margin for Marks and Bleed. To define your gutters, use the Vertical Gutter Width and Horizontal Gutter Height boxes in the Placement section.
| Anchor |
|---|
Bookmark545_concept3379__section_E05F285 | Bookmark545_concept3379__section_E05F285Defining Page Marks, Sheet Marks, and Bleeds
A page mark contains page-specific information because it will be placed near every page. See the following example.
| Anchor |
|---|
Bookmark545_concept3379__fig_2C0FBDEA732 | Bookmark545_concept3379__fig_2C0FBDEA732 | | Anchor |
|---|
Bookmark545_concept3379__image_2498D571D | Bookmark545_concept3379__image_2498D571D
In contrast, a sheet mark contains information relevant to the whole sheet. It will only be placed on the sheet once. To find the location of a PDF file containing page or sheet marks, in the Marks section, click the Browse button adjacent to the Sheet Marks and Page Marks boxes.
A bleed is an extra amount of printed image that extends beyond the trim edge of the sheet or page. Using the Default Bleed for Pages boxes, you can establish a bleed line for PDF pages within the layout.
anchor
Bookmark545_concept3379__section_94C8808 | Bookmark545_concept3379__section_94C8808 | Configuring the layout placementA key concept to remember when aligning a layout is that the elements move while the media remains stationary.
In the Layout Placement section, you can select Left, Right, and Center from the Align Horizontally list as well as Top, Bottom, and Center from the Align Vertically list. The following diagram illustrates how these settings affect output.
| Anchor |
|---|
Bookmark545_concept3379__fig_50D4EF35B52 | Bookmark545_concept3379__fig_50D4EF35B52 | | Anchor |
|---|
Bookmark545_concept3379__image_46AEF2972Bookmark545_concept3379__image_46AEF2972 | 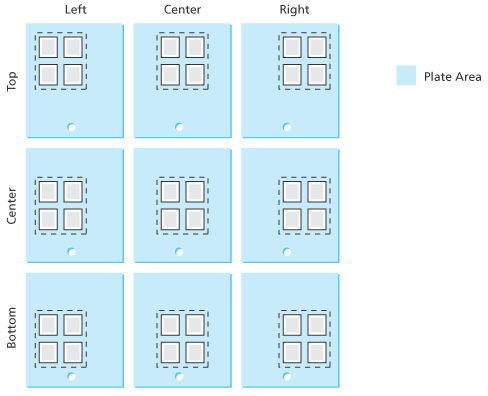
Use the Shift Along Width box to shift the layout, signature, or page from the left edge of the media along the horizontal axis. Use the Shift Along Height box to shift the layout, signature, or page from the bottom edge of the media along the vertical axis. Adding positive values in the boxes moves the layout away from the original edge. Adding negative values in the boxes moves the layout closer to the original edge.
| Anchor |
|---|
Bookmark545_concept3379__fig_D465FEC9BEF | Bookmark545_concept3379__fig_D465FEC9BEF | | Anchor |
|---|
Bookmark545_concept3379__image_A2F000301 | Bookmark545_concept3379__image_A2F000301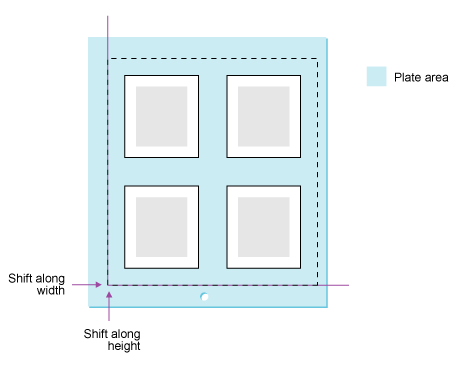
In the Orientation list, select heads-up | Anchor |
|---|
Bookmark545_concept3379__image_C8D59C8A8 | Bookmark545_concept3379__image_C8D59C8A8 |  , heads-down
 | Anchor |
|---|
Bookmark545_concept3379__image_71F3452DE | Bookmark545_concept3379__image_71F3452DE |  , heads-right
 | Anchor |
|---|
Bookmark545_concept3379__image_BF5377481 | Bookmark545_concept3379__image_BF5377481 |  , and heads-left
 | Anchor |
|---|
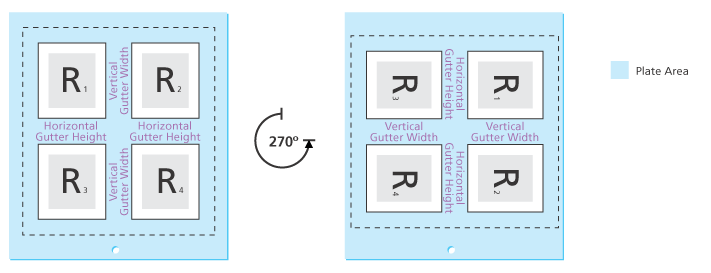
Bookmark545_concept3379__image_25568BB83 | Bookmark545_concept3379__image_25568BB83 |  to rotate the image. The following diagram illustrates how rotating a layout affects your gutters.
| Anchor |
|---|
Bookmark545_concept3379__fig_CF1B6117374 | Bookmark545_concept3379__fig_CF1B6117374 | | Anchor |
|---|
Bookmark545_concept3379__image_F56C3B475Bookmark545_concept3379__image_F56C3B475 |