| Sv translation | ||
|---|---|---|
| ||
This process template section defines how Prinergy places the pages on the output media during imposition output. Media Media Configuration This option becomes available when you select Kodak Proofers in the Output To list. Thickness This option becomes available when you select an Epson device in the Output To list. Layout for Kodak Proofers Select a template to control how multiple pages are arranged on a single proof. Name Available when a vendor's device has been defined through Prinergy Administrator. Available options are determined by the device. Size Determines the size of the media to which you will output the final files. Prinergy Workflow's ability to generate to physical media of particular sizes is governed by Device Connectivity Licenses, which are included in Output Packs and some base configurations. Output sizes are defined as 2-up, 4-up, 8-up, and VLF.
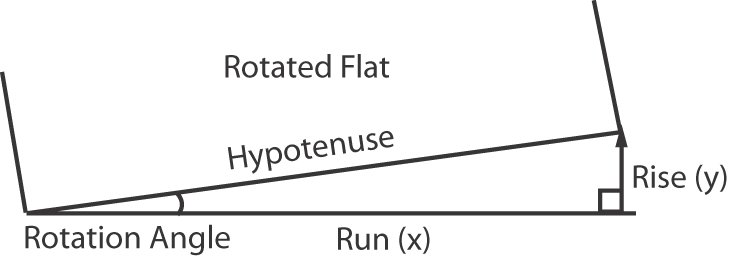
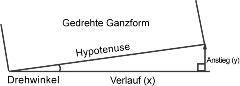
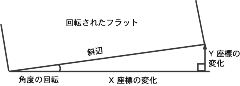
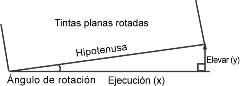
Min Width Sets the minimum width for the specified media in the unit of measure selected in the list. Min Height Sets the minimum height for the specified media in the unit of measure selected in the list. Max Width Sets the maximum width for the specified media in the unit of measure selected in the list. Max Height Sets the maximum height for the specified media in the unit of measure selected in the list. Duplexing This option is available for composite files; it is unavailable for separated files. Front Shift and Back Shift The Front Shift Along Width...Along Height and Back Shift Along Width...Along Height options give finer adjustment when aligning two-sided proofs than with Center Along Width/Height. Use these measurements to shift and align front and back pages along their turn or tumble axes, depending on the page or imposition/layout orientation (portrait or landscape). Placement Orientation (See Example: orientation) Center Along Width Centers the imposition plan along the horizontal axis of the media. Center Along Height Centers the imposition plan along the vertical axis of the media. Shift Along Width (See Example: shifting images horizontally and vertically) Shift Along Height (See Example: shifting images horizontally and vertically) Flat Rotation Makes a small angle rotation of the flat or output image. Also called plate cocking. Derive the (0.0) percentage value, or gradient, in one of two ways:
To measure for a gradient, use this formula: gradient = rise/run x 100, where:
To convert an angle to a gradient, use this formula: gradient = tangent of the angle of rotation x 100, where:
Punch Setting Available when a format for an imagesetter that has an automatic punching system (for example, Kodak Magnus VLF platesetter) is selected in the Output To list. Scaling Scale Vector Applies scaling to the layout prior to screening the file. The scaling is based on vector data (PDF data). Apply Scaling from Layout Select to use the scaling specified in the original layout application, for example, Pandora. Custom Type scaling percentages for the Along Width and Along Height directions. Fit to Media Size If the specified layout produces an image too large for the media, the image is scaled to fit. Non-Printable Margin If the Fit to Media Size option was selected, you can identify the non-printable margins that should be taken into account when determining scaled layouts. Scale Raster Applies raster scaling to the layout. Raster scaling is an optional feature that will allow you to apply distortion after the files are screened. Apply Scaling from Layout Select to use the scaling specified in the original layout application, for example, Pandora. Custom Type scaling percentages for the Along Width and Along Height directions. Assign Web Growth Profile, if Available (See Example: web growth profile and Applying and removing a web growth profile) Select the Use Web Growth Profile option to enable this feature. Then do one of the following:
Signature Booklet Enable Signature Booklet Signature Booklet (digital blueline proofing) enables you to create a 1-up or 2-up reader-order proof of the page set positions—from an imposition plan layout. Document Binding This list becomes available when you select 2-up from the Type list. Type Select how many pages will output on the sheet:
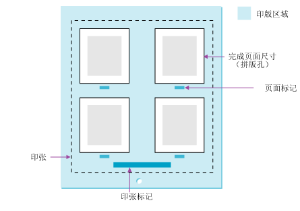
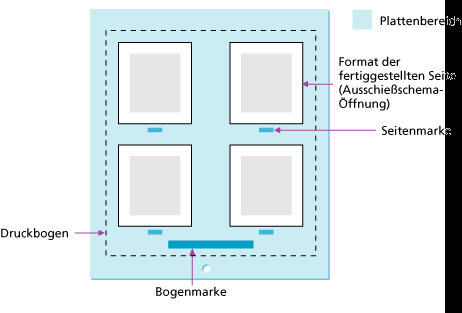
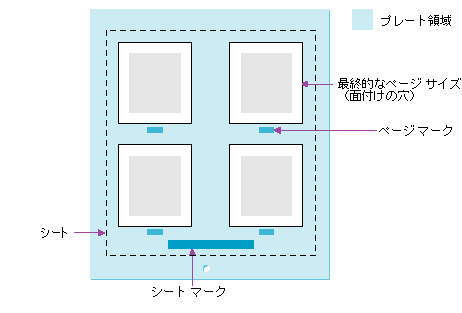
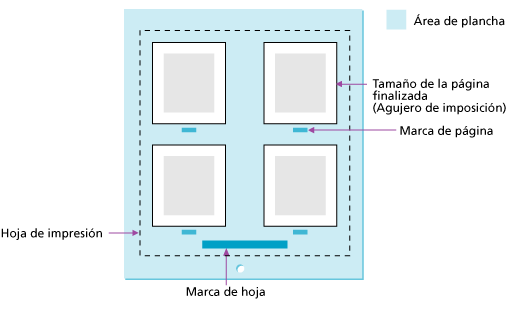
Use... with offset Determines how much of the area around the page's bleed or trim box to include when printing. You can increase the offset amount to see the bleed area, gutters, imposition and page marks, and parts of neighboring imposed pages. Be sure the output sheet is large enough to accommodate both the pages and the bleed or trim offset amount.
Duplex Offsets This option applies only if you are outputting to a duplexing laser printer. Page Marks Identify the name and location of a PDF file containing page marks. Click Browse to locate and select a file. Calibrate When this check box is selected, the plate curve and print curve are applied to the mark. The curves applied are the ones selected in the Plate Curve list and Print Curve list in the Calibration & Screening section of the process template. When this check box is cleared, only the plate curve is applied. To prevent the application of the plate curve to a mark, select %%None%% in the Plate Curve list in the Calibration & Screening section of the process template. Locate Page Marks Adjacent to Select where to place the page marks in relation to the page's trim box.
at Distance (See Calculating the at distance value on final output.)
|
| Sv translation | ||
|---|---|---|
| ||
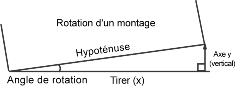
Cette section du modèle de processus définit comment Prinergy place les pages sur le support de sortie pendant la sortie d'imposition. Support Configuration de support Cette option est disponible lorsque vous sélectionnez les Systèmes d'épreuves Kodak dans la liste Sortie. Épaisseur Cette option est disponible lorsque vous sélectionnez un périphérique Epson dans la liste Sortie. Mise en page pour les systèmes d'épreuves Kodak Sélectionnez un modèle pour contrôler la disposition de plusieurs pages sur une seule épreuve. Nom Cette option est disponible lorsque le périphérique d'un fournisseur a été défini par Prinergy Administrator. Les options disponibles sont déterminées par le périphérique. Taille Détermine les dimensions du support sur lequel seront imprimés les fichiers finaux. La capacité de Prinergy Workflow à générer des supports physiques de tailles spécifiques est définie par les licences de connectivité de périphérique, incluses dans les packs Outputs et dans certaines configurations de base. Les formats de sortie sont définis en 2 poses, 4 poses, 8 poses et VLF.
Largeur minimale Définit la largeur minimale du support spécifié dans l'unité de mesure sélectionnée dans la liste. Hauteur minimale Définit la hauteur minimale du support spécifié dans l'unité de mesure sélectionnée dans la liste. Largeur maximale Définit la largeur maximale du support spécifié dans l'unité de mesure sélectionnée dans la liste. Hauteur maximale Définit la hauteur maximale du support spécifié dans l'unité de mesure sélectionnée dans la liste. Recto verso Cette option est disponible pour les fichiers composites, mais pas pour les fichiers séparés. Décalage avant et arrière Les options Décaler recto horizontalement/verticalement et Décaler verso horizontalement/verticalement permettent un meilleur alignement des épreuves recto verso que les options Centrer horizontalement/verticalement. Utilisez ces mesures pour décaler et aligner les pages recto et verso sur leur axe horizontal ou vertical, selon l'orientation de la page ou de l'imposition/mise en page (portrait ou paysage). Positionnement Orientation (Reportez-vous à la section Exemple : orientation) Centrer horizontalement Centre le plan d'imposition le long de l'axe horizontal du support. Centrer verticalement Centre le plan d'imposition le long de l'axe vertical du support. Décaler horizontalement (Reportez-vous à la section Exemple : décalage des images horizontalement et verticalement) Décaler verticalement (Reportez-vous à la section Exemple : décalage des images horizontalement et verticalement) Rotation à plat Crée une faible rotation de l'angle du montage ou de l'image de sortie. Également appelé réglage du travers. Pour trouver la valeur de pourcentage (0,0), ou gradient, procédez suivant l'une des deux méthodes suivantes :
Procédure de conversion d'un angle en gradient : gradient = tangente de l'angle de rotation x 100, où :
Configuration des perforations Cette option est disponible si une imageuse dotée d'un système de perforation automatique (par exemple, une insoleuse de plaques Kodak Magnus VLF) est sélectionnée dans la liste Sortie. Mise à l'échelle Vecteur de gamme Applique la mise à l'échelle à la mise en page avant le tramage du fichier. La mise à l'échelle est basée sur des données vectorielles (données PDF). Appliquer l'échelle à partir de la mise en page Sélectionnez cette option pour utiliser la mise à l'échelle spécifiée dans l'application de mise en page d'origine, par exemple Pandora. Personnalisé Entrez les pourcentages de mise à l'échelle pour les directions Horizontalement et Verticalement. Adapter à la taille du support Si la mise en page spécifiée génère une image dont la taille est trop importante pour le support, l'image est alors mise à l'échelle pour atteindre la dimension requise. Marge non imprimable Si l'option Adapter à la taille du support a été sélectionnée, vous pouvez identifier les marges non imprimables qui doivent être prises en compte lors de la détermination des mises en page mises à l'échelle. Trame de gamme Applique la mise à l'échelle du tramage à la mise en page. Il s'agit d'une option facultative permettant d'appliquer une distorsion une fois les fichiers tramés. Appliquer l'échelle à partir de la mise en page Sélectionnez cette option pour utiliser la mise à l'échelle spécifiée dans l'application de mise en page d'origine, par exemple Pandora. Personnalisé Entrez les pourcentages de mise à l'échelle pour les directions Horizontalement et Verticalement. Affecter le profil d'étirement de la bande, si disponible (Voir Exemple : profil d'étirement de la bande et Applying and removing a web growth profile)
Livret de cahiers Activer un livret de cahiers La fonction Livret de cahiers (ozalid numérique) vous permet de créer une épreuve une ou deux poses en ordre de lecture des positions de jeux de pages à partir d'une mise en page de plan d'imposition. Liaison de document Cette liste est disponible si vous sélectionnez deux poses dans la liste Type. Type Sélectionnez le nombre de pages en sortie sur la feuille :
Utiliser... avec offset Détermine la quantité autour du fond perdu ou du cadre de rognage de la page à inclure lors de l'impression. Vous pouvez augmenter la valeur de décalage pour voir le fond perdu, les doubles coupes, les repères d'imposition et de page et les parties des pages imposées voisines. Assurez-vous que la taille de la feuille de sortie soit suffisante pour y loger les pages et le fond perdu ou le décalage de rognage déterminé.
Décalages duplex Cette option est applicable uniquement si vous effectuez une sortie sur une imprimante laser recto-verso. Repères de page Identifie le nom et l'emplacement d'un fichier PDF contenant des repères de page. Cliquez sur Parcourir pour rechercher et sélectionner un fichier. Calibrage Lorsque cette case à cocher est sélectionnée, la courbe de plaque et la courbe d'impression sont appliquées sur le repère. Les courbes appliquées sont celles qui sont sélectionnées dans les listes Courbe de plaque et Courbe d'impression de la section Calibrage et tramage du modèle de processus. Lorsque cette case à cocher est désactivée, seule la courbe de plaque est appliquée. Pour empêcher l'application de la courbe de plaque à un repère, sélectionnez %%None%% dans la liste Courbe de plaque de la section Calibrage et tramage du modèle de processus. Rechercher les repères de page adjacents Sélectionnez le lieu d'emplacement des repères de page par rapport au cadre de rognage de la page.
À distance (Reportez-vous à la section Calculating the at distance value on final output).
|
| Sv translation | ||
|---|---|---|
| ||
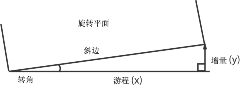
此处理模板部分定义印能捷如何在拼版输出中将页面放置在输出版材上。 版材 版材配置 当在输出至列表中选择"Kodak 打样机"时,该选项可用。 厚度 当在输出至列表中选择 Epson 设备时,该选项可用。 Kodak 打样机的版式 选择用于控制如何在单一打样上排列多个页面的模板。 名称 当在印能捷 Administrator 中定义了供应商的设备时,此选项可用。可用选项是由设备确定的。 大小 决定了输出最终文件的版材尺寸。 印能捷工作流程能生成特定型号的物理板材,该功能是由设备连接许可证(包含在输出包和部分基板配置当中)控制的。输出尺寸定义为 2-up、4-up、8-up 和 VLF。
最小宽度 根据在列表中选定的度量单位,设置指定版材的最小宽度。 最小高度 根据在列表中选定的度量单位,设置指定版材的最小高度。 最大宽度 根据在列表中选定的度量单位,设置指定版材的最大宽度。 最大高度 根据在列表中选定的度量单位,设置指定版材的最大高度。 双面印刷 该选项对合成文件可用,而对分色文件则不可用。 前移和后移 对齐双面打样时,沿宽度方向前移...沿高度方向前移和沿宽度方向后移...沿高度方向后移选项比沿宽度/高度方向居中提供了更精细的调整。 根据页面或拼版/版式方向(纵向或横向),使用这些方法来沿着页面的转动或翻滚轴移动和对齐正面及背面页面。 布局 方向 (请参见Example: orientation) 沿宽度方向居中 沿版材水平轴将拼版方案居中。 沿高度方向居中 沿版材垂直轴将拼版方案居中。 沿宽度移动 (请参见Example: shifting images horizontally and vertically) 沿高度移动 (请参见示例:水平和垂直移动图像) 平面印版旋转 使平面印版或输出图像进行小角度旋转。也称为印版调整。以下列两种方式之一得出 (0.0) 百分比值或倾斜度:
打孔器设置 在输出至列表中选择了具有自动打孔系统的照排机(例如 Kodak 超胜超大幅面制版机)的格式时可用。 缩放比例 缩放矢量 将文件加网前向版式应用缩放比例。这种缩放是基于矢量数据(PDF 数据)。 在版式中应用缩放比例 选择此选项可使用原始版式应用程序(如潘多拉盒型拼版软件)中指定的缩放比例。 自定义 键入沿宽度和沿高度方向的缩放百分比。 适合版材大小 如果指定版式产生的图像尺寸比版材大,则图像会收缩直至符合版材尺寸。 不可印刷的页面空白 如果选择了适合版材尺寸选项,可以识别确定缩放版式时应该考虑的不可印刷的页面空白。 缩放光栅 向版式应用光栅缩放比例。光栅缩放是一项可选功能,当文件加网后,允许您对文件应用变形。 在版式中应用缩放比例 选择此选项可使用原始版式应用程序(如潘多拉盒型拼版软件)中指定的缩放比例。 自定义 键入沿宽度和沿高度方向的缩放百分比。 分配轮转机延伸误差配置文件(如果可用) (请参见Example: web growth profile和Applying and removing a web growth profile。)
折标册子 启用折标册子 折标册子(数字式蓝线图打样)可用于创建拼版方案版式中页面顺序位置的单面或双面阅读顺序打样。 文档装订 当从类型列表中选择双面时,该列表变得可用。 类型 选择将在印张上输出多少页面:
使用... 偏移量 确定打印时要包含页面溢出或净尺寸框周围多大区域。可以增加偏移量以看到溢出区域、装订线、拼版和页面标记以及邻近拼版页面的部分。确保输出印张足够大以可以适应页面和溢出或净尺寸偏移量。
双面胶印 只有输出到双面激光打印机,该选项才适用。 页面标记 确定包含页面标记的 PDF 文件的名称和位置。 请单击浏览来查找并选择文件。 校准 选择此复选框时,对标记应用印版曲线和印刷曲线。应用的曲线是在处理模板的校准和加网部分的印版曲线列表和印刷曲线中选择的曲线。清除此复选框时,只应用印版曲线。要阻止向标记应用印版,请在处理模板的校准和加网部分的印版曲线列表中选择 %%None%%。 将页面标记靠近 选择放置页面标记位置(相对于页面的净尺寸框)。
距离 (请参见Calculating the at distance value on final output。)
|
| Sv translation | ||
|---|---|---|
| ||
In diesem Prozessvorlagenbereich wird definiert, wie Prinergy bei der Ausschießschema-Ausgabe die Seiten auf dem Ausgabemedium positioniert. Medium Medienkonfiguration Diese Option ist verfügbar, wenn Sie in der Liste Ausgabe auf einen Kodak-Proofer auswählen. Stärke Diese Option ist verfügbar, wenn Sie in der Liste Ausgabe auf ein Epson-Gerät auswählen. Layout für Kodak-Proofer Wählen Sie eine Vorlage aus, um zu steuern, wie mehrere Seiten auf einem einzelnen Proof angeordnet werden. Name Diese Option ist verfügbar, wenn ein Herstellerausgabegerät in Prinergy Administrator definiert wurde. Die verfügbaren Optionen hängen vom Gerät ab. Größe Diese Option legt die Größe des Mediums fest, auf dem die Dateien letztendlich ausgegeben werden. Die Ausgabe von physischen Medien bestimmter Formate über Prinergy Workflow wird über Lizenzen zur Gerätekonnektivität ermöglicht, die in Ausgabe-Paketen und einigen grundlegenden Konfigurationen enthalten sind. Die Ausgabeformate sind definiert als 2-Up, 4-Up, 8-Up und VLF.
Min. Breite Diese Option legt die minimale Breite für das gewählte Medium in der Maßeinheit fest, die in der Liste ausgewählt wurde. Min. Höhe Diese Option legt die minimale Höhe für das gewählte Medium in der Maßeinheit fest, die in der Liste ausgewählt wurde. Maximale Breite Diese Option legt die maximale Breite für das gewählte Medium in der Maßeinheit fest, die in der Liste ausgewählt wurde. Maximale Höhe Diese Option legt die maximale Höhe für das gewählte Medium in der Maßeinheit fest, die in der Liste ausgewählt wurde. Doppelseitig Diese Option gilt für unseparierte Dateien. Sie steht nicht für separierte Dateien zur Verfügung. Nach vorne/hinten verschieben Mit den Optionen Horizontal/Vertikal nach vorne verschieben und Horizontal/Vertikal nach hinten verschieben können doppelseitige Proofs genauer ausgerichtet werden als mit den Optionen Horizontal zentriert/ Vertikal zentriert. Verwenden Sie diese Optionen dazu, Vorder- und Rückseiten an ihren Dreh- bzw. Umstülpachsen zu verschieben und auszurichten, je nach Ausrichtung der Seiten bzw. des Ausschusses/Layouts (Hoch- oder Querformat). Platzierung Ausrichtung (Siehe Example: orientation) Horizontal zentriert Zentriert das Ausschießschema entlang der horizontalen Achse des Mediums. Vertikal zentriert Zentriert das Ausschießschema entlang der vertikalen Achse des Mediums. Horizontal verschieben (Siehe Beispiel: Horizontales und vertikales Verschieben von Bildern) Vertikal verschieben (Siehe Beispiel: Horizontales und vertikales Verschieben von Bildern) Ganzformdrehung Diese Option bewirkt die Drehung der Ganzform bzw. des Ausgabebilds um einen geringen Winkel. Dies wird auch als "Verfahren zum schrägen Positionieren von Platten" bezeichnet. Den Prozentwert bzw. Gradienten (0,0) können Sie auf eine der folgenden Arten ermitteln:
Verwenden Sie die folgende Formel, um einen Winkel in einen Gradienten umzuwandeln: Gradient = Tangens des Rotationswinkels x 100, wobei:
Stanzeinstellung Diese Option ist verfügbar, wenn ein Format für einen Belichter mit automatischem Stanzsystem (z. B. Kodak Magnus VLF-Plattenbelichter) in der Liste Ausgabe auf ausgewählt ist. Skalierung Skalieren - Vektor Beim Auswählen dieser Option wird vor dem Rastern der Datei eine Skalierung auf das Layout angewendet. Die Skalierung basiert auf den Vektordaten (PDF-Daten). Skalierung von Layout anwenden Wählen Sie diese Option, um die in der ursprünglichen Layout-Anwendung (z. B. Pandora) festgelegte Skalierung zu verwenden. Benutzerdefiniert Geben Sie für die Richtungen Horizontal und Vertikal Skalierungsfaktoren (in %) ein. An Mediengröße anpassen Wenn das gewählte Layout ein Bild produziert, das zu groß für das Medium ist, wird das Bild auf Mediengröße angepasst. Nicht bedruckbarer Rand Wenn die Option An Mediengröße anpassen ausgewählt wurde, können Sie die nicht bedruckbaren Ränder identifizieren, die bei skalierten Layouts berücksichtigt werden sollen. Skalieren - Raster Bei Auswahl dieser Option wird Rasterskalierung auf das Layout angewendet. Rasterskalierung ist eine optionale Funktion, mit der Sie nach dem Rastern der Dateien eine Verzerrung durchführen können. Skalierung von Layout anwenden Wählen Sie diese Option, um die in der ursprünglichen Layout-Anwendung (z. B. Pandora) festgelegte Skalierung zu verwenden. Benutzerdefiniert Geben Sie für die Richtungen Horizontal und Vertikal Skalierungsfaktoren (in %) ein. Papierausdehnungsprofil zuordnen, falls vorhanden (Siehe Beispiel: Papierausdehnungsprofil und Applying and removing a web growth profile.)
Signaturbroschüre Signaturbroschüre aktivieren Die Signaturbroschüre (Digital Blueline Proofing) ermöglicht das Erstellen eines 1-up oder 2-up-Lesereihenfolge-Proofs der Seitenfolgepositionen aus einem Ausschießschema-Layout. Dokumentbindung Diese Liste wird verfügbar, wenn Sie aus der Liste Typ die Option Zweiseitig auswählen. Typ Wählen Sie die Anzahl der auf dem Bogen auszugebenden Seiten aus:
Verwenden... mit Versatz Gibt an, wie viel von dem außerhalb des Anschnitt- bzw. Beschnittrahmens befindlichen Bereich der Seite mitgedruckt werden soll. Sie können die Versatzwerte erhöhen, um den Anschnittbereich, die Bundstege, Ausschieß- und Seitenmarken sowie Teile angrenzender ausgeschossener Seiten einzusehen. Achten Sie darauf, dass der Ausgabebogen groß genug für die Seiten und den An- bzw. Beschnittabstand ist.
Duplex-Offsets Diese Option ist nur für die Ausgabe auf einem Duplex-Laserdrucker von Bedeutung. Seitenmarken Ermitteln Sie den Namen und den Speicherort einer PDF-Datei mit Seitenmarken. Klicken Sie auf Durchsuchen, um eine Datei zu suchen und auszuwählen. Kalibrieren Wenn dieses Kontrollkästchen aktiviert ist, werden die Plattenkurve und die Druckkurve auf die Marke angewendet. Bei den angewendeten Kurven handelt es sich um die Kurven, die in der Liste Plattenkurve und in der Liste Druckkurve im Abschnitt Kalibrierung und Raster der Prozessvorlage ausgewählt wurden. Wenn dieses Kontrollkästchen deaktiviert ist, wird nur die Plattenkurve angewendet. Um die Anwendung der Plattenkurve auf eine Marke zu verhindern, wählen Sie %%Keine%% in der Liste Plattenkurve im Abschnitt Kalibrierung und Raster der Prozessvorlage aus. Seitenmarken platzieren Wählen Sie die Position der zu setzenden Seitenmarken in Bezug zum Beschnittrahmen der Seite.
Im Abstand (Siehe Calculating the at distance value on final output.)
|
| Sv translation | ||
|---|---|---|
| ||
プロセス テンプレートのこのセクションでは、Prinergy が面付け出力で出力メディアにページを配置する方法を定義します。 メディア メディアの設定 このオプションは、出力先リストで Kodak プルーファを選択すると使用できます。 厚さ このオプションは、出力先リストで Epson のデバイスを選択すると使用できます。 Kodak プルーファのレイアウト 単一のプルーフ上で複数ページの配置を制御するテンプレートを選択します。 名前 Prinergy Administrator でデバイスが定義されている場合に使用できます。使用可能なオプションは、デバイスによって異なります。 サイズ 最終ファイルを出力するメディアのサイズを指定します。 特定のサイズの物理メディアに生成する Prinergy Workflow の機能は、Output Pack と一部のベース設定に含まれる Device Connectivity License によって管理されます。出力サイズの定義は、2-up、4-up、8-up、および VLF です。
最小幅 指定したメディアの幅の最小値を、リストで選択した単位で設定します。 最小長さ 指定したメディアの長さの最小値を、リストで選択した単位で設定します。 最大幅 指定したメディアの幅の最大値を、リストで選択した単位で設定します。 最大長さ 指定したメディアの長さの最大値を、リストで選択した単位で設定します。 面付け型式 このオプションはコンポジット ファイルに使用できます。分版ファイルには使用できません。 フロント シフトおよびバック シフト 幅方向フロント シフト...高さ方向と幅方向バック シフト...高さ方向オプションでは、両面プルーフの位置合わせで横/高さ方向の中央より詳細な調整が可能です。 これらの値を使用して、ページまたは面付け/レイアウト方向(縦または横)に応じて、フロントおよびバックのページをどん天または達磨どん天方向にシフトし、位置合わせをします。 配置 方向 (Example: orientationを参照) 幅方向の中央 メディアの横軸の中央に、面付けプランの中央を合わせます。 高さ方向の中央 メディアの縦軸の中央に、面付けプランの中央を合わせます。 幅方向シフト (Example: shifting images horizontally and verticallyを参照) 高さ方向(シフト) (Example: shifting images horizontally and verticallyを参照) フラット回転 フラットまたは出力画像を小さい角度で回転します。プレート コッキングとも呼ばれます。パーセント値、または傾き度(0.0)を以下の 2 つの方法のいずれかで計算します。
角度を勾配に変換するには、次の式を使用します:勾配 = 回転角度のタンジェント x 100。
パンチ設定 出力先リストで、自動パンチ システムが搭載されたイメージセッター システム(Kodak Magnus VLF プレートセッターなど)の形式が選択されている場合に使用できます。 拡大/縮小 スケール(ベクター) ファイルをスクリーニングする前に、レイアウトにスケーリングを適用します。スケーリングはベクター データ(PDF データ)に基づいて実行されます。 レイアウトのスケーリングを適用 たとえば Pandora などのレイアウト アプリケーションで指定された元のスケーリングを使用するときに選択します。 カスタム マーク 幅方向および高さ方向のスケーリングの割合を入力します。 メディア サイズに合わせる 指定されたレイアウトで出力すると画像がメディアに収まらない場合、画像を縮小して合わせます。 印刷範囲外の余白 メディア サイズに合わせるオプションが選択されている場合、スケールされたレイアウトを決定する際に考慮する印刷範囲外の余白を設定できます。 スケール(ラスター) ラスター スケーリングをレイアウトに適用します。ラスタ スケーリングはオプション機能で、ファイルがスクリーンされた後で補正を適用できます。 レイアウトのスケーリングを適用 たとえば Pandora などのレイアウト アプリケーションで指定された元のスケーリングを使用するときに選択します。 カスタム マーク 幅方向および高さ方向のスケーリングの割合を入力します。 使用可能な見当加減プロファイルの割り当て (Example: web growth profileおよびApplying and removing a web growth profileを参照)
中綴じ小冊子 中綴じ小冊子を作成 中綴じ小冊子(デジタル ブルーライン プルーフィング)により、面付けプラン レイアウトからページ セット位置の単面または見開き(2-up)プルーフを作成できます。 開き このリストは、タイプリストで2-upを選択すると使用できるようになります。 タイプ シートに出力するページ数を選択します。
次を使用... トリミングのオフセット 印刷する際に、ページの裁ち幅ボックスまたはトリミング ボックスの周囲の領域をどの程度含めるかを指定します。オフセットの値を大きくすると、裁ち幅、ドブ、面付けとページのマーク、および面付けの隣のページの部分などが表示されます。出力に使用するシートが、ページと裁ち幅またはトリミングのオフセットが収まるのに十分な大きさであることを確認してください。
オフセット このオプションは、両面印刷のレーザー プリンタに出力する際にのみ適用されます。 ページ マーク ページ マークを含む PDF ファイルの名前と保存場所を指定します。 参照をクリックして、ファイルの場所を探して選択します。 キャリブレーション このチェックボックスをオンにすると、マークにプレート カーブとプリント カーブが適用されます。適用されるカーブは、プロセス テンプレートのキャリブレーション&スクリーニングセクションにあるプレート カーブリストとキャリブレーション カーブリストで設定したものです。このチェックボックスをオフにすると、プレート カーブのみが適用されます。マークにプレート カーブを適用しないようにするには、キャリブレーション&スクリーニングセクションのプレート カーブリストで、%%None%%を選択します。 ページ マークを配置する位置 ページのトリミング ボックスに対し、ページ マークを配置する位置を選択します。
距離 (Calculating the at distance value on final outputを参照してください)。
|
| Sv translation | ||
|---|---|---|
| ||
Esta sección de la plantilla de proceso define la forma en que Prinergy coloca las páginas en el material de salida durante la imposición. Material Configuración de material Esta opción pasa a estar disponible al seleccionar los sistemas de pruebas Kodak de la lista Salida en. Grosor Esta opción pasa a estar disponible al seleccionar un dispositivo Epson en la lista Salida en. Diseño para sistemas de pruebas Kodak Seleccione una plantilla para controlar el modo en que varias páginas se disponen en una prueba individual. Nombre Disponible si se ha definido un dispositivo de un proveedor en Prinergy Administrator. Las opciones disponibles vendrán determinadas por el dispositivo. Tamaño Determina el tamaño del material en el que se generará la salida de los archivos finales. La capacidad de Prinergy Workflow para generar materiales físicos de determinados tamaños se rige por licencias para conectividad de dispositivos, que se incluyen en paquetes de salida y algunas configuraciones básicas. Los tamaños de salida se definen como 2, 4, 8 páginas y VLF.
Anchura mínima Define el ancho mínimo para el material especificado en la unidad de medida seleccionada en la lista. Altura mínima Define el alto mínimo para el material especificado en la unidad de medida seleccionada en la lista. Anchura máxima Define el ancho máximo para el material especificado en la unidad de medida seleccionada en la lista. Altura máxima Define el alto máximo para el material especificado en la unidad de medida seleccionada en la lista. Trabajo a doble cara Esta opción está disponible para archivos compuestos; no lo está para archivos separados. Desplazamiento del anverso y del reverso Las opciones Desplazamiento del anverso a lo ancho... a lo alto y Desplazamiento del reverso a lo ancho...a lo alto proporcionan un ajuste más preciso al alinear pruebas de dos caras que las opciones Centrado a lo ancho o Centrado a lo alto. Utilice estas dos medidas para desplazar y alinear el anverso y el reverso de las páginas a lo largo de los ejes de giro o inversión, dependiendo de la orientación de la página o la imposición (horizontal o vertical). Colocación Orientación (Consulte Ejemplo: orientación) Centrado a lo ancho Centra el plan de imposición a lo largo del eje horizontal del material. Centrado a lo alto Centra el plan de imposición a lo largo del eje vertical del material. Desplazamiento a lo ancho (Consulte Ejemplo: Desplazamiento de imágenes horizontal y verticalmente) Desplazamiento a lo alto (Consulte Ejemplo: Desplazamiento de imágenes horizontal y verticalmente) Rotación de colores planos Realiza una pequeña rotación del ángulo del montaje o la imagen de salida. También se denomina "armado de placas". Derive el valor de porcentaje (0.0), o el gradiente, de una de las dos formas que se indican a continuación:
Para convertir un ángulo en un gradiente, utilice esta fórmula: gradiente = tangente del ángulo de rotación x 100, donde:
Configuración de perforación Disponible al seleccionar un formato para una filmadora con un sistema de punzón automático (por ejemplo, filmadora de planchas Kodak Magnus VLF) en la lista Salida en. Escala Vector de escala Aplica la escala al diseño con anterioridad del tramado del archivo. La escala se basa en datos vectoriales (datos PDF). Aplicar escala desde el diseño Seleccione esta opción para utilizar la escala especificada en la aplicación de diseño original, como por ejemplo, Pandora. Personalizado Introduzca los porcentajes de escala para las direcciones a lo ancho y a lo alto. Ajustar a tamaño del material Si el diseño especificado da como resultado una imagen demasiado grande para el material, se modifica el tamaño la imagen hasta que sea el adecuado. Margen no imprimible Si se ha seleccionado la opción Ajustar a tamaño del material, puede identificar los márgenes no imprimibles que se deben tener en cuenta al determinar los diseños a escala. Trazado de escala Aplica la escala de trama al diseño. La escala de trama es una función opcional que permite aplicar la distorsión después de crear las tramas para los archivos. Aplicar escala desde el diseño Seleccione esta opción para utilizar la escala especificada en la aplicación de diseño original, como por ejemplo, Pandora. Personalizado Introduzca los porcentajes de escala para las direcciones a lo ancho y a lo alto. Asignar perfil de crecimiento de la bobina, si está disponible (Consulte Ejemplo: perfil de dilatación del papel y Applying and removing a web growth profile)
Folleto en pliegos Activar folleto en pliegos: ferros La opción Folleto en pliegos (Digital Blueline Proofing) que le permite crear pruebas de orden de lectura en una página o en dos páginas en una de las posiciones del conjunto de páginas provenientes del diseño de un plan de imposición. Encuadernación de documento La lista está disponible al seleccionar Dos páginas en una en la lista Tipo. Tipo Seleccione cuántas páginas se generarán en la hoja:
Utilizar... con desplazamiento Determina qué cantidad del área que se encuentra alrededor del cuadro de sangrado o de recorte de la página se incluirá cuando se lleve a cabo la impresión. Es posible aumentar la cantidad de desplazamiento para poder ver el área de sangre, las marcas de imposición y de marcas y partes de las páginas impuestas contiguas. Asegúrese de que la página de salida es lo suficientemente grande como para que quepa en ella tanto las páginas como la cantidad de desplazamiento de sangrado o de recorte.
Desplazamientos dobles Esta opción se aplica solamente si se está generando la salida en una impresora láser que permita la impresión a doble cara. Marcas de página Identifique el nombre y la ubicación de un archivo PDF que contenga marcas de página. Haga clic en Examinar para localizar y seleccionar un archivo. Calibrar Cuando se selecciona esta casilla de verificación, la curva de la plancha y la curva de impresión se aplican a la marca. Las curvas aplicadas son las que están seleccionadas en las listas Curva de plancha y Curva de impresión de la sección Calibrado y trama de la plantilla de proceso. Al desactivar esta casilla de verificación, solo se aplica la curva de plancha. Para impedir la aplicación de la curva de plancha a una marca, seleccione %%None%% en la lista Curva de plancha, en la sección Calibrado y trama de la plantilla de proceso. Localizar marcas de página adyacentes a Seleccione dónde desea ubicar las marcas de página en relación con el cuadro de recorte de la página.
a distancia (Consulte Calculating the at distance value on final output.)
|
| Sv translation | ||
|---|---|---|
| ||
This process template section defines how Prinergy places the pages on the output media during imposition output. Media Media Configuration This option becomes available when you select Kodak Proofers in the Output To list. Thickness This option becomes available when you select an Epson device in the Output To list. Layout for Kodak Proofers Select a template to control how multiple pages are arranged on a single proof. Name Available when a vendor's device has been defined through Prinergy Administrator. Available options are determined by the device. Size Determines the size of the media to which you will output the final files. Prinergy Workflow's ability to generate to physical media of particular sizes is governed by Device Connectivity Licenses, which are included in Output Packs and some base configurations. Output sizes are defined as 2-up, 4-up, 8-up, and VLF.
Min Width Sets the minimum width for the specified media in the unit of measure selected in the list. Min Height Sets the minimum height for the specified media in the unit of measure selected in the list. Max Width Sets the maximum width for the specified media in the unit of measure selected in the list. Max Height Sets the maximum height for the specified media in the unit of measure selected in the list. Duplexing This option is available for composite files; it is unavailable for separated files. Front Shift and Back Shift The Front Shift Along Width...Along Height and Back Shift Along Width...Along Height options give finer adjustment when aligning two-sided proofs than with Center Along Width/Height. Use these measurements to shift and align front and back pages along their turn or tumble axes, depending on the page or imposition/layout orientation (portrait or landscape). Placement Orientation (See Example: orientation) Center Along Width Centers the imposition plan along the horizontal axis of the media. Center Along Height Centers the imposition plan along the vertical axis of the media. Shift Along Width (See Example: shifting images horizontally and vertically) Shift Along Height (See Example: shifting images horizontally and vertically) Flat Rotation Makes a small angle rotation of the flat or output image. Also called plate cocking. Derive the (0.0) percentage value, or gradient, in one of two ways:
To measure for a gradient, use this formula: gradient = rise/run x 100, where:
To convert an angle to a gradient, use this formula: gradient = tangent of the angle of rotation x 100, where:
Punch Setting Available when a format for an imagesetter that has an automatic punching system (for example, Kodak Magnus VLF platesetter) is selected in the Output To list. Scaling Scale Vector Applies scaling to the layout prior to screening the file. The scaling is based on vector data (PDF data). Apply Scaling from Layout Select to use the scaling specified in the original layout application, for example, Pandora. Custom Type scaling percentages for the Along Width and Along Height directions. Fit to Media Size If the specified layout produces an image too large for the media, the image is scaled to fit. Non-Printable Margin If the Fit to Media Size option was selected, you can identify the non-printable margins that should be taken into account when determining scaled layouts. Scale Raster Applies raster scaling to the layout. Raster scaling is an optional feature that will allow you to apply distortion after the files are screened. Apply Scaling from Layout Select to use the scaling specified in the original layout application, for example, Pandora. Custom Type scaling percentages for the Along Width and Along Height directions. Assign Web Growth Profile, if Available (See Example: web growth profile and Applying and removing a web growth profile) Select the Use Web Growth Profile option to enable this feature. Then do one of the following:
Signature Booklet Enable Signature Booklet Signature Booklet (digital blueline proofing) enables you to create a 1-up or 2-up reader-order proof of the page set positions—from an imposition plan layout. Document Binding This list becomes available when you select 2-up from the Type list. Type Select how many pages will output on the sheet:
Use... with offset Determines how much of the area around the page's bleed or trim box to include when printing. You can increase the offset amount to see the bleed area, gutters, imposition and page marks, and parts of neighboring imposed pages. Be sure the output sheet is large enough to accommodate both the pages and the bleed or trim offset amount.
Duplex Offsets This option applies only if you are outputting to a duplexing laser printer. Page Marks Identify the name and location of a PDF file containing page marks. Click Browse to locate and select a file. Calibrate When this check box is selected, the plate curve and print curve are applied to the mark. The curves applied are the ones selected in the Plate Curve list and Print Curve list in the Calibration & Screening section of the process template. When this check box is cleared, only the plate curve is applied. To prevent the application of the plate curve to a mark, select %%None%% in the Plate Curve list in the Calibration & Screening section of the process template. Locate Page Marks Adjacent to Select where to place the page marks in relation to the page's trim box.
at Distance (See Calculating the at distance value on final output.)
|