Page tree

Versions Compared

Key

  • This line was added.
  • This line was removed.
  • Formatting was changed.
Comment: Published by Scroll Versions from space KMS and version Current
Sv translation
languageen

 Overview 

This document outlines how to configure a pointA Point-to-site connection from a client computer that needs to interact with Prinergy running in Site (P2S) VPN gateway connection lets you create a secure connection to your virtual network from an individual client computer. It offers a secure, client-initiated way for customers to access their Prinergy system running on an Azure VM. 

Instructions are provided for both Windows and Mac clients.

Prerequisites 

Point-to-site gateway configured with:

  • tunnel type of IKEv2 and OpenVPN (SSL)
  • SKU of VpnGw1 or better

Please open a support call with Kodak if you need assistance with setting up a point to site connection. Additional information can be found on the Partner Place website (partnerplace.kodak.com). Authenticated customers can log in and find the instructions by searching for answer ID 76120.

Installation & Configuration

  1. Create root certificate and client certificates:
    1. Mac:
      1. Open Terminal (under Application→Utilities) and install openssl if it is not already installed.
      2. Execute commands to create root certificate:

        Code Block
        # Generate root private key 
        openssl genrsa -aes256 -out RootAzureVPN.key 2048
        
        # Generate a root certificate valid for 5 years
        openssl req -x509 -sha256 -new -key RootAzureVPN.key -out RootAzureVPN.cer -days 1825 -subj /CN=RootAzureVPN
      1. Execute commands to create client certificate: 

        Code Block
        # Generate a certificate request
        openssl genrsa -out clientCert.key 2048
        openssl req -new -out clientCert.req -key clientCert.key -subj /CN=ClientAzureVPN
        
        # Generate a certificate from the certificate request and sign it as the CA that you are.
        openssl x509 -req -sha256 -in clientCert.req -out clientCert.cer -CAkey RootAzureVPN.key -CA RootAzureVPN.cer -days 1825 -CAcreateserial -CAserial serial
        
        # Pack key and certificate in a .pfx (pkcs12 format)
        openssl pkcs12 -export -out clientCert.pfx -inkey clientCert.key -in clientCert.cer -certfile RootAzureVPN.cer
    1. Windows 10 and Windows Server 2016:
      1. https://docs.microsoft.com/en-us/azure/vpn-gateway/vpn-gateway-certificates-point-to-site
        • Note: 2016 theoretically should work but certificate could not be installed in Azure when tested previously
        • The following commands are executed in Powershell in ‘Run as administrator’ mode
        • Replace P2SRootCert and P2SChildCert with something appropriate for the site such as <SiteName>RootCert and <SiteName>ClientCert where <SiteName> is replaced with the actual site name.
      2. Create a self-signed root certificate:

        Code Block
        $cert = New-SelfSignedCertificate -Type Custom -KeySpec Signature `
        -Subject "CN=P2SRootCert" -KeyExportPolicy Exportable `
        -HashAlgorithm sha256 -KeyLength 2048 -NotAfter ((Get-Date).AddYears(5)) `
        -CertStoreLocation "Cert:\CurrentUser\My" -KeyUsageProperty Sign -KeyUsage CertSign

        IMPORTANT: `in each command line tells Powershell the command continues into next the line

      3. Create a client certificate:

        Code Block
        New-SelfSignedCertificate -Type Custom -DnsName P2SChildCert -KeySpec Signature `
        -Subject "CN=P2SChildCert" -KeyExportPolicy Exportable `
        -HashAlgorithm sha256 -KeyLength 2048  -NotAfter ((Get-Date).AddYears(5)) `
        -CertStoreLocation "Cert:\CurrentUser\My" `
        -Signer $cert -TextExtension @("2.5.29.37={text}1.3.6.1.5.5.7.3.2")
      4. Check that at least the two generated/registered certificates are listed:

        Code Block
        PS C:\> Get-ChildItem -Path "Cert:\CurrentUser\My"
        
        Thumbprint                                Subject
        ----------                                -------
        F3C3B23CDCBFC90AA606446966E2FAAD49B70AC5  CN=P2SRootCert
        44E1451EE36DBCD82A1B752ECC854CBE0271C520  CN=P2SChildCert
      5. Export the root certificate from Certificate Manager (certmgr.msc).  Options:
        • No Private key
        • Base 64 certificate (.cer) file
      6. Export the client certificate.  Options:
        • Include private key
        • Personal Information Exchange - PKCS #12 (.PFX) format
        • Select a secure password and write it down.  It will be needed to install the client certificate in the client later.

  2. Install root certificate in Azure:
    1. Connect to the Azure Portal from the client where the certificates were generated from.
    2. Open the root certificate .cerfile in a TextEdit (Mac) or Notepad (Windows) and copy the parts between the -----BEGIN CERTIFICATE-----and -----END CERTIFICATE-----lines from the generated certificate.

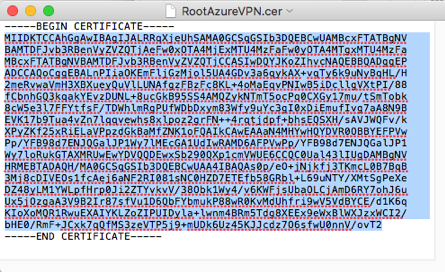
      IMPORTANT: 
      Be sure the editor you use does not alter the formatting of the content.
    3. Navigate to VNET Gateway’s Point-to-site configuration in the Portal and add it to the root certificate list.
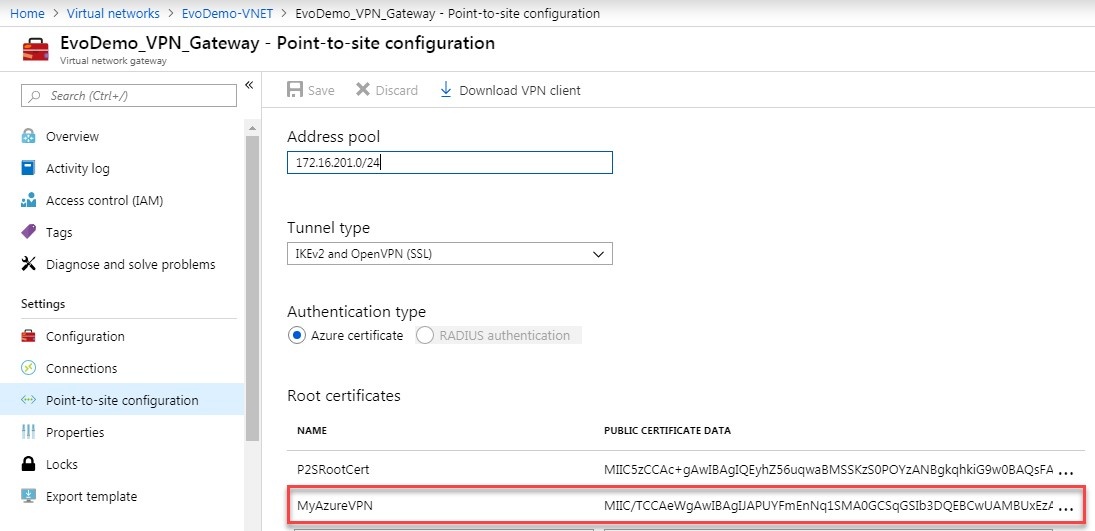
    4. Save the change.
  3. Install client certificate on the client – Windows & Mac: https://docs.microsoft.com/en-us/azure/vpn-gateway/point-to-site-how-to-vpn-client-install-azure-cert

  4. Download VPN config from Azure Portal to client.
    1. Login to Azure Portal from the client
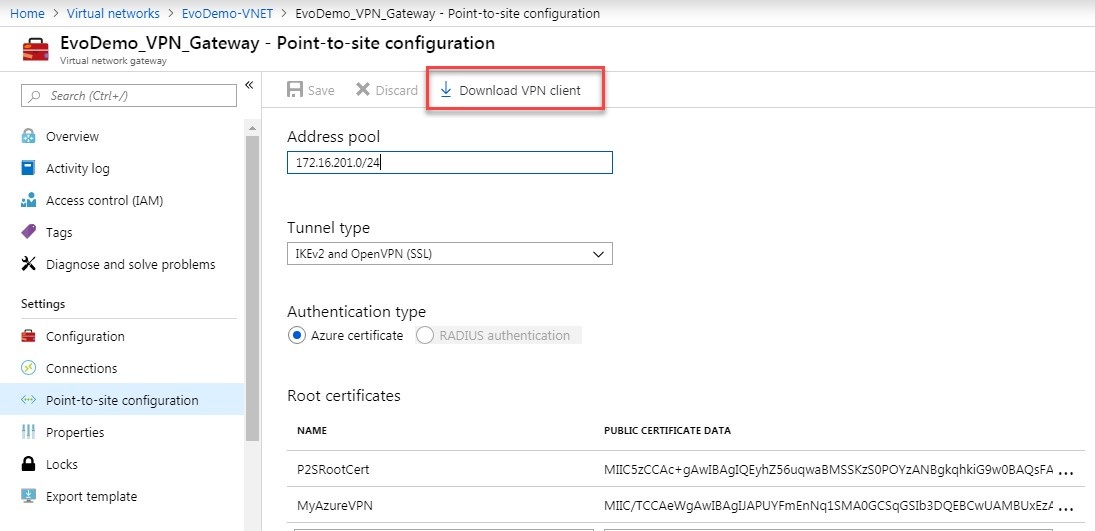
    2. Navigate to the VNET Gateway’s Point-to-site configuration
    3. Click the ‘Download VPN client’ button:


  5. Install VPN config on client:
    1.  Mac:
      1. IKEv2: https://docs.microsoft.com/en-us/azure/vpn-gateway/point-to-site-vpn-client-configuration-azure-cert
      2. OpenVPN: https://docs.microsoft.com/en-us/azure/vpn-gateway/vpn-gateway-howto-openvpn-clients 
    2.  Windows:
      1. OpenVPN:https://docs.microsoft.com/en-us/azure/vpn-gateway/vpn-gateway-howto-openvpn-clients

  6. Optional: Add a host file entry with the primary servers private IP if you want to reference it by name from the client
    1.  Mac:
      1. Launch the Terminal application found in Applications/Utilities
      2. Type: sudo nano /etc/hosts<Enter>
      3. Enter Administrator password when prompted and hit Enter
      4. Add an entry for the primary server – eg: 10.1.234.3 PrinergyPrimaryName
      5. Save the file: Control+O
      6. Exit nano: Control+X
    1. Windows:
      1. Edit C:\Windows\System32\drivers\etc\hosts
      2. Add an entry for the primary server – eg: 10.1.234.3 PrinergyPrimaryName
      3. Save the file

Using Kodak Workshop and other workflow software from the client

       Important Note: Prinergy server Private IP address must be inserted in hosts file on each client (Windows or Mac) connected through Workshop

  1. Connect the Azure VPN if not already connected.

  2. If Workshop is not already installed map a drive the Workshop installer on the Azure VM and install Workshop and related software.

  3. Start Workshop.

  4. If it does not automatically find the primary server, enter the name or IP address.

RDC to an Azure VM from the client

  1. Connect the Azure VPN if not already connected

  2. Login to Azure Portal from the client

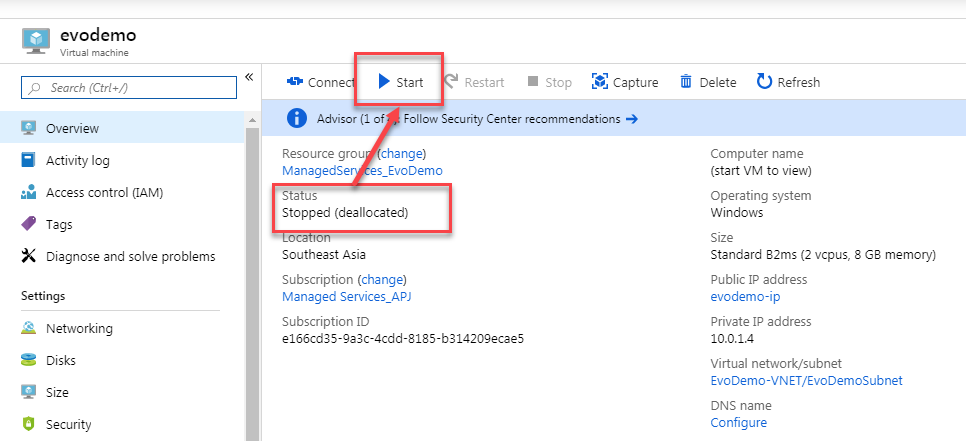
  3. Power on the VM if it is currently stopped:


  4. From Security Center request ‘Just in time VM access’:


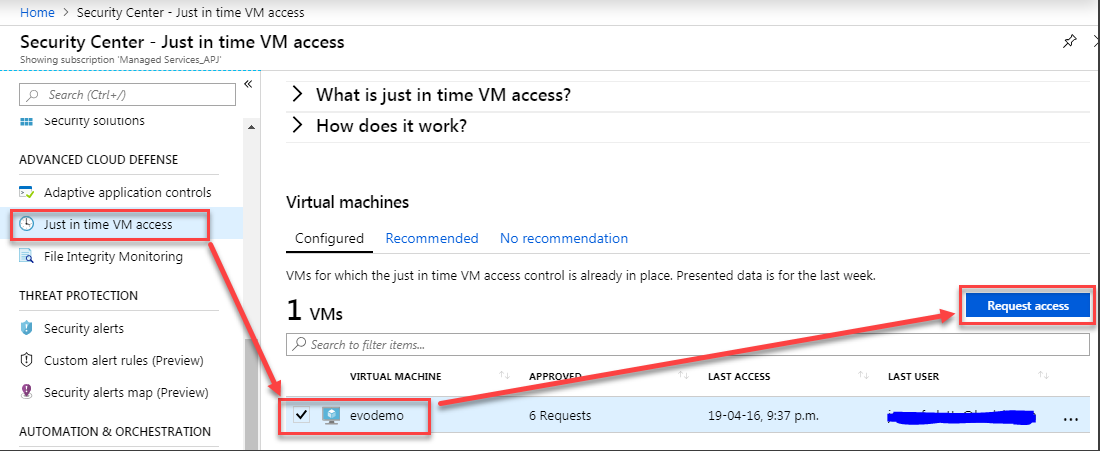
  5. Request access on port 3389 from the IP address assigned to your VPN connection:


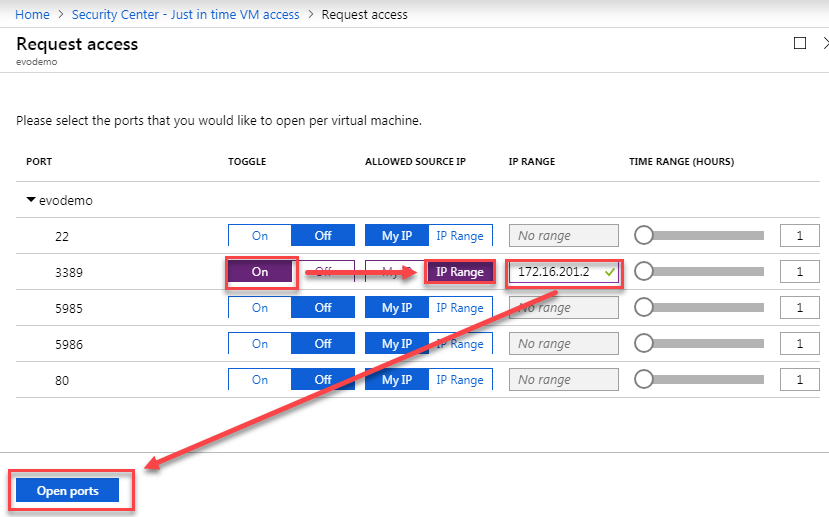
  6. Remote Desktop to the VM using the internal IP address:
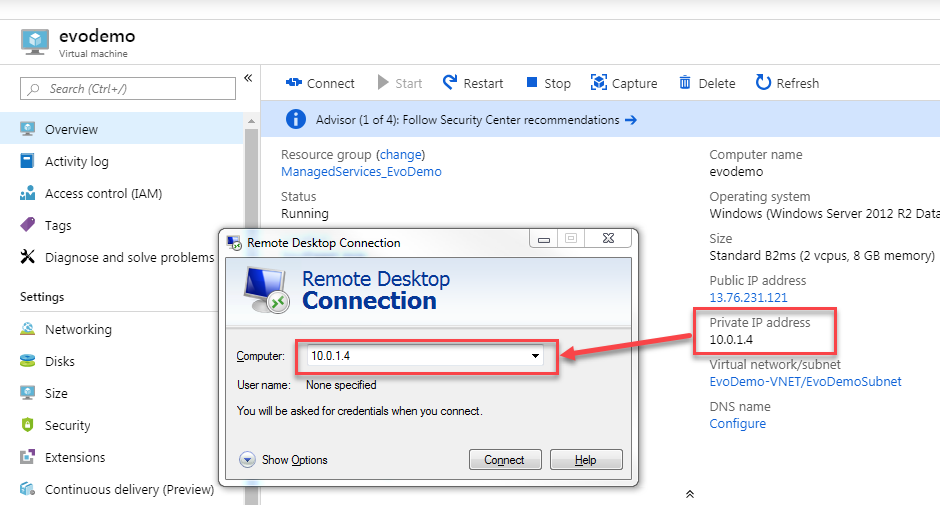


Sv translation
languagede

 Übersicht 

In diesem Dokument wird beschrieben, wie Sie eine Point-to-Site-Verbindung von einem Client-Computer konfigurieren, der mit Prinergy interagieren muss, das auf einer Azure-VM ausgeführt wird.  

Anweisungen werden sowohl für Windows- als auch für Mac-Clients bereitgestellt.

Vorbedingungen 

Point-to-Site-Gateway konfiguriert mit:

  • Tunnel vom Typ IKEv2 und OpenVPN (SSL)
  • SKU von VpnGw1 oder höher

Installation und Konfiguration

  1. Stammzertifikat und Client-Zertifikate erstellen:
    1. Mac:
      1. Öffnen Sie die Terminal-Anwendung (unter Anwendungen → Dienstprogramme) und installieren Sie openssl, falls es noch nicht installiert ist.
      2. Führen Sie die Befehle aus, um das Stammzertifikat zu erstellen:

        Code Block
        # Generate root private key openssl genrsa -aes256 -out RootAzureVPN.key 2048 # Generate a root certificate valid for 10 years openssl req -x509 -sha256 -new -key RootAzureVPN.key -out RootAzureVPN.cer -days 1825 -subj /CN=RootAzureVPN
      1. Führen Sie die Befehle aus, um das Client-Zertifikat zu erstellen: 

        Code Block
        # Generate a certificate request openssl genrsa -out clientCert.key 2048 openssl req -new -out clientCert.req -key clientCert.key -subj /CN=ClientAzureVPN # Generate a certificate from the certificate request and sign it as the CA that you are. openssl x509 -req -sha256 -in clientCert.req -out clientCert.cer -CAkey RootAzureVPN.key -CA RootAzureVPN.cer -days 1825 -CAcreateserial -CAserial serial # Pack key and certificate in a .pfx (pkcs12 format) openssl pkcs12 -export -out clientCert.pfx -inkey clientCert.key -in clientCert.cer -certfile RootAzureVPN.cer
    1. Windows 10 und Windows Server 2016:
      1. https://docs.microsoft.com/en-us/azure/vpn-gateway/vpn-gateway-certificates-point-to-site
        • Hinweis: 2016 sollte theoretisch funktionieren, aber das Zertifikat konnte bei einem Test in Azure nicht installiert werden
        • Die folgenden Befehle werden in PowerShell im Modus „als Administrator ausführen“ ausgeführt
        • Ersetzen Sie P2SRootCert und P2SChildCert durch eine für die Site geeignete Lösung wie <SiteName>RootCert und <SiteName>ClientCert, wobei <SiteName> der Name der tatsächlichen Site ist.
      2. Erstellen Sie ein selbstsigniertes Stammzertifikat:

        Code Block
        $cert = New-SelfSignedCertificate -Type Custom -KeySpec Signature ` -Subject "CN=P2SRootCert" -KeyExportPolicy Exportable ` -HashAlgorithm sha256 -KeyLength 2048 -CertStoreLocation "Cert:\CurrentUser\My" ` -KeyUsageProperty Sign -KeyUsage CertSign

        WICHTIG: `in jeder Befehlszeile teilt PowerShell mit, dass der Befehl in der nächsten Zeile fortgesetzt wird

      3. Erstellen Sie ein Client-Zertifikat:

        Code Block
        New-SelfSignedCertificate -Type Custom -DnsName P2SChildCert -KeySpec Signature ` -Subject "CN=P2SChildCert" -KeyExportPolicy Exportable ` -HashAlgorithm sha256 -KeyLength 2048 ` -CertStoreLocation "Cert:\CurrentUser\My" ` -Signer $cert -TextExtension @("2.5.29.37={text}1.3.6.1.5.5.7.3.2")
      4. Prüfen Sie, ob zumindest die beiden generierten/registrierten Zertifikate aufgelistet sind:

        Code Block
        PS C:\> Get-ChildItem -Path "Cert:\CurrentUser\My" Thumbprint                                Subject ----------                                ------- F3C3B23CDCBFC90AA606446966E2FAAD49B70AC5  CN=P2SRootCert 44E1451EE36DBCD82A1B752ECC854CBE0271C520  CN=P2SChildCert
      5. Exportieren Sie das Stammzertifikat aus dem Zertifikat-Manager (certmgr.msc).  Optionen:
        • Kein privater Schlüssel
        • Base 64-Zertifikatdatei (.cer)
      6. Exportieren Sie das Client-Zertifikat.  Optionen:
        • Mit privatem Schlüssel
        • Persönlicher Informationsaustausch – Format PKCS #12 (.PFX)
        • Wählen Sie ein sicheres Kennwort aus, und notieren Sie es.  Es wird nötig sein, um das Client-Zertifikat später auf dem Client zu installieren.
  2. Installieren Sie das Stammzertifikat in Azure:
    1. Stellen Sie von dem Client aus eine Verbindung zum Azure Portal her, von dem aus die Zertifikate generiert wurden.
    2. Öffnen Sie die Datei des Stammzertifikats (.CER) in TextEdit (Mac) oder Notepad (Windows) und kopieren Sie die Teile zwischen den Zeilen ----- ANFANG ZERTIFIKAT ----- und ----- ENDE ZERTIFIKAT----- aus dem generierten Zertifikat.

      WICHTIG: 
      Stellen Sie sicher, dass der von Ihnen verwendete Editor die Formatierung des Inhalts nicht verändert.
    3. Navigieren Sie im Portal zur Point-to-Site-Konfiguration des VNET Gateways und fügen Sie sie der Liste des Stammzertifikats hinzu.
    4. Speichern Sie den geänderten Wert.
  3. Installieren Sie das Client-Zertifikat auf dem Client – Windows und Mac:https://docs.microsoft.com/en-us/azure/vpn-gateway/point-to-site-how-to-vpn-client-install-azure-cert
  4. Laden Sie die VPN-Konfiguration vom Azure-Portal auf den Client herunter.
    1. Melden Sie sich vom Client aus beim Azure-Portal an
    2. Navigieren Sie zur Point-to-Site-Konfiguration des VNET-Gateways
    3. Klicken Sie auf die Schaltfläche „VPN-Client herunterladen“:
  5. Installieren Sie die VPN-Konfiguration auf dem Client:
    1.  Mac:
      1. IKEv2: https://docs.microsoft.com/en-us/azure/vpn-gateway/point-to-site-vpn-client-configuration-azure-cert
      2. OpenVPN: https://docs.microsoft.com/en-us/azure/vpn-gateway/vpn-gateway-howto-openvpn-clients 
    2.  Windows:
      1. OpenVPN:https://docs.microsoft.com/en-us/azure/vpn-gateway/vpn-gateway-howto-openvpn-clients
  6. Optional: Fügen Sie einen Eintrag in der Hostdatei mit der privaten IP des primären Servers hinzu, wenn Sie vom Client aus mit seinem Namen auf ihn verweisen möchten
    1.  Mac:
      1. Starten Sie die Terminal-Anwendung, die Sie in Anwendungen/Dienstprogrammen finden
      2. Geben Sie Folgendes ein: sudo nano /etc/hosts<Enter>
      3. Geben Sie bei Aufforderung das Administratorkennwort ein, und drücken Sie die Eingabetaste
      4. Fügen Sie einen Eintrag für den primären Server hinzu, z. B.: 10.1.234.3 PrinergyPrimaryName
      5. Speichern Sie die Datei: Strg+O
      6. Nano beenden: Strg+X
    1. Windows:
      1. Bearbeiten Sie C:\Windows\System32\drivers\etc\hosts
      2. Fügen Sie einen Eintrag für den primären Server hinzu, z. B.: 10.1.234.3 PrinergyPrimaryName
      3. Speichern Sie die Datei.

Kodak Workshop und andere Workflow-Software vom Client aus verwenden

  1. Verbinden Sie das Azure-VPN, falls noch keine Verbindung besteht
  2. Wenn Workshop noch nicht installiert ist, weisen Sie dem Workshop-Installationsprogramm auf der Azure-VM ein Laufwerk zu und installieren Sie Workshop und die zugehörige Software
  3. Starten Sie Workshop.
  4. Wenn der primäre Server nicht automatisch gefunden wird, geben Sie den Namen oder die IP-Adresse ein

RDC auf eine Azure-VM vom Client

  1. Verbinden Sie das Azure-VPN, falls noch keine Verbindung besteht
  2. Melden Sie sich vom Client aus beim Azure-Portal an
  3. Fahren Sie die VM hoch, wenn sie derzeit gestoppt ist:
  4. Fordern Sie im Security Center „Just-in-time-Zugriff auf VM“ an:
  5. Fordern Sie den Zugriff auf Port 3389 von der IP-Adresse an, die Ihrer VPN-Verbindung zugewiesen ist:
  6. Vom Remote-Desktop zur VM mit der internen IP-Adresse:


...