Page tree

Versions Compared

Key

  • This line was added.
  • This line was removed.
  • Formatting was changed.
Comment: Removed translated content for 'it'
Sv translation
languageen

Creating and storing a tile set for a specific media resource gives you the choice of sending output to the full media size, or to tiles that can be stripped together after imaging.  Tiling breaks up the output so that it can be imaged onto a smaller media size than the stock for which a layout is designed.

  1. Determine the media dimensions and any punch requirements of the device that will image the tiles.
  2. Plan how the tiles can be stripped to fit the final media and stock, including the number of tiles needed, the grid arrangement, and any overlap dimensions.
  3. In the Media list, select the media for which you will create the tile set.
  4. Select Resources > New Tile Set.
  5. Specify the following details for the tile set:
    • The tile media and device information, including the punch coordinates
    • The tile grid's horizontal and vertical page count
    • The tile orientation and overlap
    • The distance from the trim edge of the stripped tiles to the sheet edge
      The tile set appears in a sublist under the media resource in the Media list.
  6. Start a job and build the layout, including any marks that are required for the final output.
  7. In the Media list, select and add the media's tile set to the layout.
  8. Select Resources > Add Tile Mark to Sheet, and choose the Mark Type that corresponds to the tile orientation.
  9. Print the tiles.
    Tip: To suppress a message that appears when printing to a media that is smaller than the sheet, select the Skip device warning check box on the Output tab in the Preferences dialog box.
    1. Select File > Print
    2. In the Media list, select the tile set.
    3. Set up the other print options as needed, and click Print.
      The printed tiles are imaged according to the tile set, and the tile marks appear in the overlapping area of adjacent tiles:
  10. Overlap the printed tile sheets using the tile alignment marks, based on matching numbers. For example, the tile marks on adjacent overlapping tiles might be x1y1 and x1y2.
    • X indicates a vertical column position.
    • Y indicates a horizontal row.
      The colors on the paired marks are reversed, which helps you to determine whether adjacent tiles are positioned correctly.

Adjacent tiles before stripping:

Tiling marks correctly aligned:

The stripped tiles form a flat:


 Note: Tile sets are saved only as a media resource; they are not saved with the job.

 Next: If you used tiling for proofing, you can print the job again, sending the output to the media resource instead of the tile set.

Sv translation
languageit

La creazione e l'archiviazione di un set di sezioni per una risorsa di supporti specifica consente di inviare l'output al formato di supporto completo o alle sezioni, che possono essere sottoposti a stripping dopo l'esposizione.
La suddivisione in sezioni implica l'interruzione dell'output affinché possa essere esposto su un formato di supporto di dimensioni inferiori rispetto allo stock per cui è progettato un layout.
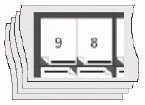
Image Removed

  1. È possibile determinare le dimensioni del supporto e gli eventuali requisiti di punzonatura del dispositivo che esporrà le sezioni.
  2. Pianificare le modalità di stripping delle sezioni affinché vengano adattate al supporto e allo stock finali, inclusi il numero di sezioni necessarie, la disposizione della griglia e le eventuali dimensioni di sovrapposizione.
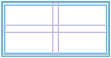
    Image Removed
  3. Nell'elenco Supporti, selezionare il supporto per cui creare il set di sezioni.
  4. Selezionare Risorse > Nuovo set di sezioni.
  5. Specificare i seguenti dettagli per il set di sezioni:
    • Le informazioni su supporto e dispositivo, incluse le coordinate di punzonatura
    • Il conteggio di pagine orizzontale e verticale della griglia
    • L'orientamento e la sovrapposizione delle sezioni
    • La distanza dal bordo di rifilo delle sezioni sottoposte a stripping al bordo del foglio
      Il set di sezioni viene visualizzato in un elenco secondario sotto la risorsa del supporto nell'elenco Supporti.
  6. Avviare un processo e generare il layout, inclusi gli eventuali segni necessari per l'output finale.
  7. Nell'elenco Supporti, selezionare e aggiungere il set di sezioni del supporto al layout.
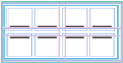
    Image Removed
  8. Selezionare Risorse > Aggiungi segno di sezione a foglio, quindi scegliere il Tipo di segno corrispondente all'orientamento delle sezioni.
  9. Stampare le sezioni.
    Suggerimento: Per eliminare un messaggio visualizzato durante la stampa su un supporto di dimensioni inferiori al foglio, selezionare la casella di controllo Ignora avviso dispositivo sulla scheda Output nella finestra di dialogo Preferenze.
    1. Selezionare File > Stampa.
    2. Selezionare il set di sezioni nell'elenco Supporti.
    3. Impostare le altre opzioni di stampa secondo necessità e fare clic su Stampa.
      Le sezioni stampate vengono esposte in base al set di sezioni, quindi i segni di sezioni vengono visualizzati nell'area di sovrapposizione delle sezioni adiacenti:
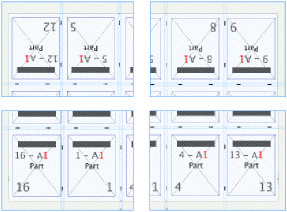
      Image Removed
  10. Sovrapporre i fogli delle sezioni stampate mediante i segni di allineamento delle sezioni, in base ai numeri di corrispondenza.
    Ad esempio, i segni delle sezioni sulle sezioni di sovrapposizione adiacenti devono essere x1y1 e x1y2.
    • X indica una posizione di colonne verticale.
    • Y indica una riga orizzontale.

I colori su una coppia di segni di sezione vengono invertiti, in tal modo è possibile determinare se le sezioni adiacenti sono posizionate correttamente.

Sezioni adiacenti prima dello stripping:
Image Removed

Segni di sezione allineati correttamente:
Image Removed

Le sezioni sottoposte a stripping formano una superficie piatta:
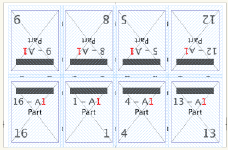
Image Removed
Nota: I set di sezioni vengono salvati solo come risorsa di supporti e non vengono salvati con il processo.

Se le sezioni sono state suddivise per la stampa di prove, è possibile stampare di nuovo il processo, inviando l'output alla risorsa del supporto anziché al set di sezioni.

Sv translation
languageja

特定のメディア用にタイル セットを設定して保存すると、メディア サイズで出力するか、または出力後に集版するタイリングで出力するかを出力時に選択できます。
タイリングにより出力が分割されるため、レイアウトにより指定された用紙よりも小さいメディア サイズに出力できます。

  1. タイルを出力するデバイスのメディア サイズとパンチ要件を指定します。
  2. 使用するメディアと用紙に合うタイルの配列を設定します。必要なタイルの数、グリッドの配置、重ね合わせる場合はそのサイズなどを決定します。
  3. メディアリストで、タイル セットを作成する対象のデバイスを選択します。
  4. リソース > タイル セットの新規作成の順に選択します。
  5. タイル セットに関する以下の詳細を指定します。
    • タイル メディアとデバイスの情報(パンチ座標を含む)
    • タイル グリッドの縦と横のページ数
    • タイルの向きと重なり
    • タイルの端からシートの端までの距離
      タイル セットは、メディアリストのメディア設定の下に表示されます。
  6. ジョブを開始してレイアウトを作成します。最終出力に必要なマークがあればそれも指定します。
  7. メディアリストで、そのメディアのタイル セットを選択してレイアウトに追加します。
  8. リソース > タイル マークをシートに追加の順に選択し、タイルの向きに対応するマーク タイプを選択します。
  9. タイルを出力します。
    ヒント: シートより小さいデバイスに出力する際にメッセージが表示されないようにするには、環境設定ダイアログ ボックスの出力タブにあるデバイスの警告を無視チェックボックスをオンにします。
    1. ファイル > 出力の順に選択します。
    2. メディアリストで、タイル セットを選択します。
    3. 必要に応じて他の出力オプションを設定し、出力をクリックします。
      タイル セットに従ってタイルが出力されます。隣接するタイルの重なり合う部分にタイル マークが表示されます。
  10. タイルの配置マークを使用して、一致する番号を基にタイル シートを重ね合わせます。
    たとえば、隣接し重なり合うタイルのタイル マークは、x1y1  x1y2 のようになっています。
    • X は縦の列の位置を表します。
    • Y は横の行を表します。
      隣接するタイルのマークのカラーは反転しているので、タイルの正しい配置を確認するのに役立ちます。

集版前の隣接するタイル:

正しく揃えられたタイル マーク:

タイルが集版され、面が作成されます。

注: タイル セットはメディアの設定としてのみ保存され、ジョブには保存されません。

プルーフ用にタイルを使用した場合は、タイル セットではなくメディア設定に出力を送信して、ジョブを再出力できます。

...