Page tree

Versions Compared

Key

  • This line was added.
  • This line was removed.
  • Formatting was changed.
Comment: Removed translated content for 'it'
Sv translation
languageen

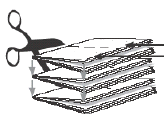
Use this 2-up layout of different sections to produce two stacks of identical books that require fewer plates and less makeready time, compared to 2-up layouts of identical sections. Come-and-go jobs are often printed on web presses and finished on 5-knife trimmers that can cut out two books at once. 
 

  1. In the Pages view, set up the product run list with the required number of PDF pages.
  2. If you are using the Press Runs view (without using the Assembly view):
    1. Use the Search tool to specify Come and Go in the Binding Style list.
      The Templates list is filtered to display only come-and-go templates.
    2. Right-click a template and select AutoSelect.
  3. If you are using the Assembly view, set up a product and part:
    1. Set up the part with the same number of pages as the run list.
    2. In the Binding Style list, select Come and Go.
    3. Select the number of pages for the Largest Section to automatically create the necessary number of sections.
    4. Select the Press Type (Sheetfed or Web).
      If you select Web, specify the number of webs.
    5. Set other part properties as needed.
    6. In the workspace, select all the sections.
      You can drag a marquee around the sections, or select one section, then press Command/Ctrl+A.
    7. In the Properties pane, select a suitable Fold Pattern.
    8. Set up other section properties as needed.
    9. Click Generate Press Runs.
      The imposition layouts are automatically generated, and the Press Runs List contains as many webs or sheetfed press runs as needed to accommodate the run-list pages.

      The printed signature from one sheet is flipped and stacked on the signature from the other sheet, resulting in two complete books that are still adjoined. One book is "coming" and the other is "going".
      The two books are then perfect-bound on a common edge, cut apart, and trimmed.
Sv translation
languageit

È possibile utilizzare questo layout 2-up costituito da sezioni diverse per produrre due fascicoli di opuscoli diversi che richiedono meno lastre e meno tempo di preparazione rispetto ai layout 2-up di sezioni identiche. I processi come-and-go vengono spesso stampati su macchine da stampa a bobine e finiti con taglierine a 5 lame in grado di tagliare due opuscoli con una sola operazione.
Image Removed

  1. Nella visualizzazione Pagine, impostare l'elenco esecuzioni del prodotto con il numero di pagine PDF richiesto.
  2. Se si utilizza la visualizzazione Cicli di stampa (senza la visualizzazione Gruppo):
    1. Utilizzare lo strumento Cerca per impostare Come-and-Go nel'elenco Stile rilegatura.
      L'elenco Modelli è filtrato in modo che visualizzi solo i modelli come-and-go.
    2. Fare clic con il pulsante destro del mouse su un modello e selezionare Selezione automatica.
  3. Se si utilizza la visualizzazione Gruppo, è necessario impostare un prodotto e un componente:
    1. Impostare il componente con lo stesso numero di pagine dell'elenco esecuzioni.
    2. Nell'elenco Stile rilegatura, selezionare Come and Go.
    3. Selezionare il numero di pagine per la sezione più grande per creare automaticamente il numero di sezioni necessarie.
    4. Selezionare il tipo di macchina da stampa (Fogli singoli o Bobina).
      Se si seleziona Bobina, è necessario anche specificare il numero di bobine.
    5. Impostare le altre proprietà del componente desiderate.
    6. Selezionare tutte le sezioni nello spazio di lavoro.
      È possibile trascinare un riquadro attorno alle sezioni oppure selezionare una sezione e premere Comando/Ctrl+A.
    7. Nel riquadro Proprietà selezionare uno schema di piegatura adatto.
    8. Impostare le altre proprietà della sezione desiderate.
    9. Fare clic su Genera cicli di stampa.

Vengono automaticamente generati i layout dell'imposizione e l'Elenco dei cicli di stampa contiene tutti i cicli di stampa a bobine o fogli singoli necessari per contenere le pagine dell'elenco esecuzioni.
Image Removed
La segnatura stampata di un foglio viene capovolta e fascicolata sulla segnatura dell'altro foglio in modo da ottenere due opuscoli completi ancora uniti. Un opuscolo "viene" e l'altro "va".
I due opuscoli vengono quindi fascicolati con cucitura a colla lungo un bordo comune, tagliati e rifilati.

Sv translation
languageja

異なるセクションを 2-up レイアウトに配置するこの方法を使用して同一の冊子を 2 組作成すると、同一セクションを 2-up レイアウトに配置する場合に比べて、必要な版と準備時間を少なくすることができます。カム&ゴー ジョブは、通常、輪転印刷機で印刷され、仕上げには 2 つの冊子を一度に裁断できる 5 ナイフ トリマーが使用されます。

  1. ページ表示で、プロダクト ラン リストに必要な PDF ページ数を設定します。
  2. プレス ラン表示を使用している(アセンブリ表示を使用しない)場合:
    1. 検索ツールを使用して、綴じ型式リストからカム&ゴーを指定します。
      テンプレートリストがフィルタリングされ、カム&ゴー テンプレートのみが表示されます。
    2. テンプレートを右クリックして、自動選択を選択します。
  3. アセンブリ表示を使用している場合は、次の手順でプロダクトおよびパートを設定します。
    1. パートを、ラン リストと同じページ数に設定します。
    2. 綴じ型式リストからカム&ゴーを選択します。
    3. 必要なセクション数を自動的に作成するため、最大セクションにページ数を指定します。
    4. プレス タイプを選択します(枚葉または輪転)。
      輪転を選択した場合は、原反数を指定します。
    5. 必要に応じて、パートの他のプロパティを設定します。
    6. 作業領域で、すべてのセクションを選択します。
      セクションの周囲をマーキーで囲むことも、1 つのセクションを選択してから command/Ctrl + A キーですべて選択することもできます。
    7. プロパティウィンドウ枠で、適切な折りパターンを選択します。
    8. 必要に応じて、セクションの他のプロパティを設定します。
    9. プレス ランの生成をクリックします。

面付けレイアウトが自動的に生成され、プレス ラン リストには、ラン リスト ページに合わせて必要な数の輪転または枚葉のプレス ランが表示されます。

1 枚のシートから出力された折丁は、折って重ねられます。その結果、切り離される前の 2 つの冊子が完成します。 2 つの冊子は共通の背で平綴じされます。
その冊子を切り離して最終的に 2 冊作成します。

...