Page tree

Versions Compared

Key

  • This line was added.
  • This line was removed.
  • Formatting was changed.
Comment: Removed translated content for 'de'
Sv translation
languageen

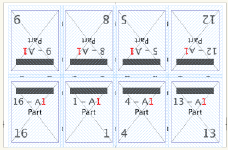
Creating and storing a tile set for a specific media resource gives you the choice of sending output to the full media size, or to tiles that can be stripped together after imaging.  Tiling breaks up the output so that it can be imaged onto a smaller media size than the stock for which a layout is designed.

  1. Determine the media dimensions and any punch requirements of the device that will image the tiles.
  2. Plan how the tiles can be stripped to fit the final media and stock, including the number of tiles needed, the grid arrangement, and any overlap dimensions.
  3. In the Media list, select the media for which you will create the tile set.
  4. Select Resources > New Tile Set.
  5. Specify the following details for the tile set:
    • The tile media and device information, including the punch coordinates
    • The tile grid's horizontal and vertical page count
    • The tile orientation and overlap
    • The distance from the trim edge of the stripped tiles to the sheet edge
      The tile set appears in a sublist under the media resource in the Media list.
  6. Start a job and build the layout, including any marks that are required for the final output.
  7. In the Media list, select and add the media's tile set to the layout.
  8. Select Resources > Add Tile Mark to Sheet, and choose the Mark Type that corresponds to the tile orientation.
  9. Print the tiles.
    Tip: To suppress a message that appears when printing to a media that is smaller than the sheet, select the Skip device warning check box on the Output tab in the Preferences dialog box.
    1. Select File > Print
    2. In the Media list, select the tile set.
    3. Set up the other print options as needed, and click Print.
      The printed tiles are imaged according to the tile set, and the tile marks appear in the overlapping area of adjacent tiles:
  10. Overlap the printed tile sheets using the tile alignment marks, based on matching numbers. For example, the tile marks on adjacent overlapping tiles might be x1y1 and x1y2.
    • X indicates a vertical column position.
    • Y indicates a horizontal row.
      The colors on the paired marks are reversed, which helps you to determine whether adjacent tiles are positioned correctly.

Adjacent tiles before stripping:

Tiling marks correctly aligned:

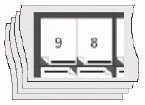
The stripped tiles form a flat:


 Note: Tile sets are saved only as a media resource; they are not saved with the job.

 Next: If you used tiling for proofing, you can print the job again, sending the output to the media resource instead of the tile set.

Sv translation
languagede

Wenn Sie für eine bestimmte Medienressource einen Unterteilungssatz erstellen und speichern, können Sie später wählen, ob die Ausgabe auf der vollen Größe des Mediums ausgegeben oder unterteilt und erst anschließend montiert werden soll.
Bei der Unterteilung wird die Ausgabe so aufgeteilt, dass sie auf einer kleineren Mediengröße ausgegeben werden kann, als es für das Material, für das das Layout entworfen wurde, eigentlich erforderlich wäre.
Image Removed

  1. Bestimmen Sie zunächst die Größe des Mediums und ggf. die Stanzanforderungen des Geräts, mit dem die Unterteilungen belichtet werden.
  2. Planen Sie, wie die Unterteilungen für das endgültige Medium und Material montiert werden können, z. B. Anzahl der benötigten Unterteilungen, Rasteranordnung und Überlappungsmaße.
    Image Removed
  3. Wählen Sie in der Liste Trägermedium das Medium aus, für das der Unterteilungssatz erstellt wird.
  4. Wählen Sie Ressourcen > Neuer Unterteilungssatz.
  5. Geben Sie die folgenden Informationen für den Unterteilungssatz ein:
    • Informationen zu Unterteilungsmedium und Gerät, einschließlich der Stanzkoordinaten
    • Die horizontale und vertikale Seitenanzahl für das Unterteilungsraster
    • Ausrichtung und Überlappung der Unterteilung
    • Der Abstand von der Beschnittkante der montierten Unterteilungen zur Bogenkante
      Der Unterteilungssatz wird in einer Unterliste unter der Medienressource in der Liste Trägermedium angezeigt.
  6. Starten Sie einen Job, und erstellen Sie das Layout, einschließlich aller Marken, die für die endgültige Ausgabe erforderlich sind.
  7. Wählen Sie in der Liste Trägermedium den Unterteilungssatz des Mediums aus, und fügen Sie ihn dem Layout hinzu.
    Image Removed
  8. Wählen Sie Ressourcen > Unterteilungsmarke zu Bogen hinzufügen, und wählen Sie den Markentyp aus, der der Ausrichtung der Unterteilungen entspricht.
  9. Drucken Sie die Unterteilungen.
    Tipp: Wenn Sie die Meldung unterdrücken möchten, die beim Drucken auf einem Medium angezeigt wird, das kleiner als der Bogen ist, aktivieren Sie das Kontrollkästchen Gerätewarnung ignorieren auf der Registerkarte Ausgabe im Dialogfeld Voreinstellungen.
    1. Wählen Sie Datei > Drucken.
    2. Wählen Sie in der Liste Trägermedium den Unterteilungssatz aus.
    3. Richten Sie die anderen Druckoptionen nach Bedarf ein, und klicken Sie dann auf Drucken.
      Die gedruckten Unterteilungen werden entsprechend dem Unterteilungssatz belichtet, und die Unterteilungsmarken werden im überlappenden Bereich von nebeneinander liegenden Unterteilungen angezeigt:
      Image Removed
  10. Ordnen Sie die gedruckten Unterteilungsbögen gemäß den übereinstimmenden Nummern mithilfe der Unterteilungsausrichtungsmarken überlappend an.
    Die Überlappungsmarken auf nebeneinander liegenden überlappenden Unterteilungen könnten z. B. x1y1 und x1y2 lauten.
    • X gibt eine vertikale Spaltenposition an.
    • Y gibt eine horizontale Reihe an.

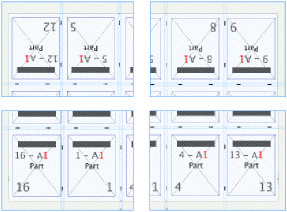
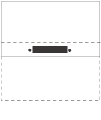
Die Farben auf dem Markenpaar sind komplementär. Dadurch können Sie leicht erkennen, ob aneinander angrenzende Unterteilungen korrekt positioniert sind.

Benachbarte Unterteilungen vor der Montage:
Image Removed

Korrekt ausgerichtete Unterteilungsmarken:
Image Removed

Die montierten Unterteilungen bilden eine Fläche:
Image Removed
Anmerkung: Unterteilungssätze werden nur als Medienressource und nicht mit dem Job gespeichert.

Wenn Sie Unterteilungen für das Proofen verwendet haben, können Sie den Job erneut drucken und die Ausgabe an die Medienressource und nicht an den Unterteilungssatz senden.

Sv translation
languageit

La creazione e l'archiviazione di un set di sezioni per una risorsa di supporti specifica consente di inviare l'output al formato di supporto completo o alle sezioni, che possono essere sottoposti a stripping dopo l'esposizione.
La suddivisione in sezioni implica l'interruzione dell'output affinché possa essere esposto su un formato di supporto di dimensioni inferiori rispetto allo stock per cui è progettato un layout.

  1. È possibile determinare le dimensioni del supporto e gli eventuali requisiti di punzonatura del dispositivo che esporrà le sezioni.
  2. Pianificare le modalità di stripping delle sezioni affinché vengano adattate al supporto e allo stock finali, inclusi il numero di sezioni necessarie, la disposizione della griglia e le eventuali dimensioni di sovrapposizione.
  3. Nell'elenco Supporti, selezionare il supporto per cui creare il set di sezioni.
  4. Selezionare Risorse > Nuovo set di sezioni.
  5. Specificare i seguenti dettagli per il set di sezioni:
    • Le informazioni su supporto e dispositivo, incluse le coordinate di punzonatura
    • Il conteggio di pagine orizzontale e verticale della griglia
    • L'orientamento e la sovrapposizione delle sezioni
    • La distanza dal bordo di rifilo delle sezioni sottoposte a stripping al bordo del foglio
      Il set di sezioni viene visualizzato in un elenco secondario sotto la risorsa del supporto nell'elenco Supporti.
  6. Avviare un processo e generare il layout, inclusi gli eventuali segni necessari per l'output finale.
  7. Nell'elenco Supporti, selezionare e aggiungere il set di sezioni del supporto al layout.
  8. Selezionare Risorse > Aggiungi segno di sezione a foglio, quindi scegliere il Tipo di segno corrispondente all'orientamento delle sezioni.
  9. Stampare le sezioni.
    Suggerimento: Per eliminare un messaggio visualizzato durante la stampa su un supporto di dimensioni inferiori al foglio, selezionare la casella di controllo Ignora avviso dispositivo sulla scheda Output nella finestra di dialogo Preferenze.
    1. Selezionare File > Stampa.
    2. Selezionare il set di sezioni nell'elenco Supporti.
    3. Impostare le altre opzioni di stampa secondo necessità e fare clic su Stampa.
      Le sezioni stampate vengono esposte in base al set di sezioni, quindi i segni di sezioni vengono visualizzati nell'area di sovrapposizione delle sezioni adiacenti:
  10. Sovrapporre i fogli delle sezioni stampate mediante i segni di allineamento delle sezioni, in base ai numeri di corrispondenza.
    Ad esempio, i segni delle sezioni sulle sezioni di sovrapposizione adiacenti devono essere x1y1 e x1y2.
    • X indica una posizione di colonne verticale.
    • Y indica una riga orizzontale.

I colori su una coppia di segni di sezione vengono invertiti, in tal modo è possibile determinare se le sezioni adiacenti sono posizionate correttamente.

Sezioni adiacenti prima dello stripping:

Segni di sezione allineati correttamente:

Le sezioni sottoposte a stripping formano una superficie piatta:

Nota: I set di sezioni vengono salvati solo come risorsa di supporti e non vengono salvati con il processo.

Se le sezioni sono state suddivise per la stampa di prove, è possibile stampare di nuovo il processo, inviando l'output alla risorsa del supporto anziché al set di sezioni.

...