...
| language | en |
|---|
By modifying the files that Prepress Portal provides, you can create a customized job info sheet that meets your unique requirements. You can then make it available for use in any Prepress Portal job.
- Plan how you want the customized job info sheet to be used. You must make the following decisions:
- Whether the customized job info sheet will be the default, or whether you will design it for a specific customer or specific job.
- Which sample job info sheet best fits your needs.
- In Prepress Portal, create a test job that you can use to test your customizations.
- On the Prepress Portal server, copy the folder of sample job info sheet files from the
PrinergyWebRoot\RUser\custom\JobInfoSheet\Examplesfolder to the\\<JobServer>\Jobs\<TestJob>\Control\UserConfig\JobInfoSheetfolder for your test job.
If necessary, create theControl,UserConfig, andJobInfoSheetfolders.
Note: The images and include folders are necessary only if the XSLT files reference the folder contents.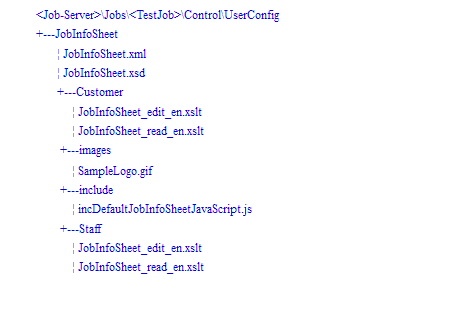
- Modify the XML, XSD, and XSLT files, or create new files to replace the existing ones.
The XML file should list all the fields in the info sheet, the XSD file should define the attributes of each field, and the XSLT file should show how to display the info sheet in HTML. Edit the customer versions of the XSLT files unless you have specific information that you want only staff users to modify. Work on theeditversions of the files to create fields into which you can enter new values. Work on thereadversions to display the fields to users.
Note: You can edit all of the files in a simple text editor. Although XMLauthoring tools may make constructing XML, XSD, and XSLT files seem easy, customization of job info sheets requires a working knowledge of the XML, XSD, and XSLT technologies. - Save each file with the same file name and file extension as the original file.
Important: Do not save the files with a TXT file extension. If you are using Notepad, use the Save As menu option. - Test your changes in Prepress Portal by viewing the job info sheet:
- In InSite Prepress Portal 8.0, click the Summary tab of your test job.
- In Insite Prepress Portal 9.0, select the job and in the Details panel, click Show Job Info Sheet.
When you are satisfied with your changes, make the customized job info sheet available to users by copying it from the
JobInfoSheetfolder to one of the following locations:
Note: Customized job info sheets appear only in new jobs; they do not appear in jobs that already exist on the system.To achieve this result Do this All jobs to use the same job info sheet
a. Create a
Defaultfolder atPrinergyWebRoot\RUser\custom\JobInfoSheet\.
b. Place your customized files in the newDefaultfolder.When a new job is created, Prepress Portal copies the job info sheet from the
Defaultfolder to the job folder and displays the job info sheet on the job's Summary tab.Different jobs to use different job info sheets
Copy your customized files to the job template folder
\\<JobServer>\Jobs\<JobTemplateName>\Control\UserConfig\JobInfoSheet.
Note: If necessary, create theControl,UserConfig, andJobInfoSheetfolders.
When a new job is created using the job template, the new job inherits the job info sheet and other template settings. Prepress
Portal copies the job info sheet from the job template folder to the new job folder, and displays the job info sheet on the Summary tab for the job.If you place your customized files in a different folder than those listed in the table, Prepress Portal displays the default job info sheet that was supplied when your system was installed.
...
| language | zh |
|---|
通过修改 Prepress Portal 提供的文件,您可以创建满足您独特需求的自定义作业信息页。接着您可以让其在任何 Prepress Portal 作业中可用。
...
- 是否将自定义的作业信息页设置为默认作业信息页,或者您是否会针对特定客户或特定作业对其进行设计。
- 哪一种示例作业信息页最能满足您的需求。
...
- 在 InSite Prepress Portal 8.0 中,单击测试作业的“摘要”选项卡。
- 在 Insite Prepress Portal 9.0 中选择作业,然后在“详细信息”面板中单击“显示作业信息页”。
如果您对更改感到满意,您可将自定义作业信息页从 JobInfoSheet 文件夹复制到以下位置之一以供用户使用:
注:自定义作业信息页仅显示在新作业中;它们不会显示在系统中已存在的作业中。
...
所有作业使用相同的作业信息页
...
a. 在 PrinergyWebRoot\RUser\custom\JobInfoSheet\ 中创建一个 Default 文件夹。
b.将您的自定义文件放置在新的 Default 文件夹中。
创建新作业后,Prepress Portal 会将作业信息页从 Default 文件夹复制到作业文件夹,并在作业“摘要”选项卡显示作业信息页。'
...
不同的作业使用不同的作业信息页
...
将自定义文件复制到作业模板文件夹 \\<JobServer>\Jobs\<JobTemplateName>\Control\UserConfig\JobInfoSheet。
注:如果需要,创建 Control、UserConfig 和 JobInfoSheet 文件夹。
当使用作业模板创建新作业时,新作业沿用作业信息页和其他模板设置。Prepress
Portal 会将作业信息页从作业模板文件夹复制到新的作业文件夹,并在作业的“摘要”选项卡显示作业信息页。
...