| Sv translation |
|---|
|
By modifying the files that Prepress Portal provides, you can create a customized job info sheet that meets your unique requirements. You can then make it available for use in any Prepress Portal job. - Plan how you want the customized job info sheet to be used. You must make the following decisions:
- Whether the customized job info sheet will be the default, or whether you will design it for a specific customer or specific job.
- Which sample job info sheet best fits your needs.
- In Prepress Portal, create a test job that you can use to test your customizations.
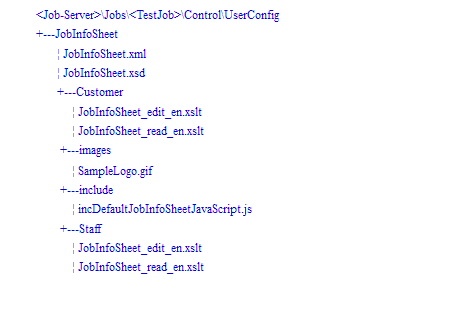
- On the Prepress Portal server, copy the folder of sample job info sheet files from the
PrinergyWebRoot\RUser\custom\JobInfoSheet\Examples folder to the \\<JobServer>\Jobs\<TestJob>\Control\UserConfig\JobInfoSheet folder for your test job.
If necessary, create the Control, UserConfig, and JobInfoSheet folders.
Note: The images and include folders are necessary only if the XSLT files reference the folder contents.
 - Modify the XML, XSD, and XSLT files, or create new files to replace the existing ones.
The XML file should list all the fields in the info sheet, the XSD file should define the attributes of each field, and the XSLT file should show how to display the info sheet in HTML. Edit the customer versions of the XSLT files unless you have specific information that you want only staff users to modify. Work on the edit versions of the files to create fields into which you can enter new values. Work on the read versions to display the fields to users.
Note: You can edit all of the files in a simple text editor. Although XMLauthoring tools may make constructing XML, XSD, and XSLT files seem easy, customization of job info sheets requires a working knowledge of the XML, XSD, and XSLT technologies. - Save each file with the same file name and file extension as the original file.
Important: Do not save the files with a TXT file extension. If you are using Notepad, use the Save As menu option. - Test your changes in Prepress Portal by viewing the job info sheet:
- In InSite Prepress Portal 8.0, click the Summary tab of your test job.
- In Insite Prepress Portal 9.0, select the job and in the Details panel, click Show Job Info Sheet.
When you are satisfied with your changes, make the customized job info sheet available to users by copying it from the JobInfoSheet folder to one of the following locations:
Note: Customized job info sheets appear only in new jobs; they do not appear in jobs that already exist on the system. | To achieve this result | Do this |
|---|
All jobs to use the same job info sheet | a. Create a Default folder at PrinergyWebRoot\RUser\custom\JobInfoSheet\.
b. Place your customized files in the new Default folder. When a new job is created, Prepress Portal copies the job info sheet from the Default folder to the job folder and displays the job info sheet on the job's Summary tab. | Different jobs to use different job info sheets | Copy your customized files to the job template folder \\<JobServer>\Jobs\<JobTemplateName>\Control\UserConfig\JobInfoSheet.
Note: If necessary, create the Control, UserConfig, and JobInfoSheet folders.
When a new job is created using the job template, the new job inherits the job info sheet and other template settings. Prepress
Portal copies the job info sheet from the job template folder to the new job folder, and displays the job info sheet on the Summary tab for the job. |
If you place your customized files in a different folder than those listed in the table, Prepress Portal displays the default job info sheet that was supplied when your system was installed.
|
| Sv translation |
|---|
| En modifiant les fichiers fournis par Prepress Portal, vous pouvez créer une fiche d'informations personnalisée sur le travail qui répond à vos propres besoins. Vous pouvez alors l'utiliser dans tout travail Prepress Portal.
Planifiez comment vous souhaitez utiliser la fiche d'informations personnalisée sur le travail. Vous devez prendre les décisions suivantes :- La fiche d'informations personnalisée sur le travail sera-t-elle la fiche par défaut ou allez-vous la concevoir pour un client ou un travail spécifique ?
- Quel exemple de fiche d'informations sur le travail répond le mieux à vos besoins ?
Dans Prepress Portal, créez un travail de test que vous pouvez utiliser pour tester vos personnalisations.Sur le serveur Prepress Portal, copiez le dossier des exemples de fichiers de fiches d'informations sur les travaux du dossier PrinergyWebRoot\RUser\custom\JobInfoSheet\Examples vers le dossier \\<JobServer>\Jobs\<TestJob>\Control\UserConfig\JobInfoSheet correspondant à votre travail de test.
Si nécessaire, créez les dossiers Control, UserConfig et JobInfoSheet .
Remarque : Les dossiers images et include ne sont nécessaires que si les fichiers XSLT référencent leur contenu.
Image RemovedModifiez les fichiers XML, XSD et XSLT ou créez-en de nouveaux pour remplacer les fichiers existants.
Le fichier XML doit répertorier tous les champs de la fiche d'informations, le fichier XSD doit définir les attributs de chaque champ et le fichier XSLT doit montrer comment afficher la fiche d'informations au format HTML. Modifiez les versions client des fichiers XSLT, à moins que vous ne souhaitiez que seuls les utilisateurs membres du personnel modifient des informations spécifiques. Utilisez les versions edit des fichiers afin de créer des champs dans lesquels vous pouvez saisir de nouvelles valeurs. Utilisez les versions read pour afficher les champs aux utilisateurs.
Remarque : Vous pouvez modifier l'ensemble des fichiers dans un simple éditeur de texte. Même si les outils de création XML peuvent laisser penser que la construction de fichiers XML, XSD et XSLT est simple, la personnalisation des fiches d'informations sur les travaux nécessite une connaissance pratique des technologies XML, XSD et XSLT.Enregistrez chaque fichier sous le même nom et avec la même extension de fichier que celui d'origine.
Remarque : N'enregistrez pas les fichiers avec l'extension de fichier TXT. Si vous utilisez le Bloc-notes, utilisez l'option Enregistrer sous.Testez vos modifications dans Prepress Portal en affichant la fiche d'informations sur le travail :- Dans InSite Prepress Portal 8.0, cliquez sur l'onglet Résumé de votre travail de test.
- Dans Insite Prepress Portal 9.0, sélectionnez le travail et cliquez sur Afficher la fiche d'informations sur le travail dans le volet Détails.
Lorsque vous êtes satisfait de vos modifications, mettez la fiche d'informations personnalisée sur le travail à la disposition des utilisateurs ; copiez-la pour cela depuis le dossier JobInfoSheet vers l'un des emplacements suivants :
Remarque : Les fiches d'informations personnalisées sur les travaux apparaissent uniquement dans les nouveaux travaux ; elles ne s'affichent pas dans les travaux qui existent déjà sur le système.
| Pour parvenir à ce résultat | Procédez ainsi |
|---|
Que tous les travaux utilisent la même fiche d'informations sur le travail | a. Créez un dossier Default dans PrinergyWebRoot\RUser\custom\JobInfoSheet\.
b. Placez vos fichiers personnalisés dans le nouveau dossier Default. Lorsqu'un travail est créé, Prepress Portal copie la fiche d'informations sur le travail du dossier Default dans le dossier du travail et affiche la fiche d'informations sur le travail dans l'onglet Résumé du travail. |
Que différents travaux utilisent différentes fiches d'informations sur les travaux | Copiez vos fichiers personnalisés dans le dossier du modèle de travail \\<JobServer>\Jobs\<JobTemplateName>\Control\UserConfig\JobInfoSheet.
Remarque : Si nécessaire, créez les dossiers Control, UserConfig et JobInfoSheet.
Lorsqu'un travail est créé à l'aide du modèle de travail, le nouveau travail hérite de la fiche d'informations sur le travail et des autres paramètres du modèle. Prepress
Portal copie la fiche d'informations sur le travail du dossier des modèles de travail dans le dossier du nouveau travail et affiche la fiche d'informations sur le travail dans l'onglet Résumé du travail. |
Si vous placez vos fichiers personnalisés dans un autre dossier que celui qui est répertorié dans le tableau, Prepress Portal affiche la fiche d'informations sur le travail par défaut fournie lors de l'installation du système.
| Sv translation |
|---|
|
通过修改 Prepress Portal 提供的文件,您可以创建满足您独特需求的自定义作业信息页。接着您可以让其在任何 Prepress Portal 作业中可用。 - 计划您要如何使用自定义的作业信息页。您必须做出以下决定:
- 是否将自定义的作业信息页设置为默认作业信息页,或者您是否会针对特定客户或特定作业对其进行设计。
- 哪一种示例作业信息页最能满足您的需求。
- 在 Prepress Portal 中,创建您可以用于测试您的自定义的测试作业。
- 在 Prepress Portal 服务器上,将示例作业信息页文件的文件夹从
PrinergyWebRoot\RUser\custom\JobInfoSheet\Examples 文件夹复制到测试作业的 \\<JobServer>\Jobs\<TestJob>\Control\UserConfig\JobInfoSheet 文件夹。
如有必要,创建 Control、UserConfig 和 JobInfoSheet 文件夹。
注:仅当 XSLT 文件引用文件夹内容时,才需要图像和包含文件夹。
- 修改 XML、XSD 和 XSLT 文件,或创建新文件以替换现有文件。
XML 文件应列出信息页中的所有字段,XSD 文件应定义每个字段的属性,XSLT 文件应说明如何将信息页显示为 HTML 格式。编辑 XSLT 文件的客户版本,除非您有仅希望员工用户修改的特定信息。处理文件的 edit 版本,创建您可以输入新值的字段。处理 read 版本,以便向用户显示字段。
注:您可以在简单的文本编辑器中编辑所有文件。虽然 XMLauthoring 工具似乎可以非常轻松地构建 XML、XSD 和 XSLT 文件,但作业信息页的自定义需要 XML、XSD 和 XSLT 技术知识。 - 使用与原始文件相同的文件名和文件扩展名来保存每个文件。
重要提示:请勿使用 TXT 文件扩展名保存文件。如果您正在使用记事本,请使用“另存为”菜单选项。 - 通过查看作业信息页在 Prepress Portal 中测试您的更改:
- 在 InSite Prepress Portal 8.0 中,单击测试作业的“摘要”选项卡。
- 在 Insite Prepress Portal 9.0 中选择作业,然后在“详细信息”面板中单击“显示作业信息页”。
如果您对更改感到满意,您可将自定义作业信息页从 JobInfoSheet 文件夹复制到以下位置之一以供用户使用:
注:自定义作业信息页仅显示在新作业中;它们不会显示在系统中已存在的作业中。 | 要实现此结果 | 执行此操作 |
|---|
所有作业使用相同的作业信息页 | a. 在 PrinergyWebRoot\RUser\custom\JobInfoSheet\ 中创建一个 Default 文件夹。
b.将您的自定义文件放置在新的 Default 文件夹中。 创建新作业后,Prepress Portal 会将作业信息页从 Default 文件夹复制到作业文件夹,并在作业“摘要”选项卡显示作业信息页。' | 不同的作业使用不同的作业信息页 | 将自定义文件复制到作业模板文件夹 \\<JobServer>\Jobs\<JobTemplateName>\Control\UserConfig\JobInfoSheet。
注:如果需要,创建 Control、UserConfig 和 JobInfoSheet 文件夹。
当使用作业模板创建新作业时,新作业沿用作业信息页和其他模板设置。Prepress
Portal 会将作业信息页从作业模板文件夹复制到新的作业文件夹,并在作业的“摘要”选项卡显示作业信息页。 |
如果您将自定义文件放置在与表中所列的文件夹不同的文件夹中,Prepress Portal 会显示系统安装时提供的默认作业信息页。
|