Page tree

Versions Compared

Key

  • This line was added.
  • This line was removed.
  • Formatting was changed.
Comment: Published by Scroll Versions from space PRINERGY and version 9.5
Sv translation
languageen
  1. Perform the following as appropriate:

    To

    Do this

    Create a job

    In Job Finder, in the Jobs view, select File > New Job.

    Create a pre-job

    In Job Finder, in the Pre-jobs view, select File > New Pre-job.

  2. In the Create New Job dialog box, navigate to the group in which you want to create a new versioning job.
  3. In the Create new Job as box, type the name of the versioning job.
  4. Click the triangle beside the Options heading to expand the options.
  5. In the Options section, select the Job Attributes check box.
  6. In the Set Job Attributes dialog box, select the Layered PDF Versioning Job radio button, and then click OK.

     
  7. In the Create New Job dialog box, select other options as required, and then click Create.
    The Job Manager appears with new UI elements as in the following figure.


Sv translation
languagefr
  1. Suivez les instructions suivantes :

    Pour

    Action

    la création d'un travail ;

    Dans l'Explorateur des travaux, dans la vue Travaux, sélectionnez Fichier > Nouveau travail.

    Créer un pré-travail

    Dans l'Explorateur des travaux, dans la vue Pré-travaux, sélectionnez Fichier > Nouveau pré-travail.

  2. Dans la boîte de dialogue Créer un nouveau travail, recherchez le groupe dans lequel vous souhaitez créer un nouveau travail multiversion.
  3. Dans le champ Créer un nouveau travail sous, entrez le nom du travail de multiversion.
  4. Cliquez sur le triangle situé à côté de l'en-tête Options pour afficher la liste d'options.
  5. Dans la section Options, cochez la case Attributs du travail.
  6. Dans la boîte de dialogue Définir les attributs du travail, sélectionnez le bouton radio Travail de production multiversion PDF superposée, puis cliquez sur OK.


  7. Dans la boîte de dialogue Créer un nouveau travail, sélectionnez d'autres options si nécessaire, puis cliquez sur Créer.
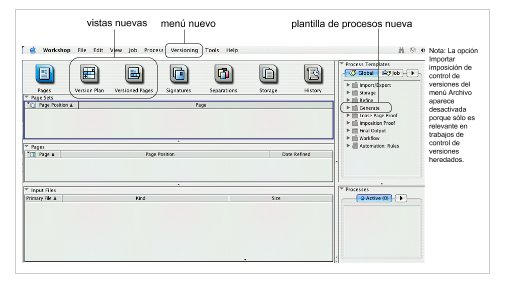
    Le gestionnaire des travaux s'affiche comme le montre la figure suivante.


Figure 1. Nouveaux éléments de l'interface utilisateur dans les travaux LPV

Sv translation
languagezh
  1. 根据需要执行以下操作:

    目标

    执行此操作

    创建作业

    在作业浏览器中,在作业视图下选择文件 > 新建作业

    创建预交作业

    在作业浏览器中,在预交作业视图下选择文件 > 新建预交作业

  2. 在新建作业对话框中,浏览至要将新的分版本作业创建到的组。
  3. 创建相同新作业框中,输入分版本作业的名称。
  4. 单击选项标题旁边的三角形,展开选项。
  5. 选项部分中,选择作业属性复选框。
  6. 在设置作业属性对话框中,选择分层 PDF 分版本作业单选按钮,然后单击确定


  7. 在新建作业对话框中,按需选择其他选项,然后单击创建
    此时将显示作业管理器,如下图所示。

     
    图 1. LPV 作业中新的用户界面元素
Sv translation
languagede
  1. Gehen Sie wie folgt vor:

    Zweck

    Vorgehensweise

    Erstellen eines Jobs

    Wählen Sie im Job Finder in der Ansicht Jobs die Option Datei > Neuer Job.

    Erstellen eines Pre-Jobs

    Wählen Sie im Job Finder in der Ansicht Pre-Jobs die Option Datei > Neuer Pre-Job.

  2. Navigieren Sie im Dialogfeld Neuen Job erstellen zu der Gruppe, in der ein neuer Versionierungsjob erstellt werden soll.
  3. Geben Sie im Feld Neuen Job erstellen als den Namen des Versionierungsjobs ein.
  4. Klicken Sie auf das Dreieck neben der Überschrift Optionen, um die Option anzuzeigen.
  5. Wählen Sie im Abschnitt Optionen das Kontrollkästchen Job-Attribute.
  6. Aktivieren Sie im Dialogfeld Job-Attribute setzen das Optionsfeld Layered PDF Versioning-Job, und klicken Sie dann auf OK.


  7. Wählen Sie im Dialogfeld Neuen Job erstellen die gewünschten Optionen, und klicken Sie dann auf Erstellen.
    Der Job Manager wird wie in der folgenden Abbildung angezeigt.

     
    Abbildung 1. Neue Oberflächenelemente für LPV-Jobs
Sv translation
languageja
  1. 必要に応じていずれかを実行します。

    目的

    手順

    ジョブの作成

    ジョブ ファインダのジョブ表示で、ファイル > ジョブの新規作成を選択します。

    プリジョブの作成

    ジョブ ファインダのプリジョブ表示で、ファイル > プリジョブの新規作成を選択します。

  2. ジョブの新規作成ダイアログ ボックスで、新しいバージョニング ジョブを作成するグループまで移動します。
  3. 以下の名前を付けてジョブを新規作成ボックスに、バージョニング ジョブの名前を入力します。
  4. オプションの設定領域を表示するには、オプションの横にある三角形をクリックします。
  5. オプションセクションで、ジョブ属性チェックボックスをオンにします。
  6. ジョブ属性の設定ダイアログ ボックスで、レイヤー PDF バージョニング ジョブラジオ ボタンを選択してから、OKをクリックします。


  7.  ジョブの新規作成ダイアログ ボックスで必要に応じて他のオプションを選択し、作成をクリックします。
    ジョブ マネージャーが次のように表示されます。


図 1. LPV ジョブの新しいユーザー インターフェイス

Sv translation
languagees
  1. Realice lo siguiente según sea oportuno:

    Para

    Haga lo siguiente

    Crear un trabajo.

    En el Buscador de trabajos, en la vista Trabajos, seleccione Archivo > Nuevo trabajo.

    Crear un trabajo previo.

    En el Buscador de trabajos, en la vista Trabajos previos, seleccione Archivo > Nuevo trabajo previo.

  2. En el cuadro de diálogo Crear trabajo, vaya al grupo en el que desee crear el nuevo trabajo de control de versiones.
  3. En el cuadro Crear trabajo como, escriba el nombre del trabajo de control de versiones.
  4. Haga clic en el triángulo que hay junto al título Opciones para ampliar las opciones.
  5. En la sección Opciones, seleccione la casilla Atributos del trabajo.
  6. En el cuadro de diálogo Definir atributos del trabajo, seleccione el botón Trabajo de Layered PDF Versioning y haga clic en Aceptar.


  7. En el cuadro de diálogo Crear trabajo, seleccione las opciones que necesite y haga clic en Crear.
    Aparece el Administrador de trabajos tal y como se muestra en la figura siguiente.


Figura 1. Elementos nuevos en la interfaz de trabajos de LPV

Sv translation
languageit
  1. Perform the following as appropriate:

    To

    Do this

    Create a job

    In Job Finder, in the Jobs view, select File > New Job.

    Create a pre-job

    In Job Finder, in the Pre-jobs view, select File > New Pre-job.

  2. In the Create New Job dialog box, navigate to the group in which you want to create a new versioning job.
  3. In the Create new Job as box, type the name of the versioning job.
  4. Click the triangle beside the Options heading to expand the options.
  5. In the Options section, select the Job Attributes check box.
  6. In the Set Job Attributes dialog box, select the Layered PDF Versioning Job radio button, and then click OK.

     
  7. In the Create New Job dialog box, select other options as required, and then click Create.
    The Job Manager appears with new UI elements as in the following figure.