Page tree

Versions Compared

Key

  • This line was added.
  • This line was removed.
  • Formatting was changed.
Comment: Published by Scroll Versions from space PRINWAGWK and version Future
Sv translation
languageen

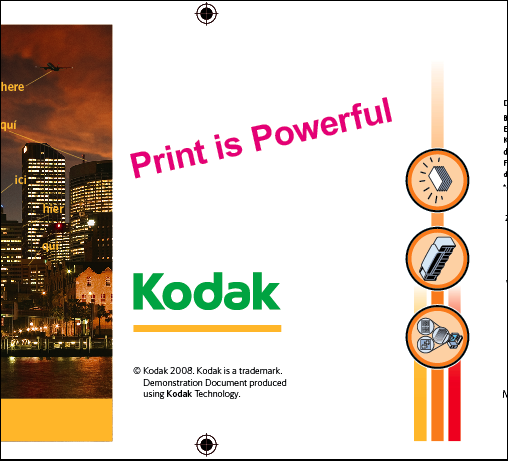
At the last minute, you need to edit a refined PDF page. To save time, you want to use the Prinergy PDF File Editor in Workshop to edit the refined PDF page. The PDF page requires a text, object, and image edit.

Prinergy PDF File Editor allows you to use Adobe Illustrator software or Adobe Photoshop software to edit refined PDF pages, and then import the edited pages back into Prinergy. PDF File Editor is a licensed feature and requires Adobe Illustrator or Adobe Photoshop CS3 or later (either Windows or Macintosh).

Anchor
Bookmark93
Bookmark93
PDF File Editor includes

Prinergy server components that convert a Prinergy PDF file into an Illustrator file containing "Kodak Protected Art" objects, and import the changes back into the job after the conversion. This includes:

  • The ability to view the properties of a Kodak protected art element without first converting the element to a native Illustrator object
  • A plug-in for Illustrator that lets you selectively convert Kodak Protected Art objects into native Illustrator objects
  • A javascript component for Illustrator that submits the changed file back into Prinergy
  • The ability to automatically recognize changes in geometry and colorants.
  • A contextual menu in Workshop that lets you open refined PDF pages in Illustrator, cancel an editing session, and resolve conflicting edits. A visible column shows which operator has the PDF file open for editing.

Anchor
Bookmark94
Bookmark94
PDF File Editor benefits

  • Only the objects that need to be changed are converted to Illustrator native format, reducing the risk of an error during the conversion process.
  • When text changes are made, only the fonts that are changed are loaded into the system, rather than requiring all the fonts in the document.
  • Most image types are extracted into the Photoshop .psd format and stored as external links to make image editing easy.
  • The Undo command is available if there are problems converting objects to Illustrator native format.

Anchor
Bookmark95
Bookmark95
PDF File Editor limitations

At present, not all object types can be converted to Illustrator native format, including:

  • Duotone images. These images are saved as external links in the PDF file.
  • DeviceN colored fills, strokes, gradients, and text.
  • Gradients that are not radial or linear.

Notes:

  • The color space for art converted to native format must be CMYK. Special color spaces are converted to CMYK on conversion.
  • Transparent elements cannot be individually selected for conversion to native art. Entire groups of elements must be converted together.

Anchor
Bookmark96
Bookmark96
Add and refine an input file

  1. Open XX_Bypass if it is not already open.
  2. Right-click the Input Files pane and choose Add Input Files.
  3. In the Add Input Files dialog box, click the Job Folder button and locate: UserDefinedFolders/Input Files/ Label_Waterbottle.pdf.
  4. Click the Add Selected button to add the file to the Files to Add list.
  5. In the Options section of the Add Input Files dialog box, select the Process Selected Files Using Process Template check box.. If the Choose Process Template dialog box does not open, click the Select button.
  6. In the Choose Process Template dialog box, locate the process template: Refine > Refine > 1stRef-Normz
  7. In the Add Input Files dialog box, click OK.
  8. In the Start Process dialog box, click the Edit Process Template button.
  9. Open the Optimize section in the refine process template.
  10. Select the Prepare PDF for Edit checkbox.
    This option pre-converts the input file during the refine process, instead of having to convert it on-demand later in Workshop. Use this option if the edit is large and consists of multiple pages. Pre-converting saves time.
  11. Click OK.
  12. In the Start Process dialog box, click OK.

Anchor
Bookmark97
Bookmark97
Open and edit the PDF page

In this task, you will open and edit a refined PDF page using Adobe CS3, CS4, or CS5 software or newer. When you open a PDF page for editing, the PDF page is converted into an Illustrator document that handles all page elements as Kodak Protected Art.

  1. In the Pages pane, right-click Label_Waterbottle.p1.pdf and select:
    PDF Editing > Open PDF For Editing
    The PDF page automatically opens in Illustrator.
  2. Press Ctrl 0 to Fit in Window.

Anchor
Bookmark98
Bookmark98
Edit the text in a PDF page

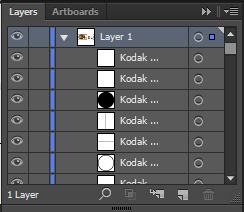
  1. Using the Arrow tool, select the text Print is powerful. View the Layers palette (F7) to verify that all PDF elements have been protected from any unintentional changes.


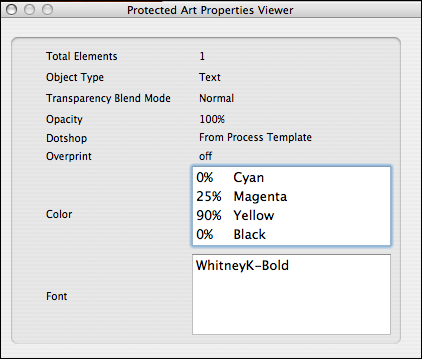
  2. With the Print is powerful text selected, choose:
    Window > Kodak > Protected Art Properties
    The Protected Art Properties Viewer verifies which object (image or text) you have selected, and provides details of the object.


  3.  Close the Protected Art Properties Viewer.
  4. With the Print is powerful text still selected, from the Filter menu in Illustrator, choose:
    Kodak > Convert to Native.
    This verifies that fonts required for the text element in the Kodak Protected Art will be loaded onto the system, allowing for full edit capabilities of the text object.
    Note: If the font used in the input file isn't available on your system, a warning message will appear to inform you that a faux font will replace the unknown font. For the purpose of this activity, don't install the missing font. The procedure steps below outline changing the font to a default system font in Illustrator. Click OK in the warning message dialog box.
  5. With Print is powerful selected:
    1. Change the font to Arial Bold.
    2. Change the color of the text.
    3. Change the "p" in "power" to a capital "P".
    4. Remove the period.
    5. Rotate the text.

Anchor
Bookmark99
Bookmark99
Edit an object in a PDF page

  1. Using the Arrow tool in Illustrator, select all letters in Kodak (vector art).
  2. From the Filter menu in Illustrator, select:
    Kodak > Convert to Native
  3. Change the color of the vector art.
  4. From the File menu, select Save.


Anchor
Bookmark100
Bookmark100
Edit an image in a PDF page

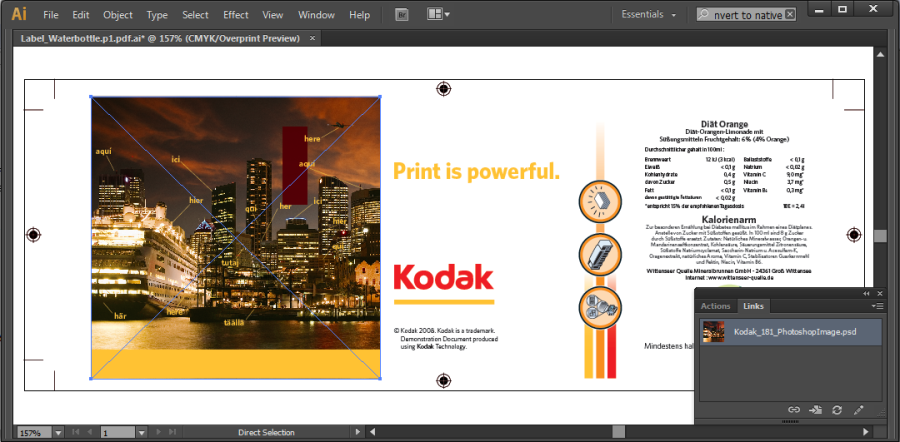
  1. Using the Arrow tool, select the image. From the Window menu in Illustrator, select Links.
    In the Links window, select the Edit Original command (Pencil icon) or from the Edit menu, select Edit Original. This starts Photoshop CS3 or later.
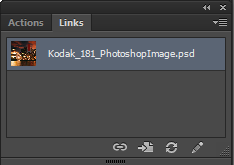


    Note: If Photoshop doesn't open, go to the Prinergy server / Jobs / XX_Bypass / System / IllustratorDocumentWorking folder. Inside, locate and right-click the .psd file. Choose Get Info. In the Open with section, select Adobe Photoshop and click Change All
  2. Using Photoshop, make an edit to the image. From the File menu, select Save. Close Photoshop.
  3. Return to the Illustrator window. You will receive a message that reads:
    Some files are missing or modified in the Link panel. Would you like to update them now?
  4. Click Yes.
    The original image is replaced with the edited image.


  5. Once the edits have been made to the Kodak Protected Art, submit the PDF page back to Prinergy.
  6. In Illustrator, select:
    File > Scripts > Kodak > Submit PDF To Prinergy
  7. Click Yes.
    The Kodak Protected Art returns to Prinergy using an import hot folder. At this time, the protected art is recorded in the database and any colors or geometry changes are updated. 
    To identify that a PDF page is currently being edited, Workshop displays the name of the editor in the Open For Edit By column in the Pages pane, and displays a pencil icon next to the name of the PDF page.


    Once the PDF page has been fully imported back into Job Manager, the editor name and pencil icon disappear. 


Anchor
Bookmark101
Bookmark101
Proof the edited PDF page using Prinergy VPS

In this task, you will use Prinergy VPS software to proof the edited PDF page.

  1. In the Pages pane, right-click Label_Waterbottle.p1.pdf and select:
    Loose Page Output > Virtual Proof > Virtual Proof.LoosePage
  2. In the Start Process dialog box, click OK.
  3. In the Pages pane, right-click Label_Waterbottle.p1.pdf and select Open VPS files. This automatically starts the Prinergy VPS software and opens the PDF page for proofing purposes.
  4. From the Window menu in Prinergy VPS, choose the Navigation and Separations Palette. Proof the entire page. At completion, quit Prinergy VPS.

Anchor
Bookmark102
Bookmark102
Destroy the Prinergy job

Destroying a job or pre-job permanently deletes all files and information about the job or pre-job. Only destroy a job if you are sure you will never need the job again. This action creates additional storage space on your Prinergy server. Only destroy a job if you have previously archived the job, or know you will never need to use the job again.

  1. Close XX_Bypass Job Manager.
  2. In Job Finder, right-click your XX_Bypass (located in your XXMain Group) and choose Destroy Entire Job.
  3. In the Destroy Job dialog box, enter your administrator name and password (supplied by your instructor, service representative, or your own system administrator).
  4. Click Destroy.
Sv translation
languagede

Sie müssen an einer Refined-PDF-Seite im letzten Augenblick noch eine Änderungen vornehmen. Um Zeit zu sparen, sollten Sie die Refined-PDF-Seite in Workshop mit dem Prinergy PDF File Editor bearbeiten. Bei der PDF-Seite müssen Änderungen am Text, an Objekten und an Bildern vorgenommen werden.

Der Prinergy PDF File Editor ermöglicht es, Refined-PDF-Seiten mit der Adobe Illustrator- oder Adobe Photoshop-Software zu bearbeiten und die bearbeiteten Seiten anschließend wieder in Prinergy zu importieren. PDF File Editor ist eine lizenzierte Funktion, für die Adobe Illustrator oder Adobe Photoshop CS3 oder höher für Windows oder Macintosh benötigt wird.

Anchor
Bookmark93
Bookmark93
PDF File Editor beinhaltet

Prinergy-Serverkomponenten, die eine Prinergy PDF-Datei in eine Illustrator-Datei mit „Kodak Protected Art“-Objekten konvertieren und die Änderungen nach der Konvertierung zurück in den Job importieren. Dazu gehört:

  • Die Möglichkeit zur Anzeige der Eigenschaften einer Kodak-geschützten Grafik, ohne das Element zunächst in ein natives Illustrator-Objekt zu konvertieren
  • Ein Plug-In für Illustrator, mit dem Sie ausgewählte „Kodak Protected Art“-Objekte in native Illustrator-Objekte konvertieren können
  • Eine Javascript-Komponente für Illustrator, die die geänderte Datei zurück an Prinergy sendet
  • Die Funktion zur automatischen Erkennung von Geometrie- und Farbänderungen.
  • Ein Kontextmenü in Workshop, über das Sie Refine-PDF-Seiten in Illustrator öffnen, eine Bearbeitungssitzung beenden und Konflikte verursachende Bearbeitungen korrigieren können. Eine sichtbare Spalte zeigt, welcher Bediener die PDF-Datei zur Bearbeitung geöffnet hat.

Anchor
Bookmark94
Bookmark94
Vorteile von PDF File Editor

  • Es werden nur die Objekte in das native Illustrator-Format konvertiert, die tatsächlich geändert werden müssen. Dies vermindert das Risiko von Fehlern bei der Konvertierung erheblich.
  • Wenn Änderungen am Text vorgenommen werden, werden nur die zu ändernden Schriftarten und nicht sämtliche im Dokument enthaltenen Schriftarten in das System geladen.
  • Die meisten Bildtypen werden in das Photoshop .psd-Format extrahiert und als externe Verknüpfungen gespeichert, um die Bildbearbeitung zu erleichtern.
  • Der Befehl Undo (Rückgängig) kann eingesetzt werden, wenn bei der Konvertierung von Objekten in das native Illustrator-Format Probleme auftreten.

Anchor
Bookmark95
Bookmark95
Einschränkungen bei PDF File Editor

Zurzeit können einige Objekttypen nicht in das native Illustrator-Format konvertiert werden, z. B.:

  • Duplex-Bilder. Diese Bilder werden als externe Verknüpfungen in der PDF-Datei gespeichert.
  • Füllungen, Strichlinien, Farbverläufe und Text in Farben des DeviceN-Farbraums.
  • Nicht radiale oder lineare Farbverläufe.

Hinweise:

  • Für Grafiken, die in ein natives Format konvertiert werden, muss der Farbraum CMYK verwendet werden. Spezielle Farbräume werden bei der Konvertierung in CMYK umgewandelt.
  • Transparente Elemente können nicht einzeln für die Konvertierung in native Grafiken ausgewählt werden. Es müssen ganze Gruppen von Elementen zusammen konvertiert werden.

Anchor
Bookmark96
Bookmark96
Hinzufügen und Refinen einer Eingabedatei

  1. Öffnen Sie XX_Bypass, sofern noch nicht geöffnet.
  2. Klicken Sie mit der rechten Maustaste auf den Bereich Input Files (Eingabedateien), und wählen Sie Add Input Files (Eingabedateien hinzufügen) aus.
  3. Klicken Sie im Dialogfeld „Add Input Files“ (Eingabedateien hinzufügen) auf die Schaltfläche Job Folder (Job-Ordner), und suchen Sie folgenden Ordner: UserDefinedFolders/Input Files/ Label_Waterbottle.pdf.
  4. Klicken Sie auf die Schaltfläche Add Selected (Auswahl hinzufügen), um die Datei zur Liste Files to Add (Hinzuzufügende Dateien) hinzuzufügen.
  5. Aktivieren Sie im Abschnitt Options (Optionen) des Dialogfelds „Add Input Files“ (Eingabedateien hinzufügen) das Kontrollkästchen Process Selected Files Using Process Template (Vom Prozess ausgewählte Dateien, die Prozessvorlage verwenden). Wenn sich das Dialogfeld „Choose Process Template“ (Prozessvorlage auswählen) nicht öffnet, klicken Sie auf die Schaltfläche Select (Auswählen).
  6. Suchen Sie im Dialogfeld Prozessvorlage auswählen nach folgender Prozessvorlage: Refine (Refinen) > Refine (Refinen) > 1stRef-Normz (1stRef-Normz)
  7. Klicken Sie im Dialogfeld „Add Input Files“ (Eingabedateien hinzufügen) auf OK (OK).
  8. Klicken Sie im Dialogfeld „Start Process“ (Prozess starten) auf die Schaltfläche Edit Process Template (Bearbeiten von Prozessvorlagen).
  9. Öffnen Sie in der Refine-Prozessvorlage den Bereich Optimize (Optimieren).
  10. Aktivieren Sie das Kontrollkästchen Prepare PDF for Edit (PDF für Bearbeitung vorbereiten).
    Mit dieser Option wird die Eingabedatei während des Refinens bereits vorab umgewandelt, so dass die Umwandlung nicht erst später in Workshop durchgeführt werden muss. Diese Option ist sinnvoll, wenn Sie umfangreiche Bearbeitungen an mehreren Seiten vornehmen müssen. Durch die vorab durchgeführte Umwandlung sparen Sie Zeit.
  11. Klicken Sie auf OK.
  12. Klicken Sie im Dialogfeld „Prozess starten“ auf OK.

Anchor
Bookmark97
Bookmark97
Öffnen und Bearbeiten der PDF-Seite

In dieser Aufgabe öffnen und bearbeiten Sie eine Refined-PDF-Seite mit der Adobe CS3-, CS4- oder CS5-Software bzw. einer höheren Version. Wenn Sie eine PDF-Seite zum Bearbeiten öffnen, wird die Seite in ein Illustrator-Dokument umgewandelt, in dem alle Seitenelemente als Kodak Protected Art behandelt werden.

  1. Klicken Sie im Bereich Pages (Seiten) mit der rechten Maustaste auf Label_Waterbottle.p1.pdf, und wählen Sie:
    PDF Editing (PDF-Bearbeitung) > Open PDF For Editing (PDF zur Bearbeitung öffnen) aus. 
    Die PDF-Seite wird automatisch in Illustrator geöffnet.
  2. Drücken Sie Strg 0, um die Option Fit in Window (An Fenster anpassen) auszuführen.

Anchor
Bookmark98
Bookmark98
Bearbeiten des Textes einer PDF-Seite

  1. Wählen Sie mit Hilfe des Pfeil-Werkzeugs den Text Print is powerful aus. Zeigen Sie die Ebenenpalette (F7) an, um sich zu vergewissern, dass keine PDF-Elemente unbeabsichtigt geändert wurden.


  2. Wählen Sie mit ausgewähltem Text Print is powerful Folgendes aus:
    Window (Fenster) > (Kodak) Kodak > Protected Art Properties (Eigenschaften geschützter Grafik)
    In der Vorschauanzeige „Protected Art Properties Viewer“ können die Auswahl des Objekts (Bild bzw. Text) überprüft und die zugehörigen Details eingesehen werden.


  3.  Schließen Sie den Protected Art Properties Viewer.
  4. Print is powerful muss weiterhin ausgewählt sein, wählen Sie dann im Menü Filter von Illustrator Folgendes aus:
    Kodak (Kodak) > Convert to Native (In nativ konvertieren).
    Dadurch wird sichergestellt, dass die für das Textelement in Kodak Protected Art (Kodak-geschützte Grafiken) erforderlichen Schriftarten in das System geladen werden, damit die vollständigen Bearbeitungskapazitäten für das Textobjekt zur Verfügung stehen.
    Hinweis: Wenn die in der Eingabedatei verwendete Schriftart auf Ihrem System nicht vorhanden ist, werden Sie mit einer Warnmeldung darüber informiert, dass anstelle der unbekannten Schriftart eine Ersatzschriftart verwendet wird. Installieren Sie für diese Übung nicht die fehlende Schriftart. Die nachfolgende Vorgehensweise beschreibt, wie die Schriftart in Illustrator auf eine Standard-Systemschriftart umgestellt werden kann. Klicken Sie im Dialogfeld mit der Warnmeldung auf OK (OK).
  5. Führen Sie bei ausgewähltem Text Print is powerful folgende Schritte durch:
    1. Ändern Sie die Schriftart in Arial Bold.
    2. Ändern Sie die Textfarbe.
    3. Ändern Sie das „p“ in „power“ in einen Großbuchstaben.
    4. Entfernen Sie den Punkt.
    5. Drehen Sie den Text.

Anchor
Bookmark99
Bookmark99
Bearbeiten eines Objekts auf einer PDF-Seite

  1. Wählen Sie in Illustrator mit Hilfe des Pfeils alle Buchstaben des Wortes Kodak (Vektorgrafik) aus.
  2. Wählen Sie in Illustrator im Menü Filter (Filter) folgende Option aus:
    Kodak (Kodak) > Convert to Native (In nativ konvertieren)
  3. Ändern Sie die Farbe der Vektorgrafik.
  4. Wählen Sie im Menü Datei die Option Speichern.


Anchor
Bookmark100
Bookmark100
Bearbeiten eines Bilds auf einer PDF-Seite

  1. Wählen Sie mit Hilfe des Pfeils das zu bearbeitende Bild aus. Wählen Sie im Menü Window (Fenster) die Option Links (Links) aus.
    Wählen Sie im Fenster „Links“ (Links) den Befehl Edit Original (Original bearbeiten) (Bleistiftsymbol) oder aus dem Menü Edit (Bearbeiten) die Option Edit Original (Original bearbeiten) aus. Damit wird Photoshop CS3 oder höher gestartet.


    Hinweis: Wenn Photoshop nicht geöffnet wird, wechseln Sie zum Ordner Prinergy server / Jobs / XX_Bypass / System / IllustratorDocumentWorking. Suchen Sie in diesem Ordner die Datei mit der Erweiterung PSD, und klicken Sie mit der rechten Maustaste darauf. Wählen Sie Get Info (Info abrufen) aus. Wählen Sie im Abschnitt Open with (Öffnen mit) Adobe Photoshop (Adobe Photoshop) aus, und klicken Sie auf Change All (Alles ändern)
  2. Bearbeiten Sie das Bild mit Hilfe von Photoshop. Wählen Sie im Menü File (Datei) die Option Save (Speichern) aus. Schließen Sie Photoshop.
  3. Kehren Sie zum Illustrator-Fenster zurück. Es wird Ihnen folgende Meldung angezeigt:
    Some files are missing or modified in the Link panel (Einige Dateien fehlen oder wurden im Bereich „Link“ geändert). Möchten Sie diese jetzt aktualisieren?
  4. Klicken Sie auf Yes (Ja).
    Das Originalbild wird durch das bearbeitete Bild ersetzt.


  5. Wenn Sie die Bearbeitung der Kodak Protected Art-Objekte beendet haben, senden Sie die PDF-Seite wieder an Prinergy.
  6. Wählen Sie in Illustrator Folgendes aus:
    File (Datei) > Scripts (Skripte) > Kodak (Kodak) > Submit PDF To Prinergy (PDF an Prinergy senden).
  7. Klicken Sie auf Yes (Ja).
    Die Kodak Protected Art-Objekte werden mit Hilfe eines Import-Hot Folders wieder an Prinergy übermittelt. Die geschützten Grafiken werden nun in der Datenbank registriert, und es werden mögliche Änderungen von Farben bzw. Geometrie aktualisiert. 
    Zur Kennzeichnung, dass eine PDF-Seite gerade bearbeitet wird, zeigt Workshop den Namen des bearbeitenden Benutzers im Bereich Pages (Seiten) in der Spalte Open For Edit By (Geöffnet zur Bearbeitung durch) an und versieht den Namen der PDF-Datei mit einem Bleistiftsymbol.


    Wenn die PDF-Seite wieder vollständig in den Job Manager importiert worden ist, verschwinden der Name des bearbeitenden Benutzers und das Bleistiftsymbol wieder. 


Anchor
Bookmark101
Bookmark101
Proofen der bearbeiteten PDF-Seite mit Hilfe von Prinergy VPS

In dieser Aufgabe erstellen Sie mit der Prinergy VPS-Software einen Proof der bearbeiteten PDF-Seite.

  1. Klicken Sie mit der rechten Maustaste im Bereich Pages (Seiten) auf Label_Waterbottle.p1.pdf, und wählen Sie Folgendes aus:
    Loose Page Output (Einzelseitenausgabe) > Virtual Proof (Virtueller Proof) > Virtual Proof.LoosePage (Virtueller Proof.Einzelseite).
  2. Klicken Sie im Dialogfeld „Prozess starten“ auf OK.
  3. Klicken Sie im Bereich Pages (Seiten) mit der rechten Maustaste auf Label_Waterbottle.p1.pdf, und wählen Sie Open VPS files (VPS-Dateien öffnen) aus. So wird automatisch die Prinergy VPS-Software gestartet und gleichzeitig die PDF-Seite zum Proofen geöffnet.
  4. Wählen Sie im Menü Window (Fenster) in Prinergy VPS die Palette Navigation (Navigation) und Separations Palette (Farbauszüge-Palette). Führen Sie einen Proof für die gesamte Seite durch. Beenden Sie Prinergy VPS nach Fertigstellung.

Anchor
Bookmark102
Bookmark102
Löschen des Prinergy-Jobs

Durch das Löschen eines Jobs oder Pre-Jobs werden alle entsprechenden Dateien und Informationen dauerhaft gelöscht. Löschen Sie einen Job nur dann, wenn Sie genau wissen, dass Sie ihn nicht wieder benötigen. Dadurch wird zusätzlicher Speicherplatz auf dem Prinergy-Server geschaffen. Löschen Sie einen Job nur dann, wenn er vorher archiviert wurde bzw. Sie sicher sind, dass Sie diesen Job auch in Zukunft nicht mehr verwenden wollen.

  1. Schließen Sie XX_Bypass im Job Manager.
  2. Klicken Sie im Job Finder mit der rechten Maustaste auf XX_Bypass (in XXMain Group), und wählen Sie Destroy Entire Job (Ganzen Job löschen) aus.
  3. Geben Sie im Dialogfeld Job löschen Ihren Administratornamen und Ihr Kennwort ein (die Sie von Ihrem Kursleiter, Kundendienstvertreter oder Systemadministrator erhalten).
  4. Klicken Sie auf Löschen.
Sv translation
languagees_ES

En el último momento, tiene que editar una página PDF afinada. Para ahorrar tiempo, desea utilizar Prinergy PDF File Editor en Workshop para editar la página PDF afinada. Necesita editar un texto, un objeto y una imagen en la página PDF.

Prinergy PDF File Editor le permite utilizar el software Adobe Illustrator y el software Adobe Photoshop para editar las páginas PDF afinadas y, a continuación, importarlas de vuelta a Prinergy. PDF File Editor es una función con licencia y requiere Adobe Illustrator o Adobe Photoshop CS3 o posterior (para Windows o Macintosh).

Anchor
Bookmark93
Bookmark93
Inclusiones de PDF File Editor

Los componentes del servidor de Prinergy que permiten convertir un archivo PDF de Prinergy en un archivo de Illustrator que contiene objetos de "gráficos protegidos de Kodak" y que importan los cambios de vuelta al trabajo tras la conversión. Esto incluye:

  • La capacidad de ver las propiedades de un elemento gráfico protegido de Kodak sin convertirlo en primer lugar a un objeto nativo de Illustrator
  • Un complemento para Illustrator que permite convertir objetos de gráficos protegidos de Kodak de forma selectiva en objetos nativos de Illustrator
  • Un componente JavaScript para Illustrator que envía el archivo cambiado de vuelta a Prinergy
  • La posibilidad de reconocer automáticamente los cambios de geometría y de colorantes.
  • Un menú contextual en Workshop que permite abrir páginas PDF afinadas en Illustrator, cancelar una sesión de edición y resolver conflictos de ediciones. Una columna visible muestra qué operador tiene el archivo PDF abierto para la edición.

Anchor
Bookmark94
Bookmark94
Ventajas de PDF File Editor

  • Sólo los objetos que es necesario cambiar se convierten al formato nativo de Illustrator, con lo que se reduce el riesgo de errores durante el proceso de conversión.
  • Cuando se hacen cambios en un texto, sólo es necesario cargar en el sistema las fuentes que se modifican, no todas las fuentes del documento.
  • La mayoría de los tipos de imágenes se extraen en formato .psd de Photoshop y se almacenan como vínculos externos para que la edición de la imagen resulte más sencilla.
  • Hay disponible un comando Deshacer por si se produjeran problemas al convertir objetos al formato nativo de Illustrator.

Anchor
Bookmark95
Bookmark95
Limitaciones de PDF File Editor

Por el momento, no todos los tipos de objetos se pueden convertir al formato nativo de Illustrator, por ejemplo:

  • Imágenes Duotone. Estas imágenes se guardan como vínculos externos en el archivo PDF.
  • Rellenos DeviceN en color, trazos, gradientes y texto.
  • Gradientes que no sean radiales ni lineales.

Notas:

  • El espacio cromático de los gráficos convertidos en formato nativo debe ser CMYK. Los espacios cromáticos especiales se convierten a CMYK durante la conversión.
  • Los elementos transparentes no se pueden seleccionar de forma individual para convertirlos en gráficos nativos. Hay que convertir grupos completos de elementos.

Anchor
Bookmark96
Bookmark96
Agregar y afinar un archivo de entrada

  1. Abra XX_Bypass si no está ya abierto.
  2. Haga clic con el botón derecho del ratón en el panel Archivos de entrada y elija Agregar archivos de entrada.
  3. En el cuadro de diálogo Agregar archivos de entrada, haga clic en el botón Carpeta de trabajo y localice: UserDefinedFolders/Input Files/ Label_Waterbottle.pdf.
  4. Haga clic en el botón Agregar elementos seleccionados para agregar todos los archivos a la lista Archivos que se van a agregar.
  5. En la sección Opciones del cuadro de diálogo Agregar archivos de entrada, marque la casilla de verificación Procesar archivos seleccionados con la plantilla de proceso. Si no se abre el cuadro de diálogo Seleccionar plantilla de proceso, haga clic en el botón Seleccionar.
  6. En el cuadro de diálogo Seleccionar plantilla de proceso, localice la plantilla de proceso: Afinar > Afinar > 1stRef-Normz
  7. En el cuadro de diálogo Agregar archivos de entrada, haga clic en Aceptar.
  8. En el cuadro de diálogo Iniciar proceso, haga clic en el botón Editar plantilla de proceso.
  9. Abra la sección Optimizar dentro de la plantilla de proceso de afinado.
  10. Seleccione la casilla de verificación Preparar PDF para edición.
    Con esta opción se convierte previamente el archivo de entrada durante el proceso de afinado, en lugar de tener que convertirlo después a petición en Workshop. Utilice esta opción si la edición es grande y consta de varias páginas. La conversión previa permite ahorrar tiempo.
  11. Haga clic en Aceptar.
  12. En el cuadro de diálogo Iniciar proceso, haga clic en Aceptar.

Anchor
Bookmark97
Bookmark97
Abrir u editar la página PDF

Con esta tarea aprenderá a abrir y a editar una página PDF afinada con el software Adobe CS3, CS4, CS5 o posterior. Cuando abra una página PDF para su edición, la página PDF se convertirá en un documento de Illustrator que gestiona todos los elementos de página como gráficos protegidos de Kodak.

  1. En el panel Páginas, haga clic con el botón secundario del ratón Label_Waterbottle.p1.pdf y seleccione:
    Edición de PDF > Abrir PDF para edición
    Se abrirá automáticamente la página PDF en Illustrator.
  2. Pulse Ctrl 0 para Ajustar a la ventana.

Anchor
Bookmark98
Bookmark98
Editar el texto en una página PDF

  1. Con la herramienta Flecha, seleccione el texto Print is powerful. Consulte la paleta de capas Layers (F7) para comprobar que todos los elementos PDF están protegidos antes cambios no intencionados.


  2. Con el texto Print is powerful seleccionado, seleccione:
    Ventana > Kodak > Protected Art Properties
    En Protected Art Properties Viewer se puede comprobar el objeto (imágenes o texto) que se ha seleccionado y ver detalles sobre él.


  3.  Cierre la ventana Protected Art Properties Viewer.
  4. Con el texto Print is powerful todavía seleccionado, en el menú Filtro de Illustrator, seleccione:
    Kodak > Convertir en nativo.
    De esta manera, se comprueba que las fuentes necesarias para el elemento de texto del gráfico protegido de Kodak se cargarán en el sistema, lo que facilita todas las funciones de edición completa del objeto de texto.
    Nota: Si la fuente utilizada en el archivo de entrada no está disponible en el sistema, aparecerá un mensaje de advertencia para informarle de que la fuente desconocida se ha sustituido por otra. Para esta actividad, no instale la fuente que falta. Los pasos del procedimiento que se explican a continuación definen cómo cambiar la fuente por una fuente del sistema predeterminada en Illustrator. Haga clic en Aceptar en el cuadro de diálogo del mensaje de advertencia.
  5. Con Print is powerful seleccionado:
    1. Cambie la fuente a Ariel Bold.
    2. Cambie el color del texto.
    3. Cambie la "p" de "power" por una "P" mayúscula.
    4. Elimine el punto.
    5. Gire el texto.

Anchor
Bookmark99
Bookmark99
Editar un objeto en una página PDF

  1. Con la herramienta Flecha en Illustrator, seleccione todas las letras de Kodak (gráfico vectorial).
  2. En el menú Filtro de Illustrator, seleccione:
    Kodak > Convertir a nativo
  3. Cambie el color del gráfico vectorial.
  4. En el menú Archivo, seleccione Guardar.


Anchor
Bookmark100
Bookmark100
Editar una imagen en una página PDF

  1. Con la herramienta Flecha, seleccione la imagen. En el menú Ventana de Illustrator, seleccione Enlaces.
    En la ventana Enlaces, seleccione el comando Editar original (icono de Lápiz) o en el menú Editar, seleccione Editar original. Esto inicia Photoshop CS3 o posterior.


    Nota: Si Photoshop no se abre, vaya a la carpeta Prinergy server / Jobs / XX_Bypass / System / IllustratorDocumentWorking. En ella, busque el archivo .psd y haga clic con el botón secundario sobre él. Seleccione Obtener información. En la secciónAbrir con, seleccione Adobe Photoshop y haga clic en Cambiar todo
  2. Con Photoshop, edite la imagen. En el menú Archivo, seleccione Guardar. Cierre Photoshop.
  3. Vuelva a la ventana de Illustrator. Recibirá el siguiente mensaje:
    En el panel Links faltan algunos archivos o se han modificado. ¿Desea actualizarlos ahora?
  4. Haga clic en .
    La imagen original se sustituye por la imagen editada.


  5. Cuando se haya completado la edición del gráfico protegido de Kodak, envíe la página PDF de vuelta a Prinergy.
  6. En Illustrator, seleccione:
    Archivo > Secuencias de comandos > Kodak > Enviar PDF a Prinergy
  7. Haga clic en .
    El gráfico protegido de Kodak volverá a Prinergy mediante una hot folder de importación. En ese momento, el gráfico protegido se grabará en la base de datos y se actualizarán todos los cambios de color o geometría. 
    Para identificar que una página PDF se está editando, Workshop muestra el nombre del editor en la columna Abierto para editar por del panel Páginas y un icono de lápiz junto al nombre de la página PDF.


    Cuando la página PDF se ha terminado de importar de vuelta al Administrador de trabajos, el nombre del editor y el icono del lápiz desaparecen. 


Anchor
Bookmark101
Bookmark101
Prueba de la página PDF editada con Prinergy VPS

En esta tarea, utilizará el software Prinergy VPS para probar la página PDF editada.

  1. En el panel Páginas, haga clic con el botón secundario del ratón Label_Waterbottle.p1.pdf y seleccione:
    Salida de páginas sueltas > Prueba virtual > Virtual Proof.LoosePage
  2. En el cuadro de diálogo Iniciar proceso, haga clic en Aceptar.
  3. En el panel Páginas, haga clic con el botón secundario del ratón en Label_Waterbottle.p1.pdf y seleccione Abrir archivos VPS. Así se inicia automáticamente el software Prinergy VPS y se abre la página PDF para generar pruebas.
  4. En el menú Ventana de Prinergy VPS, seleccione la paleta Navegación y Paleta de separaciones. Pruebe la página completa. Al finalizar, salga de Prinergy VPS.

Anchor
Bookmark102
Bookmark102
Destruir el trabajo de Prinergy

Cuando se destruye un trabajo o un trabajo previo, se eliminan permanentemente todos los archivos y toda la información del trabajo o trabajo previo. Destruya un trabajo sólo si está seguro de que nunca va a volver a necesitarlo. Esta acción libera espacio de almacenamiento en el servidor de Prinergy. Sólo debe destruir un trabajo si lo ha archivado previamente o sabe que no va a necesitar utilizarlo nunca más.

  1. Cierre el Administrador de trabajos de XX_Bypass.
  2. En el Buscador de trabajos, haga clic con el botón secundario del ratón en XX_Bypass (ubicado en XXMain Group) y seleccione Destruir todo el trabajo.
  3. En el cuadro de diálogo Destruir trabajo, escriba el nombre y la contraseña de administrador (que le habrá proporcionado su instructor, el representante del servicio o el administrador del sistema).
  4. Haga clic en Destruir.
Sv translation
languagefr

À la dernière minute, vous devez modifier une page PDF raffinée. Pour gagner du temps, vous voulez utiliser Prinergy PDF File Editor dans Workshop pour modifier la page PDF raffinée. La page PDF nécessite une modification de texte, d'objet et d'image.

Prinergy PDF File Editor vous permet d'utiliser les logiciels Adobe Illustrator ou Adobe Photoshop pour modifier des pages PDF raffinées, puis de réimporter les pages modifiées dans Prinergy. PDF File Editor est une fonctionnalité sous licence et nécessite Adobe Illustrator ou Adobe Photoshop CS3 ou une version ultérieure (pour Windows ou Macintosh).

Anchor
Bookmark93
Bookmark93
Éléments composant PDF File Editor

Des composants du serveur Prinergy qui convertissent un fichier PDF Prinergy en un fichier Illustrator contenant des objets « Kodak Protected Art » et qui réimportent les modifications dans le travail après la conversion. Cela comprend :

  • La possibilité d'afficher les propriétés d'un élément artistique protégé par Kodak sans devoir au préalable convertir l'élément en objet Illustrator natif
  • Un module externe pour Illustrator qui vous permet de convertir de façon sélective les objets Kodak Protected Art en objets Illustrator natifs
  • Un composant javascript pour Illustrator qui soumet à nouveau le fichier modifié à Prinergy
  • la capacité de reconnaître automatiquement les modifications de géométrie et de colorants ;
  • Un menu contextuel dans Workshop qui vous permet d'ouvrir des pages PDF raffinées dans Illustrator, d'annuler une session de modification et de résoudre des conflits de modification. une nouvelle colonne visible indique quel opérateur ouvre le fichier PDF pour les modifications.

Anchor
Bookmark94
Bookmark94
Avantages de PDF File Editor

  • Seuls les objets qui doivent être modifiés sont convertis en un format natif Illustrator, réduisant le risque d'erreur durant le processus de conversion.
  • Lorsque des modifications sont apportées au texte, seules les polices de caractère modifiées sont chargées dans le système plutôt que l'ensemble des polices du document.
  • De nombreux types d'images sont extraits dans le format .psd de Photoshop et enregistrés comme liens externes pour faciliter la modification d'images.
  • La commande Annuler est disponible en cas de problème de conversion d'objets vers un format Illustrator natif.

Anchor
Bookmark95
Bookmark95
Inconvénients de PDF File Editor

Pour le moment, tous les types d'objets ne peuvent pas être convertis en un format natif Illustrator, y compris :

  • Les images Duotone. Ces images sont enregistrées en tant que liens externes dans le fichier PDF.
  • Les remplissages,traits,gradients, et texte colorés du dispositifN.
  • Les gradients qui ne sont ni radiaux ni linéaires.

Remarques :

  • L'espace de couleur pour l'art converti en format natif doit être CMJN. Des espaces de couleur spéciaux sont convertis en CMJN lors de la conversion.
  • Les éléments transparents ne peuvent pas être sélectionnés individuellement pour la conversion en objets natifs. Les groupes entiers d'éléments doivent être convertis ensemble.

Anchor
Bookmark96
Bookmark96
Ajout et raffinage d'un fichier d'entrée

  1. Ouvrez XX_Contournement s'il n'est pas déjà ouvert.
  2. Faites un clic droit sur le volet Fichiers d'entrée et choisissez Ajouter des fichiers d'entrée.
  3. Dans la boîte de dialogue Ajouter des fichiers d'entrée, cliquez sur le bouton Dossier de travail et accédez à : UserDefinedFolders/Input Files/ Label_Waterbottle.pdf.
  4. Cliquez sur le bouton Ajouter la sélection pour ajouter le fichier à la liste Fichiers à ajouter.
  5. Dans la section Options de la boîte de dialogue Ajouter des fichiers d'entrée, cochez la case Traiter les fichiers sélectionnés à l'aide du modèle de processus. Si la boîte de dialogue Sélectionner un modèle de processus ne s'ouvre pas, cliquez sur le bouton Sélectionner.
  6. Dans la boîte de dialogue Sélectionner un modèle de processus, recherchez le modèle de processus°: Raffiner > Raffiner > 1stRef-Normz
  7. Dans la boîte de dialogue Ajouter des fichiers d'entrée, cliquez sur OK.
  8. Dans la boîte de dialogue Démarrer le processus, cliquez sur le bouton Modifier le modèle de processus.
  9. Ouvrez la section Optimisation dans le modèle de processus de raffinage.
  10. Cochez la case Préparer PDF pour modification.
    Cette option va préconvertir le fichier d'entrée au cours du processus de raffinage, au lieu de devoir le convertir à la demande ultérieurement dans Workshop. Utilisez cette option si la modification est importante et porte sur plusieurs pages. La préconversion permet de gagner du temps.
  11. Cliquez sur OK.
  12. Dans la boîte de dialogue Démarrer le processus, cliquez sur OK.

Anchor
Bookmark97
Bookmark97
Ouvrir et modifier la page PDF

Dans cette tâche, vous allez ouvrir et modifier une page PDF raffinée à l'aide du logiciel Adobe CS3, CS4, ou CS5 ou d'une version plus récente. Lorsque vous ouvrez une page PDF pour modification, celle-ci est convertie en un document Illustrator qui traite tous les éléments de page en tant qu'objets Kodak Protected Art.

  1. Dans le volet Pages, faites un clic droit sur Label_Waterbottle.p1.pdf et sélectionnez :
    Modification du PDF > Ouvrir PDF pour modification
    La page PDF s'ouvre automatiquement dans Illustrator.
  2. Appuyez sur Ctrl 0 pour Ajuster à la fenêtre.

Anchor
Bookmark98
Bookmark98
Modifier le texte dans une page PDF

  1. À l'aide de l'outil Flèche, sélectionnez le texte L'impression est puissante. Consultez la palette des couches (F7) pour vérifier que tous les éléments PDF ont été protégés de toute modification accidentelle.


  2. Une fois le texte L'impression est puissante sélectionné, cliquez sur :
    Fenêtre > Kodak > Propriétés Protected Art
    Le visualiseur de propriétés Protected Art vérifie quel objet (image ou texte) vous avez sélectionné et donne des détails sur l'objet.


  3.  Fermez le visualiseur de propriétés Protected Art.
  4. En conservant toujours L'impression est puissante sélectionné, depuis le menu Filtre dans Illustrator, choisissez :
    Kodak > Convertir en natif.
    Ceci permet de vérifier que les polices nécessaires pour l'élément texte dans l'objet Kodak Protected Art seront chargées dans le système afin de profiter de toutes les capacités d'édition de l'objet texte.
    Remarque : si la police utilisée dans le fichier d'entrée n'est pas disponible dans votre système, un message d'avertissement apparaît pour vous informer qu'une police factice va remplacer la police inconnue. Pour les besoins de cette activité, n'installez pas la police manquante. Les étapes de la procédure ci-dessous décrivent la modification de la police en une police système par défaut dans Illustrator. Cliquez sur OK dans la boîte de dialogue du message d'avertissement.
  5. Avec le texte L'impression est puissante sélectionné :
    1. Changez la police en Arial Gras.
    2. Changez la couleur du texte.
    3. Changez le « p » de « puissante » en « P » majuscule.
    4. Supprimez le point.
    5. Faites pivoter le texte.

Anchor
Bookmark99
Bookmark99
Modifier un objet dans une page PDF

  1. À l'aide de l'outil Flèche d'Illustrator, sélectionnez toutes les lettres de Kodak (dessin vectoriel).
  2. Depuis le menu Filtre d'Illustrator, sélectionnez :
    Kodak > Convertir en natif
  3. Changez la couleur du dessin vectoriel.
  4. Dans le menu Fichier, sélectionnez Enregistrer.


Anchor
Bookmark100
Bookmark100
Modifier une image dans une page PDF

  1. À l'aide de l'outil Flèche, sélectionnez l'image. Depuis le menu Fenêtre dans Illustrator, sélectionnez Liens.
    Dans la fenêtre Liens, sélectionnez la commande Modifier original (icône de crayon) ou depuis le menu Modifier, sélectionnez Modifier original. Cela lance Photoshop CS3 ou version ultérieure.


    Remarque : si Photoshop ne s'ouvre pas, accédez au dossier Prinergy server / Jobs / XX_Bypass / System / IllustratorDocumentWorking. Trouvez-y le fichier .psd et cliquez dessus avec le bouton droit de la souris. Choisissez Obtenir des infos. Dans la section Ouvrir avec, sélectionnez Adobe Photoshop et cliquez sur Modifier tout
  2. À l'aide de Photoshop, apportez une modification à l'image. Depuis le menu Fichier, sélectionnez Enregistrer. Fermez Photoshop.
  3. Revenez à la fenêtre Illustrator. Vous recevrez un message indiquant :
    Certains fichiers sont manquants ou modifiés dans le panneau Lien. Voulez-vous les actualiser maintenant ?
  4. Cliquez sur Oui.
    L'image d'origine est remplacée par l'image modifiée.


  5. Une fois les modifications apportées à Kodak Protected Art, renvoyez la page PDF dans Prinergy.
  6. Dans Illustrator, sélectionnez :
    Fichier > Scripts > Kodak > Soumettre le PDF à Prinergy
  7. Cliquez sur Oui.
    L'objet Kodak Protected Art retourne dans Prinergy via un Hot Folder d'importation. À ce moment, le dessin protégé est enregistré dans la base de données et toutes les couleurs ou les modifications de géométrie sont actualisées. 
    Pour déceler qu'une page PDF est en cours de modification, Workshop affiche le nom de l'éditeur dans la colonne Ouvert pour modification par du volet Pages et affiche une icône de crayon à côté du nom de la page PDF.


    Une fois la page PDF entièrement réimportée dans le Gestionnaire des travaux, le nom de l'éditeur et l'icône Crayon disparaissent. 


Anchor
Bookmark101
Bookmark101
Effectuer l'épreuve de la page PDF modifiée à l'aide de Prinergy VPS

Dans cette tâche, vous allez utiliser le logiciel Prinergy VPS pour réaliser l'épreuve de la page PDF modifiée.

  1. Dans le volet Pages, faites un clic droit sur Label_Waterbottle.p1.pdf et sélectionnez :
    Sortie de page non imposée > Épreuve virtuelle > Épreuve virtuelle.PageNonImposée
  2. Dans la boîte de dialogue Démarrer le processus, cliquez sur OK.
  3. Dans le volet Pages, faites un clic droit sur Label_Waterbottle.p1.pdf et sélectionnez Ouvrir des fichiers VPS. Cette action démarre automatiquement le logiciel Prinergy VPS et ouvre la page PDF pour épreuvage.
  4. Depuis le menu Fenêtre de Prinergy VPS, choisissez la Navigation et la Palette des sélections. Effectuez l'épreuve de toute la page. Lorsque l'épreuvage est terminé, quittez Prinergy VPS.

Anchor
Bookmark102
Bookmark102
Détruire le travail Prinergy

La destruction d'un travail ou d'un pré-travail supprime définitivement tous les fichiers et toutes les informations le concernant. Ne détruisez un travail que si vous êtes certain de ne plus en avoir besoin. Cette action crée un espace de stockage supplémentaire sur le serveur Prinergy. Ne détruisez un travail que si vous l'avez précédemment archivé ou si vous êtes certain de ne plus en avoir besoin.

  1. Fermez le Gestionnaire des travaux XX_Contournement.
  2. Dans l'Explorateur des travaux, faites un clic droit sur votre travail XX_Contournement (situé dans votre XX_Groupe principal) et choisissez Détruire tout le travail.
  3. Dans la boîte de dialogue Détruire le travail, saisissez votre nom et votre mot de passe administrateur (fournis par votre formateur, représentant technique ou administrateur système).
  4. Cliquez sur Détruire.
Sv translation
languageit

All'ultimo minuto dovete modificare una pagina PDF rifinita. Per risparmiare tempo, volete modificare la pagina PDF rifinita con l'editor di file PDF Prinergy in Workshop. La pagina PDF richiede modifiche di testo, oggetto e immagine.

L'editor di file PDF Prinergy permette di usare Adobe Illustrator o Adobe Photoshop per modificare le pagine PDF rifinite e importare nuovamente le pagine modificate in Prinergy. L'editor di file PDF Prinergy è una funzione concessa in licenza e richiede Adobe Illustrator o Adobe Photoshop CS3 (per Microsoft Windows o Macintosh).

Anchor
Bookmark93
Bookmark93
L'editor di file PDF comprende:

Componenti del server Prinergy che convertono un file PDF Prinergy in un file di Illustrator contenente oggetti "Kodak Protected Art" e importano le modifiche nel processo dopo la conversione. Sono incluse le seguenti operazioni:

  • La possibilità di visualizzare le proprietà di un elemento "Kodak Protected Art" senza la necessità di dover prima convertire l'elemento in un oggetto Illustrator nativo
  • Un plug-in per Illustrator che consente di convertire in modo selettivo gli oggetti Kodak Protected Art in oggetti nativi di Illustrator
  • Un componente javascript per Illustrator che reinvia il file modificato a Prinergy
  • La possibilità di riconoscere automaticamente le modifiche apportate alla geometria e ai coloranti.
  • Un menu contestuale in Workshop che permette di aprire le pagine PDF rifinite in Illustrator, annullare una sessione di modifica e risolvere le modifiche in conflitto. Una colonna visibile mostrerà il nome dell'operatore che ha aperto il file PDF per modificarlo.

Anchor
Bookmark94
Bookmark94
Vantaggi dell'editor di file PDF

  • Solo gli oggetti che devono essere modificati vengono convertiti nel formato nativo di Illustrator. Ciò riduce il rischio di errori durante il processo di conversione.
  • Quando vengono eseguite modifiche di testo, sul sistema vengono caricati solo i font modificati e non tutti i font presenti nel documento.
  • Per semplificare la modifica delle immagini, la maggior parte di tipi di immagine viene estratta nel formato Photoshop .psd e archiviata come collegamento esterno.
  • In caso di problemi nella conversione di oggetti nel formato nativo di Illustrator, il comando Undo (Annulla) diventa disponibile.

Anchor
Bookmark95
Bookmark95
Limitazioni dell'editor di file PDF

Al momento attuale, non tutti i tipi di oggetti possono essere convertiti nel formato nativo di Illustrator, tra di essi compaiono:

  • Le immagini in bicromia. Queste immagini vengono salvate come link esterni nel file PDF.
  • I riempimenti, i tratti, le sfumature e i testi colorati DeviceN.
  • Le sfumature non radiali o lineari.

Note:

  • Lo spazio colori delle immagini convertite in formato nativo deve essere CMYK. Durante la conversione, gli spazi di colore speciali vengono convertiti in CMYK.
  • Gli elementi trasparenti non possono essere selezionati individualmente per la conversione in art nativi. È necessario convertire contemporaneamente interi gruppi di elementi.

Anchor
Bookmark96
Bookmark96
Aggiungere e rifinire il file di input

  1. Aprire XX_Bypass se non è ancora aperto.
  2. Fare clic con il pulsante destro nel riquadro Input Files (File di input) e scegliere Add Input Files (Aggiungi file di input).
  3. Nella finestra di dialogo Add Input Files (Aggiungi file di input), fare clic sul pulsante Job Folder (Cartella processo) e individuare: UserDefinedFolders/Input Files/ Label_Waterbottle.pdf.
  4. Fare clic sul pulsante Add Selected (Aggiungi selezionato) per aggiungere il file all'elenco Files to Add (File da aggiungere).
  5. Nella sezione Options (Opzioni) della finestra di dialogo Add Input Files (Aggiungi file di input), selezionare la casella di controllo Process Selected Files Using Process Template (Elabora i file selezionati utilizzando il modello di processo). Se la finestra di dialogo Choose Process Template (Scegli modello di processo) non si apre, fare clic sul pulsante Select (Seleziona).
  6. Nella finestra di dialogo Scegli il modello di processo individuate il modello del processo: Refine (Rifinitura) > Refine (Rifinitura) > 1stRef-Normz
  7. Nella finestra di dialogo Add Input Files (Aggiungi file di input), fare clic su OK.
  8. Nella finestra di dialogo Start Process (Avvia processo), fare clic sul pulsante Edit Process Template (Modifica modello di processo).
  9. Aprire la sezione Optimize (Ottimizza) nel modello di processo di rifinitura.
  10. Selezionare la casella di controllo Prepare PDF for Edit (Prepara PDF per la modifica).
    Questa opzione esegue una conversione del file di input durante il processo di rifinitura, eliminando la necessità di una successiva conversione su richiesta in Workshop. Usate questa opzione se la modifica è vasta e interessa più di una pagina. La pre-conversione permette di risparmiare tempo.
  11. Fare clic su OK.
  12. Nella finestra di dialogo Start Process (Avvia processo), fare clic su OK.

Anchor
Bookmark97
Bookmark97
Aprire e modificare pagine PDF

In questa operazione, verranno aperte e modificate pagine PDF rifinite con Adobe CS3,CS4 o CS5 o versioni successive. Quando si apre un PDF per modificarlo, la pagina PDF viene convertita in un documento di Illustrator che gestisce tutti gli elementi della pagina come Kodak Protected Art.

  1. Nel riquadro Pages (Pagine), fare clic con il pulsante destro del mouse su Label_Waterbottle.p1.pdf e selezionare
    PDF Editing (Modifica PDF) > Open PDF For Editing (Apri PDF per la modifica)
    La pagina PDF si apre automaticamente in Illustrator.
  2. Premere il tasto Ctrl 0 per selezionare l'opzione Fit in Window (Adatta a finestra).

Anchor
Bookmark98
Bookmark98
Modificare il testo in una pagina PDF

  1. Usando lo strumento freccia, selezionare il testo Print is powerful (La stampa è potente). Visualizzate la tavolozza Strati (F7) per controllare che nessuno degli elementi PDF abbia subito modifiche involontarie.


  2. Con il testo Print is powerful (La stampa è potente) selezionato, scegliere:
    Window (Finestra) > Kodak > Protected Art Properties (Proprietà Protected Art)
    Il Protected Art Properties Viewer controlla l'oggetto (immagine o testo) selezionato e fornisce i relativi dettagli.


  3.  Chiudete il Protected Art Properties Viewer.
  4. Con il testo Print is powerful (La stampa è potente) ancora selezionato, dal menu Filter (Filtro) in Illustrator, scegliere:
    Kodak > Convert to Native (Converti in nativo).
    Questa operazione controlla che i font richiesti per l'elemento testuale in Kodak Protected Art vengano caricati sul sistema, consentendo di modificare completamente l'oggetto di testo.
    Nota: Se il font usato nel file di input non è disponibile sul sistema, apparirà un messaggio di avvertenza per informare che il font sconosciuto verrà sostituito con un font alternativo. Per gli scopi di questa attività, non è necessario installare il font mancante. I passaggi della procedura esposti di seguito descrivono la trasformazione di un font in un altro font predefinito dal sistema su Illustrator. Fare clic su OK nella finestra di dialogo del messaggio di avvertenza.
  5. Con il testo Print is powerful (La stampa è potente) selezionato:
    1. Modificare il font in Arial Bold
    2. Modificare il colore del testo
    3. Sostituire la "p" di "potente" con una "P" maiuscola
    4. Rimuovere il punto
    5. Ruotare il testo

Anchor
Bookmark99
Bookmark99
Modificare un oggetto in una pagina PDF

  1. Usando lo strumento Freccia su Illustrator, selezionare tutte le lettere di Kodak (immagine vettoriale).
  2. Dal menu Filter (Filtro) su Illustrator, selezionare:
    Kodak > Convert to Native (Converti in nativo)
  3. Cambiate il colore dell'immagine vettoriale.
  4. Dal menu File, selezionare Save (Salva).


Anchor
Bookmark100
Bookmark100
Modificare un'immagine in una pagina PDF

  1. Usando lo strumento freccia, selezionare l'immagine. Nel menu Window (Finestra) in Illustrator, selezionare Links (Collegamenti).
    Nella finestra Links (Collegamenti), selezionare il comando Edit Original (Modifica originale) (icona a forma di matita) oppure, dal menu Edit (Modifica), selezionare Edit Original (Modifica originale). In questo modo si avvia Photoshop CS3 o una versione successiva.


    Nota: Se Photoshop non si apre, andare alla cartella Prinergy server / Jobs / XX_Bypass / System / IllustratorDocumentWorking . All'interno della cartella, individuare e fate clic con il pulsante destro sul file .psd. Scegliere Get Info (Informazioni). Nella sezione Open with (Apri con), selezionare Adobe Photoshop e fare clic su Change All (Modifica tutto)
  2. Eseguite una modifica sull'immagine con Photoshop. Dal menu File, selezionare Save (Salva). Chiudete Photoshop.
  3. Tornate alla finestra di Illustrator. Verrà visualizzato un messaggio per informare che
    nel riquadro Link (Collegamento) alcuni file sono mancanti o stati modificati e chiede se eseguire l'aggiornamento adesso.
  4. Fare clic su Yes (Sì).
    L'immagine originale viene sostituita con l'immagine modificata.


  5. Una volta apportate le modifiche a Kodak Protected Art, inviate la pagina PDF a Prinergy.
  6. In Illustrator, selezionare:
    File > Scripts (Script) > Kodak > Submit PDF To Prinergy (Invia PDF a Prinergy)
  7. Fare clic su Yes (Sì).
    Kodak Protected Art viene reinserito in Prinergy tramite una hot folder di importazione. A questo punto, la protected art viene registrata nel database e tutte le modifiche apportate ai colori e alla geometria vengono aggiornate. 
    Per indicare lo stato di modifica di una pagina PDF, Workshop mostra il nome dell'editor nella colonna Open For Edit By (Aperto per la modifica da) nel riquadro Pages (Pagine) e visualizza l'icona a forma di matita accanto al nome della pagina PDF.


    Una volta completata l'importazione della pagina PDF in Gestione lavoro, il nome dell'editor e la matita scompaiono. 


Anchor
Bookmark101
Bookmark101
Eseguire una prova di stampa della pagina modificata con Prinergy VPS

In questa operazione userete il software Prinergy VPS per eseguire una prova di stampa della pagina PDF.

  1. Nel riquadro Pages (Pagine), fare clic con il pulsante destro del mouse su Label_Waterbottle.p1.pdf e selezionare:
    Loose Page Output (Output a pagine sciolte) > Virtual Proof (Prova di stampa virtuale) > Virtual Proof.LoosePage
  2. Nella finestra di dialogo Start Process (Avvia processo), fare clic su OK.
  3. Nel riquadro Pages (Pagine), fare clic con il pulsante destro del mouse su Label_Waterbottle.p1.pdf e selezionare Open VPS files (Apri i file VPS). Il software Prinergy VPS si avvia automaticamente e viene aperta la pagina PDF per eseguire la prova di stampa.
  4. Dal menu Window (Finestra) in Prinergy VPS, scegliere Navigation (Navigazione) e Separations Palette (Tavolozza separazioni). Eseguite una stampa di prova dell'intera pagina. Al termine, chiudere Prinergy VPS.

Anchor
Bookmark102
Bookmark102
Eliminare il processo Prinergy

La distruzione di un lavoro o di un lavoro preliminare elimina in modo permanente tutti i file e le relative informazioni. Distruggete un lavoro solo se siete sicuri di non averne più bisogno. Con questa attività viene liberato spazio aggiuntivo nel server Prinergy. Eliminate un lavoro solo se lo avete già archiviato o se siete sicuri che non ne avrete più bisogno.

  1. Chiudete XX_Bypass in Job Manager (Gestione processi).
  2. In Job Finder (Ricerca processi), fare clic con il pulsante destro del mouse su XX_Bypass (che si trova in XXMain Group) e scegliere Destroy Entire Job (Elimina intero processo).
  3. Nella finestra di dialogo Elimina lavoro, inserite il vostro nome amministratore e la password (fornita dal vostro insegnante, dal rappresentante del servizio di assistenza o dal vostro amministratore di sistema).
  4. Fare clic su Distruggi.
Sv translation
languageja

最終段階でリファイン済み PDF ページを編集する必要が生じました。時間を節約するため、Workshop の Prinergy PDF File Editor を使用して、リファイン済み PDF ページを編集します。PDF ページのテキスト、オブジェクト、および画像を編集する必要があります。

Prinergy PDF File Editor では、リファイン済みの PDF ページを Adobe Illustrator ソフトウェアや Adobe Photoshop ソフトウェアで編集してから、編集済みのページを Prinergy に再度インポートできます。PDF File Editor はライセンスが必要な機能で、Adobe Illustrator または Adobe Photoshop CS3 以降(Windows 版または Macintosh 版)が必要です。

Anchor
Bookmark93
Bookmark93
PDF File Editor のコンポーネント

Prinergy PDF ファイルを「Kodak Protected Art」オブジェクトが含まれる Illustrator ファイルに変換した後で、変更をジョブに再度インポートする Prinergy サーバー コンポーネント。以下の機能が含まれています。

  • Kodak Protected Art エレメントのプロパティを表示する機能。ネイティブの Illustrator オブジェクトに変換する必要がありません。
  • Adobe Illustrator のプラグイン。選択した Kodak Protected Art オブジェクトをネイティブの Illustrator オブジェクトに変換できます。
  • Illustrator 用 JavaScript コンポーネント。変更されたファイルを Prinergy に返します。
  • ジオメトリおよびカラー指定の変更を自動的に認識する機能。
  • Workshop のコンテキスト メニュー。このメニューでは、リファイン済み PDF ページを Illustrator で開いたり、編集中のセッションをキャンセルしたり、矛盾している編集内容を解決したりできます。表示列には、編集用に PDF ファイルを開いたオペレータが表示されます。

Anchor
Bookmark94
Bookmark94
PDF File Editor のメリット

  • 変更が必要なオブジェクトのみがネイティブの Illustrator 形式に変換されるので、変換プロセス中にエラーが発生するリスクが減少します。
  • テキストを変更した場合、ドキュメント内で必要なすべてのフォントがシステムにロードされるのではなく、変更されたフォントのみがロードされます。
  • ほとんどの画像タイプを Photoshop .psd 形式に抽出して外部リンクとして保存できるので、画像を簡単に編集できます。
  • オブジェクトをネイティブの Illustrator 形式に変換しているときに問題が発生した場合は、[元に戻す]コマンドを使用できます。

Anchor
Bookmark95
Bookmark95
PDF File Editor の制限

現時点では、以下のオブジェクト タイプは、ネイティブの Illustrator 形式には変換できません。

  • ダブルトーン画像。このタイプの画像は、PDF ファイル内に外部リンクとして保存されます。
  • DeviceN カラーのベタ、ストローク、諧調、およびテキスト。
  • 円形でもリニアでもない諧調。

注意:

  • ネイティブ形式に変換されるアート用のカラー スペースは CMYK である必要があります。特殊なカラー スペースは、変換時に CMYK に変換されます。
  • ネイティブ アートへの変換では、透明エレメントを個別には選択できません。エレメント グループ全体をまとめて変換する必要があります。

Anchor
Bookmark96
Bookmark96
入力ファイルを追加してリファインする

  1. まだ開いていなければ、[XX_Bypass]を開きます。
  2. 入力ファイル]ウィンドウ枠を右クリックして、[入力ファイルの追加]を選択します。
  3. [入力ファイルの追加]ダイアログ ボックスで、[ジョブ フォルダ]ボタンをクリックして、次の場所を探します:UserDefinedFolders/Input Files/ Label_Waterbottle.pdf
  4. 選択したファイルを追加]ボタンをクリックして、このファイルを[追加するファイル]リストに追加します。
  5. [入力ファイルの追加]ダイアログ ボックスの[オプション]セクションで、[次のプロセス テンプレートを使用して処理]チェックボックスをオンにします。[プロセス テンプレートの選択]ダイアログ ボックスが開いていない場合は、[選択]ボタンをクリックします。
  6. [プロセス テンプレートの選択]ダイアログ ボックスで、次のワークフロー テンプレートを選択します。[リファイン] > [リファイン] > [1stRef-Normz
  7. [入力ファイルの追加]ダイアログ ボックスで、[OK]をクリックします。
  8. [プロセスの開始]ダイアログ ボックスで、[プロセス テンプレートの編集]ボタンをクリックします。
  9. リファイン プロセス テンプレートの[オプティマイズ]セクションを開きます。
  10. 編集用の PDF を作成]チェックボックスをオンにします。
    このオプションを使用すると、リファイン プロセス中に入力ファイルが変換されます。そのため、後から Workshop で変換する必要がなくなります。編集規模が大きく、複数のページにわたる場合に、このオプションを使用します。事前変換により時間を節約できます。
  11. OKをクリックします。
  12. [プロセスの開始]ダイアログ ボックスで、OKをクリックします。

Anchor
Bookmark97
Bookmark97
PDF ページを開いて編集する

この課題では、Adobe CS3、CS4、または CS5 以降のソフトウェア バージョンを使用し、リファイン済み PDF ページを開いて編集します。編集するために PDF ページを開くと、PDF ページは Illustrator ドキュメントに変換され、ページのすべてのエレメントが Kodak Protected Art として処理されます。

  1. ページ]ウィンドウ枠で、Label_Waterbottle.p1.pdf を右クリックして、次の順に選択します。
    PDF の編集] > [PDF を開いて編集]。
    PDF ページが Illustrator で自動的に開かれます。
  2. Ctrl キーを押しながら 0 を押して、[ウィンドウに合わせて表示]に変更します。

Anchor
Bookmark98
Bookmark98
PDF ページのテキストを編集する

  1. 矢印ツールを使用して、テキスト「Print is powerful」を選択します。レイヤー パレット(F7)を表示して、すべての PDF エレメントが意図しない変更を受けていないことを確認します。


  2. Print is powerful」のテキストを選択して次の順に選択します。
    ウィンドウ] > [Kodak] > [Protected Art Properties]。
    Protected Art Properties Viewer は、選択されたオブジェクト(画像やテキスト)を確認して、オブジェクトの詳細を表示します。


  3.  Protected Art Properties Viewer を閉じます。
  4. Print is powerful」のテキストを選択したまま、Illustrator の[フィルタ]メニューから次の順に選択します。
    Kodak] > [Convert to Native]。
    これにより、Kodak Protected Art のテキスト エレメントに必要なフォントがシステムにロードされていることが確認され、テキスト オブジェクトの全編集機能が使用可能になります。
    注意:入力ファイルで使用されているフォントがシステムで使用できない場合は、警告メッセージが表示され、不明なフォントの代わりに代替フォントが使用される旨が表示されます。不足しているフォントをインストールしないでください。インストールすると、この演習の目的を達成できなくなります。次に、このフォントを Illustrator のデフォルト システム フォントに変更する手順を説明します。[警告メッセージ]ダイアログ ボックスで、[OK]をクリックします。
  5. Print is powerful」を選択した状態で、次の手順を行います。
    1. フォントを Arial Bold に変更します。
    2. テキストの色を変更します。
    3. 「power」の「p」を大文字の「P」に変更します。
    4. ピリオドを削除します。
    5. テキストを回転させます。

Anchor
Bookmark99
Bookmark99
PDF ページのオブジェクトを編集する

  1. Illustrator の[矢印]ツールを使用して、「Kodak」(ベクター アート)のすべての文字を選択します。
  2. Illustrator の[フィルタ]メニューから、次の順に選択します。
    Kodak] > [Convert to Native
  3. ベクター アートの色を変更します。
  4. ファイルメニューから保存を選択します。


Anchor
Bookmark100
Bookmark100
PDF ページの画像を編集する

  1. [矢印]ツールを使用して、画像を選択します。Illustrator の[ウィンドウ]メニューから、[リンク]を選択します。
    [リンク]ウィンドウで、[オリジナルを編集]コマンド(鉛筆アイコン)を選択するか[編集]メニューの[オリジナルを編集]を選択します。これにより Photoshop CS3 以降が起動します。


    注意:Photoshop が開かない場合は、Prinergy server / Jobs / XX_Bypass / System / IllustratorDocumentWorking フォルダに移動します。フォルダ内で、.psd ファイルを探して右クリックします。[情報を見る]を選択します。[このアプリケーションで開く]セクションで、[Adobe Photoshop]を選択して[すべてを変更]をクリックします。 
  2. Photoshop を使用して、画像を編集します。[ファイル]メニューから、[保存]を選択します。Photoshop を閉じます。
  3. Illustrator ウィンドウに戻ります。次のようなメッセージが表示されます。
    リンク パネルの一部のファイルが見つからないか変更されています。今すぐ更新しますか?
  4. はい]をクリックします。
    元の画像が編集した画像で置き換えられます。


  5. Kodak Protected Art の編集が完了したら、その PDF ページを Prinergy に返送します。
  6. Illustrator で次の順に選択します。
    ファイル] > [スクリプト] > [Kodak] > [Prinergy に PDF を送信
  7. はい]をクリックします。
    Kodak Protected Art は、インポート ホット フォルダを使用して Prinergy に戻ります。このとき、Protected Art がデータベースに記録され、カラーやジオメトリの変更が更新されます。
    PDF ページが編集中であることを示すために、Workshop の[ページ]ウィンドウ枠の[編集中のユーザー]に編集者の名前が表示され、PDF ページの名前の横に鉛筆アイコンが表示されます。


    PDF ページがジョブ マネージャーに再度インポートされると、編集者名と鉛筆アイコンは表示されなくなります。 


Anchor
Bookmark101
Bookmark101
Prinergy VPS を使用して編集済み PDF ページをプルーフする

この課題では、Prinergy VPS ソフトウェアを使用して、編集済みの PDF ページをプルーフします。

  1. ページ]ウィンドウ枠で、 Label_Waterbottle.p1.pdf を右クリックして、次の順に選択します。
    単ページ出力] > [Virtual Proof] > [Virtual Proof.LoosePage
  2. [プロセスの開始]ダイアログ ボックスで、OKをクリックします。
  3. ページ]ウィンドウ枠で、[Label_Waterbottle.p1.pdf]を右クリックして[VPS ファイルを開く]を選択します。これにより、Prinergy VPS ソフトウェアが自動的に起動し、プルーフィングのために PDF ページが開きます。
  4. Prinergy VPS の[ウィンドウ]メニューから、[ナビゲーション パレット]と[色版パレット]を選択します。ページ全体をプルーフします。完了したら、Prinergy VPS を終了します。

Anchor
Bookmark102
Bookmark102
Prinergy ジョブを破棄する

ジョブまたはプリジョブを破棄すると、そのジョブまたはプリジョブ内のすべてのファイルと情報が完全に削除されます。ジョブの廃棄は、再度使用する必要がないジョブにのみ実行してください。この処理を行うと、Prinergy サーバーの記憶領域の空き容量を増やすことができます。アーカイブ済みのジョブ、または再度使用する必要がないジョブのみを破棄してください。

  1. XX_Bypass ジョブ マネージャーを閉じます。
  2. ジョブ ファインダで、[XX_Bypass](XXMain Group 内)を右クリックし、[ジョブ全体の破棄]を選択します。
  3. [ジョブの破棄]ダイアログ ボックスで、管理者の名前とパスワード(インストラクター、サービス担当者、または社内のシステム管理者が提供)を入力します。
  4. 破棄をクリックします。
Sv translation
languagept_BR

De última hora, você precisa editar uma página em PDF refinada. Para economizar tempo, você quer usar o Prinergy PDF File Editor no Workshop para editar a página em PDF refinada. A página em PDF requer um texto, objeto e edição de imagem.

O Prinergy PDF File Editor permite usar o software Adobe Illustrator ou Adobe Photoshop para editar páginas em PDF refinadas e importar as páginas editadas de volta no Prinergy. O PDF File Editor é um recurso licenciado e requer o Adobe Illustrator ou o Adobe Photoshop CS3 ou posterior (Windows ou Macintosh).

Anchor
Bookmark93
Bookmark93
Inclusões do PDF File Editor

Componentes de servidor do Prinergy que convertem um arquivo PDF do Prinergy em um arquivo Illustrator contendo objetos do "Kodak Protected Art" e importam as alterações de volta no trabalho após a conversão. Isso inclui:

  • A capacidade de visualizar as propriedades de um elemento de arte protegido Kodak sem converter primeiro o elemento em um objeto do Illustrator nativo
  • Um plug-in para Illustrator que permite converter seletivamente objetos do Kodak Protected Art em objetos do Illustrator nativos
  • Um componente javascript para Illustrator que envie o arquivo alterado de volta para o Prinergy
  • A capacidade de reconhecer automaticamente as alterações na geometria e nos corantes.
  • Um menu contextual no Workshop que permite abrir páginas em PDF refinadas no Illustrator, cancelar uma sessão de edição e resolver edições conflitantes. Uma coluna visível mostra qual operador tem o arquivo PDF aberto para edição.

Anchor
Bookmark94
Bookmark94
Benefícios do PDF File Editor

  • Apenas os objetos que precisam ser alterados são convertidos no formato nativo do Illustrator, reduzindo o risco de um erro durante o processo de conversão.
  • Quando são feitas alterações no texto, apenas as fontes que estão alteradas são carregadas no sistema, em vez de requerer todas as fontes no documento.
  • A maioria dos tipos de imagem é extraída para o formato Photoshop .psd e armazenada como links externos para tornar a edição de imagens fácil.
  • O comando Undo (Desfazer) estará disponível se houver problemas na conversão de objetos no formato nativo do Illustrator.

Anchor
Bookmark95
Bookmark95
Limitações do PDF File Editor

Atualmente, nem todos os tipos de objetos podem ser convertidos no formato nativo do Illustrator, incluindo:

  • Imagens de tom duplo. Essas imagens são salvas como links externos no arquivo PDF.
  • Preenchimentos coloridos, pinceladas, gradientes e texto de DeviceN.
  • Gradientes que não são radiais ou lineares.

Observações:

  • O espaço de cores para arte convertida em formato nativo deve ser CMYK. Espaços de cores especiais são convertidos em CMYK na conversão.
  • Elementos transparentes não podem ser selecionados individualmente para conversão em arte nativa. Grupos inteiros de elementos devem ser convertidos em conjunto.

Anchor
Bookmark96
Bookmark96
Adicionar e refinar um arquivo de entrada

  1. Abra XX_Bypass se ainda não estiver aberto.
  2. Clique com o botão direito do mouse no painel Input Files (Arquivos de entrada) e escolha Add Input Files (Adicionar arquivos de entrada).
  3. Na caixa de diálogo Add Input Files (Adicionar arquivos de entrada), clique no botão Job Folder (Pasta de trabalhos) e localize: UserDefinedFolders/Input Files/ Label_Waterbottle.pdf.
  4. Clique no botão Add Selected (Adicionar selecionados) para adicionar o arquivo à lista Files to Add (Arquivos a adicionar).
  5. Na seção Options (Opções) da caixa de diálogo Add Input Files (Adicionar arquivos de entrada), marque a caixa de seleção Process Selected Files Using Process Template (Processar arquivos selecionados usando modelo de processo). Se a caixa de diálogo Choose Process Template (Escolher modelo de processo) não abrir, clique no botão Select (Selecionar).
  6. Na caixa de diálogo Choose Process Template (Escolher modelo de processo), localize o modelo de processo: Refine (Refinar) > Refine (Refinar) > 1stRef-Normz
  7. Na caixa de diálogo Add Input Files (Adicionar arquivos de entrada), clique em OK.
  8. Na caixa de diálogo Start Process (Iniciar processo), clique no botão Edit Process Template (Editar modelo do processo).
  9. Abra a seção Optimize (Otimizar) no modelo de processo de refinamento.
  10. Marque a caixa de seleção Prepare PDF for Edit (Preparar PDF para edição).
    Esta opção pré-converte o arquivo de entrada durante o processo de refinamento, em vez de precisar convertê-lo sob demanda depois no Workshop. Utilize esta opção se a edição for grande e consistir em várias páginas. A pré-conversão poupa tempo.
  11. Clique em OK.
  12. Na caixa de diálogo Start Process (Iniciar processo), clique em OK.

Anchor
Bookmark97
Bookmark97
Abrir e editar a página em PDF

Nesta tarefa, você deverá abrir e editar uma página em PDF refinada usando o software Adobe CS3, CS4 ou CS5 ou mais recente. Quando você abre uma página em PDF para edição, ela é convertida em um documento do Illustrator que lida com todos os elementos de página como Kodak Protected Art.

  1. No painel Pages (Páginas), clique com o botão direito do mouse em Label_Waterbottle.p1.pdf e selecione:
    PDF Editing (Edição de PDF) > Open PDF For Editing (Abrir PDF para edição). 
    A página em PDF será aberta automaticamente no Illustrator.
  2. Pressione Ctrl 0 para Fit in Window (Ajustar à janela).

Anchor
Bookmark98
Bookmark98
Editar o texto em uma página em PDF

  1. Usando a ferramenta Arrow (Seta), selecione o texto Print is powerful (A impressão é poderosa). Visualize a paleta Layers (Camadas) (F7) para verificar se todos os elementos de PDF foram protegidos contra quaisquer alterações não intencionais.


  2. Com o texto Print is powerful (A impressão é poderosa) selecionado, escolha:
    Window (Janela) > Kodak > Protected Art Properties
    O Protected Art Properties Viewer verifica qual objeto (imagem ou texto) você selecionou e fornece detalhes do objeto.


  3.  Feche o Protected Art Properties Viewer.
  4. Com o texto Print is powerful (A impressão é poderosa) ainda selecionado, no menu Filter (Filtro) no Illustrator, escolha:
    Kodak > Convert to Native (Converter em nativo).
    Isso verifica se as fontes necessárias para o elemento de texto no Kodak Protected Art serão carregadas no sistema, ativando os recursos de edição completos do objeto de texto.
    Nota: Se a fonte usada no arquivo de entrada não estiver disponível no seu sistema, uma mensagem de aviso será exibida para informá-lo de que uma fonte artificial substituirá a fonte desconhecida. Para o objetivo desta atividade, não instale a fonte ausente. As etapas do procedimento abaixo descrevem a mudança da fonte para uma fonte do sistema padrão no Illustrator. Clique em OK na caixa de diálogo da mensagem de aviso.
  5. Com Print is powerful (A impressão é poderosa) selecionado:
    1. Altere a fonte para Arial Bold.
    2. Altere a cor do texto.
    3. Altere o "p" em "poderosa" para a letra maiúscula "P".
    4. Remova o ponto.
    5. Gire o texto.

Anchor
Bookmark99
Bookmark99
Editar um objeto em uma página em PDF

  1. Usando a ferramenta Arrow (Seta) no Illustrator, selecione todas as letras em Kodak (arte de vetor).
  2. No menu Filter (Filtro) no Illustrator, selecione:
    Kodak > Convert to Native (Converter em nativo)
  3. Altere a cor da arte de vetor.
  4. No menu File (Arquivo), selecione Save (Salvar).


Anchor
Bookmark100
Bookmark100
Editar uma imagem em uma página em PDF

  1. Usando a ferramenta Arrow (Seta), selecione a imagem. No menu Window (Janela) no Illustrator, selecione Links.
    Na janela Links, selecione o comando Edit Original (Editar original) (ícone de lápis) ou, no menu Edit (Editar), selecione Edit Original (Editar original). Isso inicia o Photoshop CS3 ou posterior.


    Nota: Se o Photoshop não abrir, vá para a pasta Prinergy server / Jobs / XX_Bypass / System / IllustratorDocumentWorking. Nela, localize o arquivo .psd e clique com o botão direito do mouse nele. Escolha Get Info (Obter informações). Na seção Open with (Abrir com), selecione Adobe Photoshop e clique em Change All (Alterar tudo). 
  2. Usando o Photoshop, edite a imagem. No menu File (Arquivo), selecione Save (Salvar). Feche o Photoshop.
  3. Volte para a janela do Ilustrador. Você receberá a seguinte mensagem:
    Some files are missing or modified in the Link panel. (Alguns arquivos estão faltando ou foram modificados no painel Link.) Would you like to update them now? (Gostaria de atualizá-los agora?)
  4. Clique em Yes (Sim).
    A imagem original é substituída pela editada.


  5. Quando as edições tiverem sido feitas no Kodak Protected Art, envie a página em PDF de volta para o Prinergy.
  6. No Illustrator, selecione:
    File (Arquivo) > Scripts > Kodak > Submit PDF To Prinergy (Enviar PDF para o Prinergy)
  7. Clique em Yes (Sim).
    O Kodak Protected Art retorna para o Prinergy usando uma pasta ativa de importação. Neste momento, a arte protegida é gravada no banco de dados, e todas as alterações de cores ou geometria são atualizadas. 
    Para identificar se uma página em PDF está sendo editada no momento, o Workshop exibe o nome do editor na coluna Open For Edit By (Aberto para edição por) no painel Pages (Páginas) e exibe um ícone de lápis ao lado do nome da página em PDF.


    Quando a página em PDF tiver sido totalmente importada de volta no Job Manager (Gerenciador de trabalho), o nome do editor e o ícone de lápis desaparecerão. 


Anchor
Bookmark101
Bookmark101
Realizar a prova de uma página em PDF editada usando o Prinergy VPS

Nesta tarefa, você usará o software Prinergy VPS para realizar a prova da página em PDF editada.

  1. No painel Pages (Páginas), clique com o botão direito do mouse em Label_Waterbottle.p1.pdf e selecione:
    Loose Page Output (Saída de páginas avulsas) > Virtual Proof (Prova virtual) > Virtual Proof.LoosePage
  2. Na caixa de diálogo Start Process (Iniciar processo), clique em OK.
  3. No painel Pages (Páginas), clique com o botão direito do mouse em Label_Waterbottle.p1.pdf e selecione Open VPS files (Abrir arquivos VPS). Isso inicia automaticamente o software Prinergy VPS e abre a página em PDF para fins de prova.
  4. No menu Window (Janela) no Prinergy VPS, escolha Navigation (Navegação) e Separations Palette (Paleta de separações). Verifique a página inteira. Após a conclusão, saia do Prinergy VPS.

Anchor
Bookmark102
Bookmark102
Elimine o trabalho do Prinergy

Destruir um trabalho ou pré-trabalho exclui permanentemente todos os arquivos e informações sobre o trabalho ou pré-trabalho. Destrua apenas um trabalho se você tiver certeza de que nunca precisará do trabalho novamente. Esta ação cria espaço de armazenamento adicional no servidor do Prinergy. Destrua um trabalho apenas se você já tiver arquivado o trabalho ou souber que nunca precisará usar o trabalho novamente.

  1. Feche o Job Manager (Gerenciador de trabalho) XX_Bypass.
  2. Em Job Finder (Pesquisa de trabalho), clique com o botão direito do mouse em XX_Bypass (localizado em XXMain Group) e escolha Destroy Entire Job (Destruir todo o trabalho).
  3. Na caixa de diálogo Destroy Job (Destruir trabalho), insira seu nome de administrador e a senha (fornecidos pelo seu instrutor, representante de atendimento ou o próprio administrador de sistema).
  4. Clique em Destroy (Destruir).
Sv translation
languagezh

最后,您需要编辑已精炼的 PDF 页面。为节省时间,您想要使用 Workshop 中的印能捷 PDF 文件编辑器来编辑已精炼的 PDF 页面。PDF 页面需要文本、对象和图像编辑。

印能捷 PDF 文件编辑器使您能够使用 Adobe Illustrator 软件或 Adobe Photoshop 软件编辑已精炼的 PDF 页面,然后将编辑好的页面导回印能捷。PDF 文件编辑器是授权功能,需要 Adobe Illustrator 或 Adobe Photoshop CS3 或者更高版本(Windows 或 Macintosh)。

Anchor
Bookmark93
Bookmark93
PDF 文件编辑器包括

印能捷服务器组件,用于将印能捷 PDF 文件转换为包含“受 Kodak 保护作品”对象的 Illustrator 文件,以及在转换后将更改导回到作业其中包括:

  • 能够查看受 Kodak 保护的图形元素的属性,而不先将元素转换为原生 Illustrator 对象。
  • Illustrator 插件,使您能够选择性地将“受 Kodak 保护作品”对象转换为原生 Illustrator 对象
  • Illustrator 的 javascript 组件,用于将更改后的文件重新提交给印能捷
  • 自动识别尺寸和色料变化的功能。
  • Workshop 中的上下文菜单,使您能够在 Illustrator 中打开已精炼的 PDF 页面,取消编辑会话,以及解决编辑冲突。可见列将显示打开 PDF 文件进行编辑的操作员列表

Anchor
Bookmark94
Bookmark94
PDF 文件编辑器优势

  • 仅将需要更改的对象转换为 Illustrator 原生格式,从而降低转换过程中出错的风险
  • 更改文本时,只有改变过的字体会载入系统,而无需载入文档中的所有字体。
  • 大多数图像类型都已提取为 Photoshop .psd 格式并作为外部链接进行存储,以便于编辑图像。
  • 如果将对象转换为 Illustrator 原生格式时出现问题,则可以使用撤销命令

Anchor
Bookmark95
Bookmark95
PDF 文件编辑器限制

此时,并非所有对象类型均可转换为 Illustrator 原生格式,包括:

  • Duotone 图像这些图像在 PDF 文件中将另存为外部链接
  • DeviceN 色彩填充
  • 渐变不是放射状或线性渐变

注意:

  • 转换为原生格式的作品的颜色空间必须为 CMYK特殊颜色空间在转换时将转换为 CMYK
  • 透明元素无法单独选择用于转换为原生作品。必须将整组元素一同转换。

Anchor
Bookmark96
Bookmark96
添加并精炼输入文件

  1. 如果尚未打开 XX_Bypass,请将其打开。
  2. 右键单击输入文件窗格并选择添加输入文件
  3. 在“添加输入文件”对话框中,单击作业文件夹按钮并查找:UserDefinedFolders/Input Files/ Label_Waterbottle.pdf
  4. 单击添加选定项按钮将文件添加至要添加的文件列表。
  5. 在“添加输入文件”对话框的选项部分,选择使用处理模板处理所选文件复选框。如果“选择处理模板”对话框未打开,请单击选择按钮。
  6. 在“选择处理模板”对话框中,查找处理模板:精炼 > 精炼 > 1stRef-Normz
  7. 在“添加输入文件”对话框中,单击确定
  8. 在“开始处理”对话框中,单击编辑处理模板按钮。
  9. 在精炼处理模板中,打开优化部分。
  10. 选择准备 PDF 进行编辑复选框。
    此选项将在精炼期间预转换输入文件,而无需之后在 Workshop 中根据要求对其进行转换。如果编辑较大且包括多个页面,请使用此选项。预转换节省时间。
  11. 单击确定
  12. 在“开始处理”对话框中,单击确定

Anchor
Bookmark97
Bookmark97
打开和编辑 PDF 页面

在此任务中,您将使用 Adobe CS3、CS4、CS5 软件或者更新版本打开和编辑已精炼的 PDF 页面。当您打开 PDF 页面进行编辑时,PDF 页面将转换为 Illustrator 文档,将所有页面元素视作受 Kodak 保护的作品进行处理。

  1. 页面窗格中,右键单击 Label_Waterbottle.p1.pdf 并选择:
    PDF 编辑 > 打开 PDF 进行编辑
    PDF 页面将自动在 Illustrator 中打开。
  2. 按住 Ctrl 0 以适合窗口

Anchor
Bookmark98
Bookmark98
编辑 PDF 页面中的文本

  1. 使用箭头工具,选择文本印刷强大。查看层面板 (F7) 以验证所有 PDF 元素都受到保护,不会进行任何意外更改。


  2. 在选定印刷强大文本的情况下,选择
    窗口 > Kodak > 受保护的图形属性
    受保护的图形属性查看器将验证哪个对象(图像或文本)已选定,并提供该对象的详细信息。


  3.  关闭受保护的图形属性查看器。
  4. 在仍选定印刷强大文本的情况下,从 Illustrator 中的过滤器菜单,选择:
    Kodak > 转换为本地
    这将验证受 Kodak 保护的图形中文本元素所需的字体是否已加载至系统,从而允许对文本对象进行完整的编辑。
    注意:如果您的系统上不提供输入文件中使用的字体,则将出现一则警告消息,通知您人造字体将替换该未知字体。出于此练习的目的,请勿安装缺少的字体。以下流程步骤概述了如何将字体更改为 Illustrator 中的默认系统字体。在警告消息对话框中,单击确定
  5. 在选定印刷强大的情况下:
    1. 将字体更改为 Arial Bold。
    2. 更改文本颜色。
    3. 将“power”中的“p”更改为大写“P”。
    4. 移除时间段。
    5. 旋转文本。

Anchor
Bookmark99
Bookmark99
编辑 PDF 页面中的对象

  1. 使用 Illustrator 中的箭头工具,选择 Kodak(矢量图形)中的所有字母。
  2. 从 Illustrator 的过滤器菜单中,选择:
    Kodak > 转换为本地
  3. 更改矢量图形的颜色。
  4. 文件菜单中,选择保存


Anchor
Bookmark100
Bookmark100
编辑 PDF 页面中的图像

  1. 使用箭头工具,选择图像。从 Illustrator 中的窗口菜单,选择链接
    在“链接”窗口,选择编辑原始图像命令(铅笔图标)或从编辑菜单选择编辑原始图像。这将启动 Photoshop CS3 或更高版本。


    注意:如果 Photoshop 无法打开,请转至 Prinergy server / Jobs / XX_Bypass / System / IllustratorDocumentWorking 文件夹。在其内部,查找并右键单击 .psd 文件。选择获取信息。在打开方式部分,选择 Adobe Photoshop 并单击全部更改。 
  2. 使用 Photoshop,编辑图像。从文件菜单中,选择保存。关闭 Photoshop。
  3. 返回 Illustrator 窗口。您将收到一则消息:
    部分文件丢失或在“链接”面板中修改。现在是否要对其进行更新?
  4. 单击
    原始图像将替换为已编辑的图像。


  5. 对受 Kodak 保护的作品进行编辑后,将 PDF 页面提交回印能捷。
  6. 在 Illustrator 中,选择:
    文件 > 脚本 > Kodak > 将 PDF 提交至印能捷
  7. 单击
    受 Kodak 保护的作品将使用导入热文件夹返回印能捷。此时,受保护的作品将记录在数据库中,并将对所有颜色或尺寸更改进行更新。
    要确定 PDF 页面当前已编辑,Workshop 在页面窗格的打开编辑者栏中显示编辑者的姓名,并在 PDF 页面名称的旁边显示一个铅笔图标。


    将 PDF 页面完全导回作业管理器后,编辑者的姓名和铅笔图标将消失。 


Anchor
Bookmark101
Bookmark101
使用印能捷 VPS 打样编辑好的 PDF 页面

在此任务中,您将使用印能捷 VPS 软件打样已编辑的 PDF 页面。

  1. 页面窗格中,右键单击 Label_Waterbottle.p1.pdf 并选择:
    单页输出 > 虚拟打样 > Virtual Proof.LoosePage
  2. 在“开始处理”对话框中,单击确定
  3. 页面窗格,右键单击 Label_Waterbottle.p1.pdf 并选择打开 VPS 文件。这将自动启动印能捷 VPS 软件并打开 PDF 页面,以进行打样。
  4. 在印能捷 VPS 的窗口菜单中,选择导航分色面板。打样整个页面。完成后,退出印能捷 VPS。

Anchor
Bookmark102
Bookmark102
删除印能捷作业

永久删除某个作业或预交作业会删除有关该作业或预交作业的所有文件和信息。只有在您确定不再需要作业时才删除作业。此操作将在您的印能捷服务器上创建额外存储空间。如果您之前已存档作业,或者知道不再需要使用该作业,则您可以将其删除。

  1. 关闭 XX_Bypass 作业管理器。
  2. 在作业浏览器中,右键单击 XX_Bypass(位于 XXMain Group)并选择删除整个作业
  3. 在“删除作业”对话框中,输入由教师、服务代表或您的系统管理员提供的管理员名称和密码。
  4. 单击删除