You can review, approve, or reject files in Smart Review or on the web UI.
Requirements:
- To set the status of tasks as a reviewer, your project role must include the View Tasks user right.
To set the status of tasks as a approver, your project role must include the Approve Tasks user right.
Smart Review
Reviewing
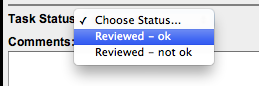
Review - OK Review - Not OK a. Click Review - OK.

b. (Optional) Type a comment in the Comment box.
c. Click Apply.
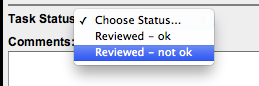
The Review – Not OK status is available only if it is selected by the task creator.
a. Click Review - Not OK.

b. (Optional) Type a comment in the Comment box.
c. Click Apply.
Approving
Approve Reject a. Click Approve.
b.Select Approve or Approve With Changes.
Note: The Approved With Changes status is available only if it is selected by the task creator.


c. (Optional) Type a comment in the Comment box.
d. Click Apply.
Note: If the voting restriction option is selected for the customer, you cannot set the status to
Approve if you have added an annotation.a. Click Reject.
b. (Optional) Type a comment in the Comment box.
c. Click Apply.
Note: If the voting restriction option is selected for the customer, you have to add at least one annotation to
set the status to Reject.
Web UI
Reviewing
Review - OK Review - Not OK a. Click Review - OK.
b. (Optional) Type a comment in the Comment box.
c. Click Apply.
The Review – not OK status is available only if it is selected by the task creator.
a. Click Review - not OK.
b. (Optional) Type a comment in the Comment box.
c. Click Apply.
Approving
Approve Reject a. Select Approve as-is or Approved with changes.
Note: The Approved with changes status is available only if it is selected by the task creator.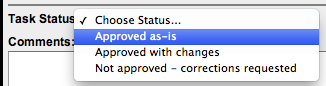
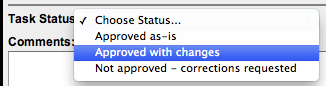
b. (Optional) Type a comment in the Comment box.
c. Click Apply.
Note: If the voting restriction option is selected for the customer, you cannot set the status to Approve as-is if you have added an annotation. Also, you cannot add comments when you set the status to Approve as-is.
a. Select Not approve – correction requested.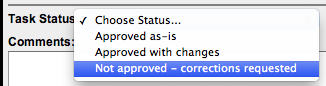
b. (Optional) Type a comment in the Comment box.
c. Click Apply.
Note: If the voting restriction option is selected for the customer, you have to add at least one annotation to set the status to Not approved - correction requested.
.